Citrus and Berry Tartlets
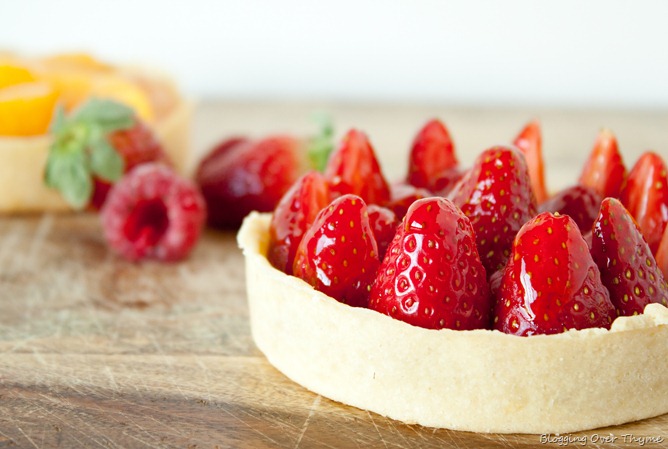
Delicious Citrus and Berry Tartlets are filled with homemade pastry cream, topped with citrus or berries, and finished with an apricot glaze.
Last Monday, during my second week of culinary school, we learned how to make pâte sucrée, a classic French pastry dough used for sweet tarts. Though it was a busy day in the kitchen, I was excited to learn how to make a classic tart filled with homemade pastry cream and fresh fruit.
Though I’ve made my share of desserts and, most definitely, cupcakes, before culinary school I didn’t a lot of experience making homemade tarts. I’ve always been a bit intimidated by them in the past. With that said, I love how elegant and timeless they are!
In an effort to practice some of my newly acquired skills and techniques and share a recipe with you, this past weekend I decided to make these citrus and berry tartlets in my standard apartment kitchen.
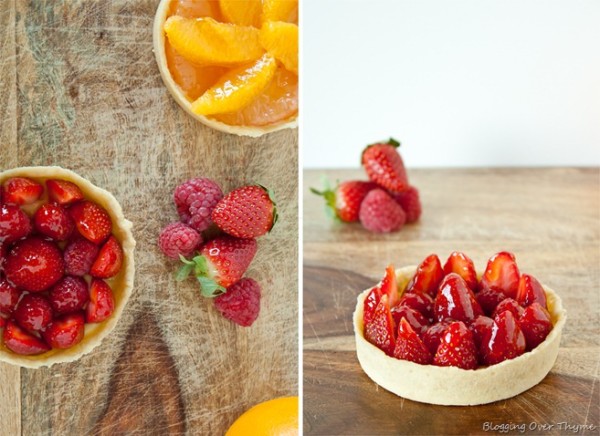
To add my own little twist, I made two variations: a berry tartlet filled with raspberries and strawberries, as well a seasonal citrus tartlet filled with fresh grapefruit and orange segments.
If you enjoy these tarts, you’ll love these Meyer Lemon Tarts too.

Feel free to adapt the fillings with whatever fruit you have on hand or a combination of several types of fruit.
Whole homemade tartlets are more time-intensive than most desserts, the process is relatively simple once you get the hang of it. In addition, the tart dough and pastry cream can be prepped in advance.
If you do not have tart rings, you can use regular tartlet pans with removable bottoms. You can also adapt the recipe to work with a standard 9 or 10-inch tart pan. Please note that this recipe requires fully baking the tart shell.
One of the main lessons we learned in culinary school was that fruit tarts should be all about the fruit, not the tart shell or pastry cream.
In order to achieve this, roll the tart dough thinly (roughly 1/8-inch thick) and fill the shell less than halfway with pastry cream. This ensures that the fruit will be the star of the finished dessert!
Here’s a quick video tutorial to walk you through the process.
Citrus and Berry Tartlets
Equipment
- 4 (4-Inch) Tart Rings or Mini Tart Pans with Removable Bottoms
Ingredients
Pate Sucree Dough:
- 12 ounces (340g) unbleached all-purpose flour
- 1½ teaspoons kosher salt
- 8 ounces (230g) cold unsalted butter cubed
- 4 ounces (115g) granulated sugar
- 1 large egg
- 1 teaspoon pure vanilla extract
- ½ teaspoon fresh lemon zest
Pastry Cream:
- 3 large egg yolks
- 5 ounces (140g) granulated sugar plus more for sprinkling
- ¾ ounce (22g) cornstarch
- 1 cup (240 mL) whole milk
- 1 teaspoon pure vanilla extract
Fruit Topping (Of Your Choosing):
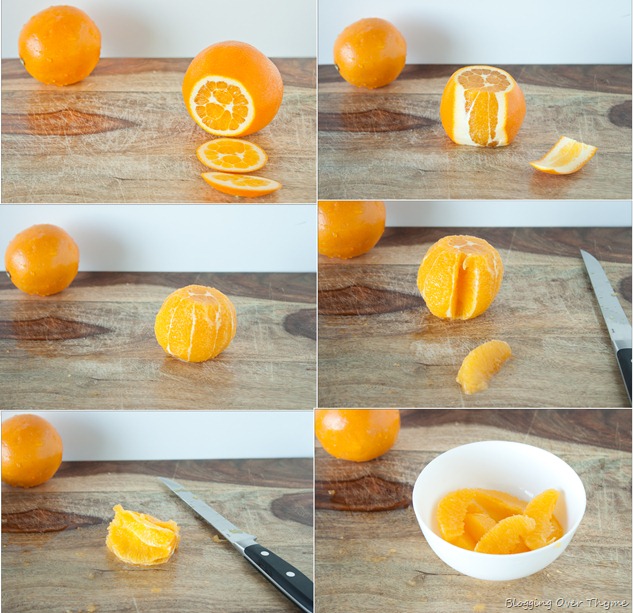
- 3-4 oranges or 1 grapefruit segmented
- fresh strawberries or raspberries
Apricot Glaze:
- ½ cup apricot jam
- ½ cup water
Instructions
- Prepare Pâte Sucrée Tart Dough: Place the flour and salt in a pile on a clean working surface. Using a metal bench scraper, chop the cold, unsalted butter into the flour mixture until the butter is finely distributed in small pieces. Pour the sugar over the flour and butter mixture and incorporate thoroughly. Create a well in the center of the mixture.
- Pour the sugar over the flour mixture and incorporate thoroughly. Create a well in center of mixture and add the whole egg, vanilla, and zest. Using your hands and the bench scraper, incorporate the wet ingredients into the dry ingredients by pressing the mixture together as you combine.
- Knead the dough using the “fraisage” method: Use the heel of your hand to press down and smear the dough onto the countertop. Push the dough back together and repeat until the dough is smooth and all ingredients are well incorporated. The dough will have a slight sheen.
- Place the dough between two pieces of parchment or wax paper. Using a rolling pin, roll the dough into a disc roughly ½-inch to ¾-inch thick. This initial rolling out step will help make the final assembly process much easier. Set the dough on a sheet pan and refrigerate for 45 to 60 minutes or until very firm. Freeze any remaining dough for up to 3 months; press into a round disc and wrap tightly in plastic wrap (thaw in the refrigerator overnight before using).
- Shape Tart Shells and Blind Bake: Preheat the oven to 325°F (165°C) with a rack in the center position. Line a half sheet pan with parchment paper and set aside.
- Remove the chilled tart dough from the fridge. You may want to work with half the dough at at time. Using a lightly floured rolling pin and starting from the center of dough and working outward, roll the dough until it is ⅛-inch thick. Throughout the process, lift and move the dough repeatedly on the countertop to ensure it is not sticking. Note: If dough cracks, gently press the pieces back together with your hands and continue to roll. This type of dough is very forgiving.
- Set a tart ring mold (or tart shell pan with removable botom) on top of the rolled dough to use as a guide. Using a sharp knife, trace and cut out a circle of dough that is 1-inch larger in diameter than the tart pan. Repeat with the remaining tart dough. Set the tart rings or pans on the lined sheet pan and gently transfer the dough pieces on top of each respective tart pan. Using your fingers, press the dough into the edges of the rings or pans to shape each tart shell. Be sure to press the dough tightly inside the corners and sides. Repeat until all tarts are assembled. Note: Leftover scraps of dough can be pressed together and rolled out again to use as needed.
- Dock the bottom of each tart shell with a fork. Line each tart shell with a small square of aluminum foil, ensuring that it reaches into the corners. Fill with dried beans (or pie weights) so that they reach to the top of each tart shell. This will ensure that the tart retains its shape during the blind-baking process.
- Bake the tart shells for roughly 15 minutes. Remove from the oven and carefully lift out the foil with the beans. Place the uncovered tart shells back in oven and bake for an additional 5 to 7 minutes or until the tart dough is cooked all the way through and looks dry. Set the tart pans on a wire rack to cool completely.
- Prepare the Pastry Cream: In a large mixing bowl, combine the egg yolks, sugar, and cornstarch with a stiff whisk until smooth. Set aside.
- Heat the whole milk in a medium saucepan over medium-low heat until warm. Remove from the heat. Slowly whisk half the warmed milk into the egg mixture until tempered (this ensures that the eggs do not scramble from the heat). Whisk in the remaining warm milk.
- Return the mixture to the saucepan and place over medium-low heat, whisking continuously. It will be very foamy at first, and then the foam will dissipate and the mixture will begin to thicken. Continue to cook, whisking aggressively, until the pastry cream becomes very shiny and slowly bubbles. Remove from heat and using a spatula, press the pastry cream through a fine-meshed sieve. Set bowl over an ice bath and stir every few minutes until it reaches room temperature.
- Remove the bowl from the ice bath and whisk in the vanilla extract. Sprinkle hte surface of the pastry cream with granulated sugar and cover the surface with plastic wrap. Set aside. If prepping ahead, transfer to the refrigerator until ready to use. Pastry cream can be made 1-2 days in advance of assembly.
- Assemble the Tarts: Carefully remove the tart shells from the tart pans.
- Remove the plastic wrap from the pastry cream and use a whisk to reincorporate it until smooth. Using a pastry bag fitted with a round tip, fill each tart shell halfway or less with pastry cream. Spread into a smooth layer and top with fruit (citrus segments, strawberries, or raspberries).
- Brush with Glaze and Serve: Heat the apricot jam and water over medium heat until it begins to simmer. Whisk until smooth. Using a pastry brush, brush the fruit with apricot glaze. This adds shine and makes for a nicer presentation. Serve the tarts at room temperature.
13 Comments on “Citrus and Berry Tartlets”
Your Tarlettes look just yummy and I’m definitely going to make them.
Can you please tell me if these quantities are in weight or measurement? I mean 12 ounces of flour, is it one-and-a-half-cup or I weight the flour? (same for butter and granulated sugar).
Hi Achee! Thanks for your comment– this entire recipe is for weight measurement. So to achieve the same results, I recommend using a kitchen scale. Please let me know if you try it!! 🙂
TheDude — Haha! So glad you enjoyed them, thanks for the feedback .
I tried your recipe today. You were right, it is al lot of hard work, but the result is great!
Reminders me of a really fine French bakery where I got some nice strawberry thingies. Thanks a lot!
I am always looking for healthy desserts, this looks amazing!
Heidi — Thanks so much! Tarts are always what my eyes are drawn to as well. The video was a lot of fun, but I have a huge appreciation for those who make video blogs! Hopefully I can make another one at some point!
Vanessa — Thank YOU Vanessa! Glad a chef approves 🙂
Tasha — You are so sweet. Making them at home is a bit easier, because they were all I was focusing on 😉
Madonna –Yes! Straining the pastry cream was definitely a big lesson of the day. You are so nice! I use lightroom to make the photo collages, its a print feature which you can save to a JPEG file. Hope this helps!
Anna — Thanks Anna! You could easily adapt it to whichever fruit is currently in season, which is why I tried a citrus one 🙂
Cindy — I totally agree, which is why I really wanted to make the time to document the process. Some things are so difficult to explain with words! Hope this made the whole recipe more approachable!
Heather Michelle — Yes! After much deliberation, I took the plunge and started less than three weeks ago. I still can't believe it sometimes! Thanks so much for stopping by Heather!
Awesome!! I loved the video!! It's much easier to understand by visuals! Those look amazing. Great job Laura, keep up the good work!
These look so dainty! Excited to hear your in Culinary School. It's been far too long since I stopped by your blog. 🙂
Oh hello! Those look simply delectable and perfect for spring/summer desserts! 🙂
I will have to bookmark this recipe so that I can use it for when it is my turn to host family dinners!
I bet you received an A+ in class. Great job. I was glad to see you strained your pastry cream.
Can you tell me what type of software you used for the collage of photos?
These look great Laura. You are really a natural. You should be very proud!!
Loved your video!! The tarts look great Laura!
Wow, those are beautiful! I'm always drawn to these when they're among other things in a window or display. Loved the video! I can only imagine how much time it took just to do the video, not to mention making the tarts is already time consuming, but it's really nice to be able to see each step so thanks for doing it 😀