Sourdough Starter Troubleshooting Guide and FAQ
Basics + FAQ Maintenance Baking Troubleshooting

Many people are creating sourdough starters and exploring sourdough for the first time. It’s exciting to see people diving into a subject that I’m so passionate about!
Over the past month, I’ve received many questions on sourdough starters. To create a helpful and easily referenced resource, I’ve put together an extensive Sourdough Starter Troubleshooting Guide below.
If you’ve already established a strong sourdough starter and are experiencing troubleshooting issues related to bread baking, please check out my Sourdough Bread Troubleshooting Guide.
Here you’ll find answers to the following questions and much more:
- How do I get started?
- How can I reduce sourdough discard and waste?
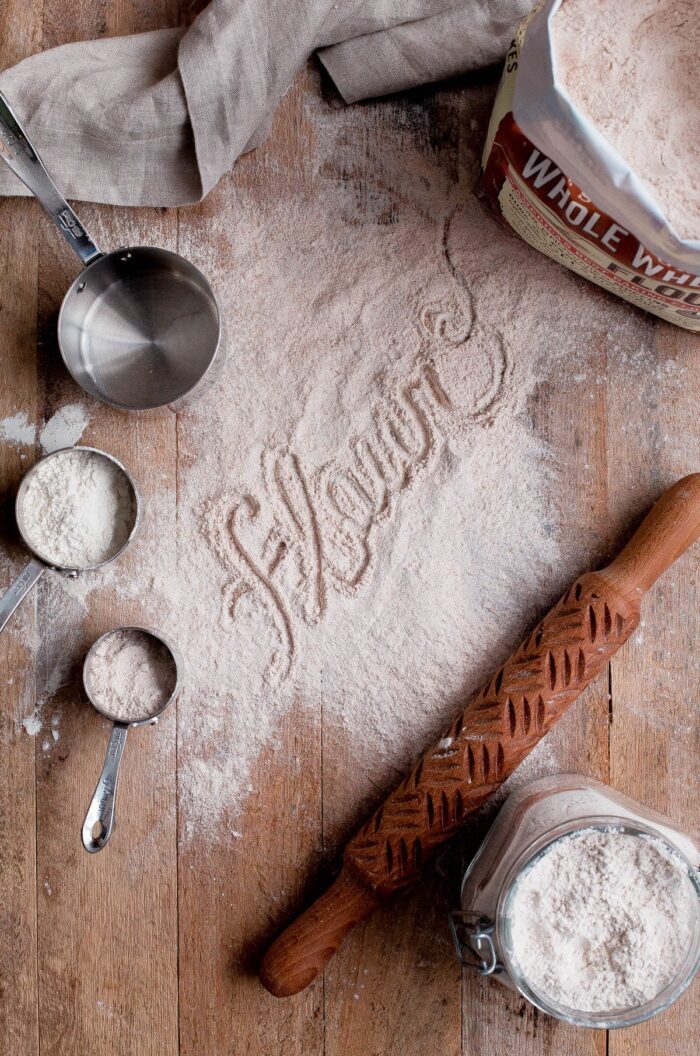
- What flour should I feed my starter? What is a feeding ratio?
- Why isn’t my starter more active? Should I start over? When can I start baking with it?
Note: If you have additional questions not addressed, please leave them in the comment section.
Skip to Various Sections:
Basics + FAQ Maintenance Baking Troubleshooting
Sourdough Starter FAQ:
Q: How do I get started?
A sourdough starter is a culture of naturally occurring wild yeast and lactic acid bacteria used to make naturally leavened, fermented bread. Sourdough starters are active organisms that require regular feedings for best results.
If you’re new to sourdough baking and interested in creating a starter from scratch, I recommend checking out this list of my favorite sourdough resources and tools before getting started.
While I don’t have a sourdough starter recipe, I recommend The Perfect Loaf’s starter guide or Baker Bettie’s starter guide. Be patient as it can take up at least 2 weeks (or longer) to build an active, strong sourdough starter ready for bread baking.
Q: Do I really need a kitchen scale?
Yes. This is less of a deal-breaker for creating a starter, but vital for bread baking if you’re looking to achieve consistent results.
Volume measurements are wildly inaccurate (on that note, be sure to learn how to measure flour properly!) and will not yield consistent results for sourdough baking. I recommend this basic scale, but any accurate scale with 1-gram increments will work.
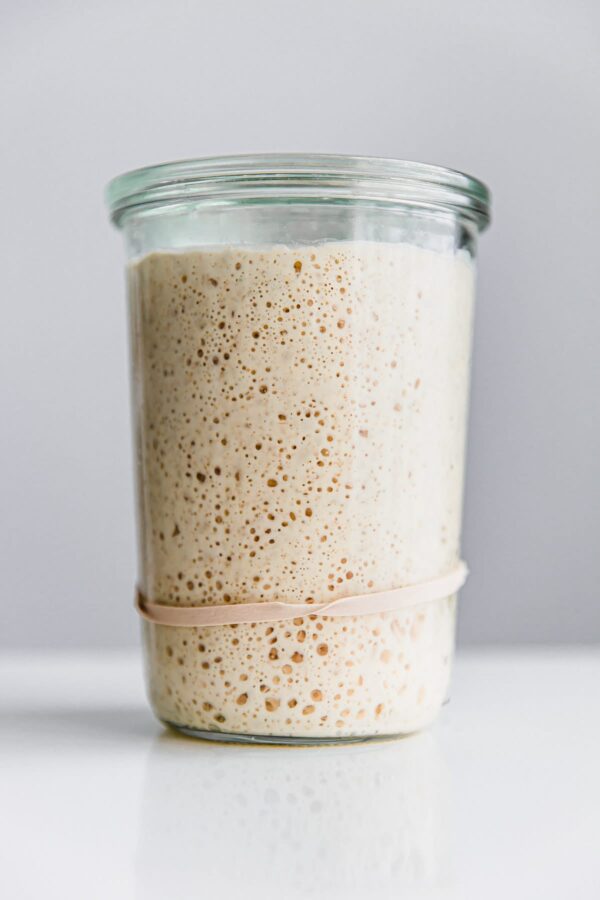
Q: Where are your starter jars from?
I’ve found Weck jars to be perfect because they’re straight-sided. This makes them easy to clean and offers a visual clue as to your starter’s activity level.
If you would prefer to use something else, choose a container that meets the following criteria: 1) easy-to-clean, 2) glass, 3) includes a lid, which can be set askew or is not airtight, 4) is appropriately sized and allows your starter to grow at least 3-4x in volume.
Q: Do I have to discard sourdough starter? How can I reduce flour waste?
Yes! Discarding part of the starter is required to maintain a healthy sourdough starter. This actually reduces waste, as it means your starter remains small and requires less flour during feedings. Also, please remember that homemade bread is less wasteful and less resource-intensive than packaged store-bought bread.
When I’m not baking bread, I scale down my starter. If I do plan on making bread, I simply scale it up during the previous night’s feeding (same feeding ratios, just larger quantities) before preparing sourdough bread or sourdough pizza dough the next morning. Please remember that you can always scale a starter up or down; the volume of your starter does not have an impact on its strength.
The best way to reduce the amount of sourdough discard during each feeding is to maintain a small starter or use the discard in sourdough discard recipes or for bread baking. You can also compost discard or gift dry sourdough starter to friends.
Note: If you want to use the discard, but don’t want to bake every day, you can compile the discard into one jar at each feeding and store this in the refrigerator. You’ll need to bring it back to room temperature (wake it up!) or give it additional feedings, depending on what you are using it for.
Q: Why do some starter guides call for different types of flours?
Methods will vary depending on a baker’s preference and experience. While you can make a sourdough starter with many flour types (do not use bleached flour for any bread baking), whole grain flours will generally yield faster results.
Rye flour is one of the best, as it is higher in nutrients than other whole grain flours. Extra nutrients will often speed up the process. If you don’t have access to rye flour, organic whole wheat flour is the next best option. Most starter guides will transition flour types and instruct you to change feeding ratios as it builds strength.
Whole grain flours contain the germ and endosperm, which become rancid if stored for extended periods at room temperature. Make sure your flour isn’t spoiled before starting.
Q: What kind of flour should I feed my starter?
Sourdough starters can be made and maintained with many different types of flours. All sourdough starters will behave differently, but different flours will yield different characteristics and flavor profiles.
Once your starter is active, I generally recommend feeding it with the type of flour that you will most often bake with. Therefore, if you’re making mostly whole grain bread, you might want to maintain a whole wheat (or predominantly whole grain) starter.
If you plan on baking with bread flour, you might want to slowly transition it to bread flour or unbleached all purpose flour over time. See more on transitioning to different flour types below.
Q: Can I make a gluten free sourdough starter?
Yes, this is possible! Gluten free starters behave extremely differently and require a completely different baking approach. There are various flour options you can try, so you’ll need to do more research to figure out what is best for you.
I am not experienced with gluten-free sourdough baking, but there are great resources (Vanilla and Bean, as well as King Arthur Flour) out there if you’re interested.
Q: Can I use packaged yeast in my starter?
No! Sourdough starters are cultures of wild yeast/lactic acid bacteria. You cannot jumpstart or create an a sourdough starter from commercial or dried yeast. It sort of defeats the point.
Q: What is a 100% hydration starter? What does that mean?
Hydration refers to water (or other liquids) quantity relative to total weight (grams) of flour. A 100% hydration sourdough starter is fed and maintained with equal parts flour and water by weight. Most sourdough bread recipes call for and use this type of starter.
Starter Maintenance Questions;
Q: Can I switch or transition flour types over time?
If your starter is brand new, I don’t recommend constantly switching your flours (type or brand) as this will impact its activity and can create confusion if you’re looking to establish a solid feeding schedule.
However, if your starter is active and mature, you can change flour type as desired or needed. I recommend transitioning the flours slowly over the course of a week. Remember that flours behave differently and you may need to adjust your feeding schedule.
Q: How do I scale my starter up or down for baking or other reasons?
Simple increase or decrease the quantities in your next feeding using the same feeding ratio (see explanation below) to maintain your current schedule. Example:
Current Starter Feeding: 20 grams starter: 100 grams flour: 100 grams water (1:5:5 ratio)
Scaled Down Starter: 5 grams starter: 25 grams flour: 25 grams water (1:5:5 ratio)
Scaled Up Starter: 40 grams starter: 200 grams flour: 200 grams water (1:5:5 ratio)
Q: Can I preserve my sourdough starter in case something happens? What’s the best way to gift it to other people?
For long term storage, I recommend keeping dried sourdough starter on hand. Follow this guide on how to dry sourdough starter. Great for an emergency back-up or for gifting to friends and family.
Q: Can I refrigerate my starter if I don’t bake frequently?
Yes. If you don’t bake frequently or are going out of town, you can refrigerate a healthy sourdough starter for long period of time. Cold temperatures slow yeast and bacteria activity and will naturally extend how long your starter can sit between feedings.
I don’t recommend continuous refrigeration as it can change the balance of wild yeast/lactic acid bacteria and yield inconsistent results. However, it’s a great option for short-term breaks!
Before refrigerating your sourdough starter, discard a portion and give it a regular feeding. Allow the mixture to sit at room temperature for roughly 1 hour before transferring it to the fridge.
Once you are ready to resume regular feedings or bake with your starter, remove it from the refrigerator and allow it to sit at room temperature (ideally between 74°F-78°F) until it is bubbly and has reached peak activity. Continue with regular feedings and observe its activity.
Depending on how long it has been refrigerated, a refrigerated sourdough starter may require an additional 2 to 3 regular feedings at room temperature before it has resumed regular activity levels and is strong enough for baking sourdough bread or sourdough pizza.
Q: What do you mean by feeding ratio? Which feeding ratio should I use?
Feeding ratios are used to indicate the ratio of sourdough starter, flour, and water in each feeding. Here are a few examples:
1:1:1 ratio = equal amounts of sourdough starter, total flour, and total water by weight. [Eg. 20 grams sourdough starter: 20 grams flour: 20 grams water].
1:2:2 ratio = [Eg. 20 grams sourdough starter: 40 grams flour: 40 grams water]
1:5:5 ratio [Eg. 20 grams sourdough starter: 100 grams flour: 100 grams water]
*Most sourdough starter guides begin with a 1:1:1 ratio. As your starter becomes more active (more wild yeast/lactic acid bacteria), you will change your feeding ratio to account for the increased activity level.
Once your starter is active and on a reliable feeding schedule, you can adapt your feeding ratio as needed to adjust baking timelines, etc.
Sourdough Starter Baking Questions
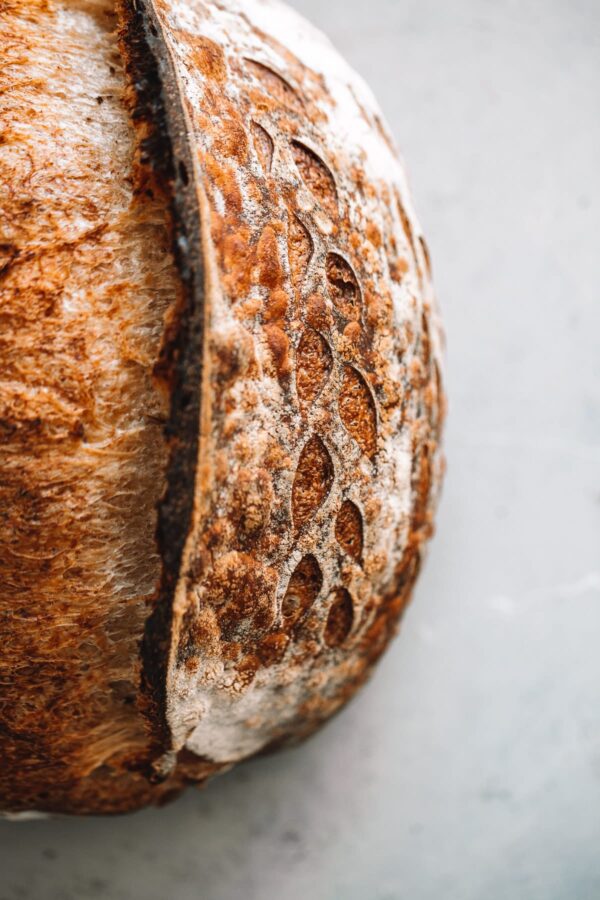
Q: How do I know when my starter is ready for bread baking?
Before baking, your sourdough starter should rise predictably and be on a reliable, consistent feeding schedule. If your starter is struggling to rise between feedings or taking a significantly long period to reach peak activity, it is most likely not strong enough to leaven bread.
This might vary depending on the type of flour you’re using, but your starter should at least double in volume (or more) at peak activity and pass the float test.
My current feeding and starter activity: My two-year-old starter is currently fed King Arthur unbleached bread flour. Using a 1:5:5 ratio, my starter peaks in about 10-12 hours when held at a temperature of roughly 75F.
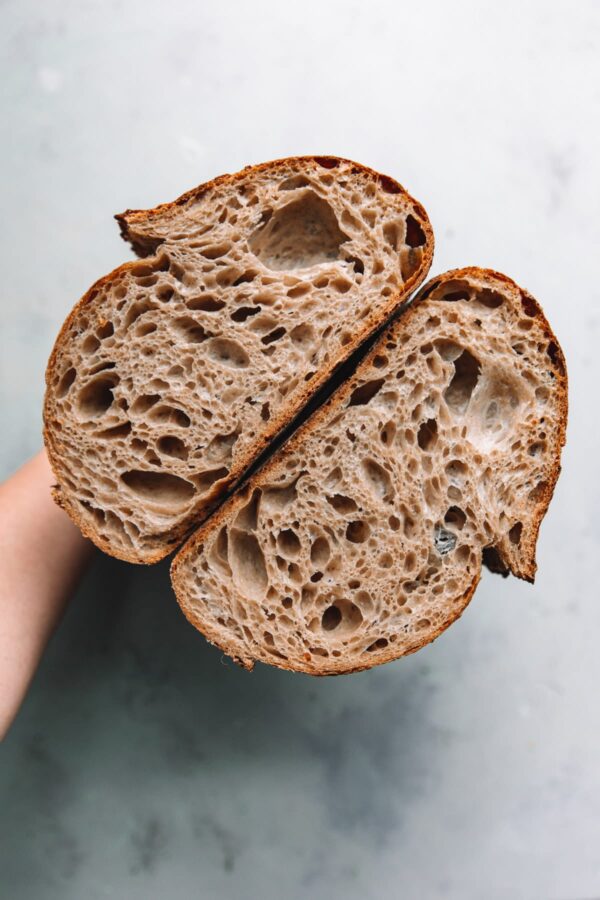
Q: Do I have to use my starter at peak activity? Can it be used early or late?
Once your starter is active, you can play with these elements to introduce different flavor profiles into your bread. Younger starters will have a more delicate, sweet flavor. Peaked, slightly fallen starters are higher in acetic acid and will contribute more sourness/tanginess to your loaf.
I prefer to use my sourdough starter at peak activity and when it is just beginning to fall, as this has yielded the best results for me. Remember that changing these variables will impact your dough and bulk fermentation times.
Sourdough Starter Troubleshooting
Q: My starter is developing mold. How do I know if my sourdough starter is bad?
If your starter is developing any mold (pink, etc.), throw it out immediately. There is no way to fix or salvage a moldy starter. Check your flours (are they rancid? spoiling?) before starting over.
Q: My starter isn’t showing any signs of activity and it has been several days. Did I kill my sourdough starter?
Be patient and try placing it in a warmer area of your home (76F-80F is ideal). Use your nose as a guide, as it a better tool than visual activity in the beginning. Use recipes as guidelines, not strict timelines. If your starter peaks in activity, feed it. If it sluggish, wait and give it more time.
Many guides indicate that your sourdough starter should be active and ready for baking within less than a week. This is best case scenario and is not common. Many starters take up to 2 weeks or longer to become active enough to use in bread.
Q: My starter was really active on day 2 and 3, and then there was zero activity. What is happening?
It is common for a sourdough starter to have a surge in activity those first few days and then die down. This is normal and the results of another type of bacteria build up, not an indication that your starter is dead.
It will pick up again with time and the right types of bacteria (wild yeast/lactic acid) will increase and become more stable.
Q: My starter is active, but is barely rising between feedings. What do I do?
Stay the course, be patient, and continue with regular feedings until it strengthens. If you’re using a smaller ratio of sourdough starter in your feedings, consider increasing it until the starter gains more strength.
If your starter is not doubling or growing substantially in volume between feedings, it is not strong enough to leaven dough. You can certainly try baking, but you most likely will not achieve proper fermentation.
Q: Why isn’t my starter passing the float test?
Float tests are not fool-proof, but are generally reliable for 100% hydration sourdough starters (starters that are fed equal portions of flour and water). Failed float tests generally indicate the following:
- Your sourdough starter is too young and not strong enough for bread baking.
- The starter is strong and active, but not quite ready. Allow the starter to sit at temperature for another 30 minutes or hour and test again.
Q: My ambient kitchen is very cold. What can I do?
Wild yeast prefers warmer temperatures. If you’re dealing with cooler temperatures, your sourdough starter will take longer to develop, require more time to peak between feedings, and your bulk fermentation time for bread baking will be extended considerably. This isn’t a deal-breaker, but something to be aware of.
You can try storing your starter in an oven with the light on (please use an ambient thermometer to keep an eye on the temperature as some ovens can easily become too hot). You can also try placing your starter container in a microwave next to a warm bowl of water.
If you’re serious about bread baking and struggling with temperature regulation, I highly recommend a bread proofing box (I own this Brod & Taylor one and love it).
If you enjoyed this post, be sure to check out my other sourdough bread baking resources:
166 Comments on “Sourdough Starter Troubleshooting Guide and FAQ”
Hello! I love your info! I’m trying to revive my leaven from ‘putty’ that has been in the fridge for … 5 years? About.
Not a lot happening … I’ve used A LOT OF FLOUR but it’s just not strong enough :/. I presume this means that I’ll have to start again from scratch?
I was getting so excited about being able to make some bread; but every day I feed it and every day a few bubbles – it’s in a warm place on top of my gas fire with pilot light (looks like a wood burner).
Would welcome any feedback but I think I’ll throw it away … Oh well, we learn 😂
Hi! That’s a long time (possibly too long, but not necessarily!) to sit in the fridge without a feeding. With that said, if yoou’re reviving it, it will take some time, possibly a week or two – maybe longer. I’m guessing it’s very acidic right now.
Are you feeding it too often as you’re trying to revive it? If you’re seeing bubbles that’s promising, but I wouldn’t expect it to bounce back super fast due to the long hiatus.
Hi,thank you so much for this post. Really interesting. I created my own starter at thé beginning of january and since 15th it was really active everyday bubbling and double or triple at 1.1.1 in 4 h. After i followed some advices to put it in the fridge. I wasnt sure about that and decided it was a wrong Idea (my breads were flat and it seems to not like it a lot) and put it back in my kitchen. Since that my starter seems weak, take a longer time to rise after feedings , not a lot of bubbles as before…. Do you have any advice ? I havent tried to make bread because since the fridge they were flat and I want to wait my starter to be in a better shape.
Try substituting some of the flour with rye flour and keeping it out at room temperature, warmer if possible! Keep up regular feedings and it will probably pick up. Sometimes it takes some time for it to get back to its regular schedule/activity after a fridge rest, and it sounds like you transferred a new starter to the fridge quite early (which I don’t recommend), so keep I would wait until its very active and you’re regularly baking with it before trying that again.
so i was out of my house all day and accidentally forgot to feed my starter before i left. it’s been about 35-36 hours since i last fed it. do i start all over again? did i miss the feeding window so much that it’s ruined?
Absolutely not. Just feed it now and continue, it might need a few more feedings to get back on track! Never toss a starter unless it’s growing mold.
Hi, I’ve just established a starter . I am using weck jars for sourdough starter- found you on their Instagram . I am seeing conflicting info on using seal on established starter or discard jar in fridge? Also I continually get condensation in my starter jar with just glass lid even discard jar in fridge- is this normal ?
Hi – so glad you discovered my site. I have a lot of sourdough resources that you can find on this page.
You do not want to use the seal for sourdough discard – it should never be airtight as gases could build up. I have never used more than just the glass lid on Weck jars, or you’d want to cover lightly with another lid, if you’re using another type of jar. Condensation will happen in the fridge, it’s most likely because of the temperature/humidity differential between the contents of the jar and the fridge environment. Don’t worry about it, it’s very normal!
I am on day 14 with my whole wheat starter and still no rise. I am doing 1 cup each of flour, starter and bottled lukewarm water 2xs a day.
Any suggestions?
Hi Rebecca. It’s really hard to say. What temperature is the starter being kept at? Your room might be too cool. It also sounds like you’re over feeding a sluggish starter, so I would only feed it at most 1x a day until you start to see some activity, otherwise you’re diluting any good bacteria that’s developing in there each time. I might also switch to a bread flour + rye flour combination, as I have more success with that.
Hi, I followed The Clever Carrot’s starter instructions and it was beautiful and active and growing by day 7. I continued to feed it for another few days then popped it in the fridge bc I wasn’t sure when I was going to use it. 4 days later I took it out, discarded half, and fed with the same amounts I had been using before (60g each water and flour). It is still bubbly and smells good but it just won’t double. I’ve been keeping it in 75-80degree temps and still won’t grow. What have I done wrong? Is this salvageable? Many thanks in advance.
My starter was active and healthy until our new HVAC system was installed. Since then I’ve attempted to create a new starter from scratch. I tried both white and whole wheat flours although the whole wheat is maybe 1 year old. Some bubbles appear on the surface but there’s no rise. I purchased a proofing box but the results have been about the same. The house temp is 21-22C and humidity 50%. I appreciate any help that you can provide.
Sorry for the late reply! I would personally use a combination of bread flour and rye flour, as I’ve had the most success with that combination when starting one. Did you throw out the last one? It might have slowed down, but it shouldn’t have died. I would personally not throw it out and try to work with what you had. The proofing box should eliminate any issues that cool temperatures from the HVAC are causing – keep it around 76F when you’re getting the starter going and you shouldn’t have any issues.
Help! 22 day starter from scratch.
I’m currently doing
30g starter, 30 ww flour 30 Unbleached ap flour 60 water.
It’s doubled a few times now, only once under 6 hours. Is it not riding so high because I have whole wheat flour? I read all purpose helps for a higher rise.
I’m following King aurther starter recipe.. I ended up adding ww flour back in to my starter because I thought it would like the boost.
Should I have more starter each time? I was following their 113g 1:1:1 ratio but since it’s takin sooo long that’s just a lot of flour it feels like to be burning through.
I keep it in mid-high 70s in house.
Filtered water
It has passed a float test so I used it, and my dough didn’t rise what so ever while proofing. So I don’t think it’s anywhere near ready.
Thank you for this information! If you have a cup of starter in a jar, should you double it in feeding or give it smaller amounts?
Hi Ann,
The amount of starter you have doesn’t impact how you choose to feed it – if you keep doubling it, it will grow to an enormous size and you’ll essentially just keep wasting flour during feeds. You ideally want to reduce discard, unless you use a LOT of discard every single day. I usually keep a very small amount of starter on hand for basic feedings (5-10 grams starter; 30 grams flour; 30 grams water) and then scale it up before I use it for baking.
I did the float test and it floats, but then after a minute or two sinks. Is it ready?
Hi Keri, eventually it will sink! How old is your starter? It sounds like you should try baking, but I’d need more details as the float test isn’t absolute or foolproof, just a helpful guide.
Hi, first thank you so much for the great information. The way you’ve explained sourdough starters has helped me understand the process so much better!
I have a starter that I purchased dehydrated and have been nurturing for a few weeks now. I have it where it’s consistently doubling/peaking around 12 hours with a 1:3:3 ratio. My issue is that no matter what, it never ever passes the float test, even when it’s at peak. It sinks like a rock every time. I haven’t tried making bread with it yet for this reason. I’ve tried in the past & failed miserably, so I’m hesitant to waste my time & ingredients if it’s not passing the float test.
Do you have any ideas what could be wrong? It looks great otherwise, very bubbly & rising. I’m using an unbleached whole grain bread flour. Any feedback would be great!
Hi Nancy! Glad that you’ve found this guide helpful. So while the float test can be helpful, it’s definitely not a fail safe way to test the ‘strength’ of a starter, especially if you’re using a whole grain flour for feeding. Whole grains will have the germ and endosperm present, so essentially they’ll be a bit denser and that could explain why it isn’t floating.
I’d say that if your starter is doubling in that time, it’s worth trying to bake! If you’re still nervous, I would switch to a combination of unbleached bread and rye flour for feeding (80/20 ratio) and see if it makes a difference. 100% whole grain starters can be more challenging to judge, so it might give you a bit more confidence as you’re getting started.
Hello, I’ve made several batches of the sourdough bread and the last 4 have been difficult to use the lame to score the bread. When I use the lame it drags and pulls the dough.
Any suggestions? Thanks
Hi Pattie! It’s hard to troubleshoot sourdough without a lot of details. Has anything changed? Ambient temperature? Other things you’ve noticed? Sometimes this can happen when your dough is slightly overproofed. Also, sometimes you just need to replace the blade on the lame, but I have a feeling that isn’t the culprit here.
My starter is a hundred yrs old and kept on the counter. When I feed it it will have a ton of bubbles in a couple of days, but it will not rise. No matter what I do it will NEVER double in size. Please HELP!!!
Hi Deena, I’m not sure. It could be that you’re over feeding it or there are some other issues present. Feel free to send me an email with more details and I might be able to troubleshoot better.
Hey Laura,
Great advice. i have tried in the past to get sourdough starter going. i guess being in a rush is sure to be a failure. I will be more patient this time. can’t wait to make my anchovy pizza . fantastic
best regards
Hi Laura – I’m struggling with my sourdough. My starter seemed strong enough? Doubling every 8-10 hours for about a week before I attempted to make my bread. I used a miche recipe that started with a pretty dense levain that didn’t quite double over night but I could see some activity so I soldiered on. Needless to say, the dough really didn’t rise much. Any thoughts on if it was the starter being too weak still or if I somehow just messed up starting with my levain? So terribly frustrating! Thanks.
Hi Linda – happy to offer some assistance! New sourdough starters can often be frustrating, so it requires some patience for sure to get to the point where you’re starting to get consistent and good results from bakes. I would personally try a simpler recipe that uses an 100% hydration levain. I also wonder if you’re dealing with super cool temperatures in your kitchen? At this time of year, that can be very common.
Have you tried my artisan sourdough recipe? https://www.abeautifulplate.com/artisan-sourdough-bread-recipe/ It’s hard for me to provide a ton of guidance for other recipes because I just don’t know enough details to be helpful (and a lot is visual too). I have a YouTube step by step video for that recipe as well. I would recommend trying that out and seeing if you have more success? It sounds like your starter is strong enough, but there might be some other issues at play. How old is it?
Hi Laura: I can’t find much information on my issue online anywhere, so I thought I would ask you. Perhaps others may find the info useful too.
I live in a climate with hot summers. Ambient kitchen/house temperature often 28-32 degrees Celsius (82.4 to 89.6 Fahrenheit).
The recommended proving cabinets don’t provide cooling effect, they only heat, and I don’t need any more heat.
The refrigerator is too cold to age a starter (4 C / 39 F), and my only other option is a wine refrigerator at 18 Celsius (64.4 F).
As you may expect, I am struggling with getting the starter to become active. In the wine fridge, it does create bubbles and is active but never doubles in size. I feed it once a day 1:1:1, (baker’s flour 12% protein). It’s not strong enough to bake.
In ambient kitchen temperatures (I split it in two, to try different environments), the starter still doesn’t rise double (I feed that one twice a day), and in fact, smells quite funky and I think I need to chuck that one out.
Any ideas to supercharge the wine fridge starter so I can bake? Thank you
Hi Evan! Hmm, so that is definitely a predicament. It will be very hard to build a strong new starter if you’re using a refrigerator (or super cool temperatures, like a wine fridge). In that case, you’d be better off controlling the ambient temperature and using super cold water or ice water for feedings – then eventually transitioning to storing in the fridge between bakes. That should help control it a bit even if the ambient temp is high. You could find some sort of reusable freezer pack and cooler, and storing your starter in that on your countertop? Trying to think of ways for you to keep the temperature lower than ambient, but not quite as cold as the fridge.
If you aren’t, I would also recommend using a whole grain flour, such as rye, for a portion of the flours in your feedings (80/20; high protein bread flour + rye). That would also make a difference in activity level. Hope this helps in some way!
I started making starter. After 24 hrs i fed it with equal flour and water as there were bubbles already. It started rising 2 hrs after. After 12 hrs I noticed that it already has rises to more than double and then fell to base line. Should i wait for 24 hes to complete before feeding or should i feed after 12 hrs from day 3???
Always feed at peak activity, not when it falls (that’s a sign it’s been out of food for a while). But activity in the first few days of creating a starter is deceptive and not the same thing, I’d hold off and see how it goes in the next few days.
Hello! My starter is over a month old. I use organic unbleached AP flour & spring water. I keep the jar between 70-80° with a seed heating pad near but not touching the jar. I feed it roughly every 12 hours. I had been doing a 1:1:1 ratio always discarding, but recently have tried 1:2:2 and even tried a feed just adding flour (advice found online for a sluggish starter). The starter has doubled exactly ONCE in the past month. Otherwise, it bubbles and rises but maybe by a third in volume.
Any advice for what I can try and get this more active?
Hi Jen! It’s hard to say because so many factors are involved. Ideally, the starter would be held around 72-76 degrees Fahrenheit, but it sounds like you have that on track. I would try feeding less, especially if it is not rising much, and also incorporating rye flour into your feedings. Some whole grain flours – especially rye – contain more nutrients that help young starters get more active. Try this and see if it helps!
It has been 24 hours and my starter jar has condensation. I love in a warm humid climate. Any suggestions?
It’s been about three weeks and my sourdough starter has only risen half of its size. I feed it a 1:4:4 ratio with 50% wholemeal flour and 50% ap flour. What should I do to make it double in size? Is it strong enough to bake bread?
Hi Max! Sometimes starters can take a while to get going. I would recommend switching to a combination of bread flour (AP can work too) and rye flour, and maybe switching to a 80/20 ratio of those. Keep that up for another week and see how it’s doing! You might also want to play around with using slightly warmer water or trying to find a warmer spot in your house where it can sit in between feedings. Hope this helps!
After seven days my starter is creamy and no bubbles, shall I continue to feed it more days?
Starters can take up to 2-3 weeks to become reliable and active. Definitely give it more time but try feeding it slightly less often or introducing some rye flour to get it going! I don’t know what recipe or technique you used to create it, so extra details would help me troubleshoot more.
Hello Laura,
When you say “feeding the starter less often”, what does it really mean? Can you please give an example?
Not sure exactly what portion of the guide you’re referring to, but if you’re struggling to grow a starter and it’s not doing anything for a while – don’t feed it every 12 hours, give it more time (maybe closer to 24 hours), as sometimes you can be diluting any activity with too many feedings. Hope this helps.
I have been feeding my starter for six weeks now and it’s barely rising. I started it from scratch. Is it dead? I’ve done a starter from scratch before that took only three weeks so I’m confused. Some days it will rise but not double and other days there is zero activity.
I would recommend playing with temperature (either ambient – where it’s held – or using slightly warmer water). Unfortunately I can’t give much advice or specifics because you didn’t provide any details, but using a portion of rye or whole grain flour in your feeds should also help.
Can I feed my ripe/peak starter to keep it from falling if I can’t start my recipe for a few hours? If so, how much should I feed it? Just a little to keep it active? Thx
Hi! You give so much great detail here! My starter is over a year old. For a while, I was getting really Great rise out of it it lately is is barely rising at all. It’s slightly bubbly on top. I typically don’t discard and do a 1/2 cup flour and 1/2 cup water. I tried removing lots of the starter and doing the 1/2 to 1/2 cup again and still barely got a rise. Is it possible to salvage?
Hello! Just ran across your blog today and am loveing the info!
I’m on my second starter attempt (the first one got to just over 2 weeks old and got some mold on top 🙁 so had to throw it.) I’m on day 5 of my starter now. I have been doing a 1:1:1 ratio and have been using ww flour and unbleached bread flour.
The first 2 days it’s exploded and even ran over my 1 qt jar. So I was pretty excited but now I’m on day 6 and it hasn’t done much of anything since day 2. I did get some hooch on top by day 3, since I had no idea I should have fed it when it fell rather than waiting the whole 24 hours.
I just fed it 2 hours ago and it was the nice thick consistency and now it’s super runny. I could easily pour it out of thr jar. I was keeping it in the oven with the light on. The thermometer was reading it is about 85 degrees in there. Is that to hot? Should I feed it again when it gets runny? It’s smells fine and has maybe 6 little bubbles on top.
I’m so excited to start a new hobby! My husband it very impatiently waiting for a loaf of bread. 😅
Sorry for not replying to this sooner. It isn’t uncommon to see a surge of activity in the first few days and have it die down substantially right after that. The initial activity is misleading, and does not indicate that your starter is strong enough for baking with yet. Ideally, you’ll want to feed your starter when it reaches peak activity (you might want to use a rubber band to see how ‘tall’ it gets before no further growth – this is peak activity and it will shift and change as it gets stronger). Hooch will develop if it is not fed for quite some time. In that case, pour off and discard the hooch and proceed to feed. Avoid following super prescriptive starter feeding instructions at this point, as every starter behaves differently and it’s the basics that you’ll want to follow (feed once peak activity is reached, etc.), not an arbitrary timeline.
85 degrees is very warm for a starter to be stored at – and will lead to it peaking very quickly – and oven temperatures are notoriously wrong and it may be even WARMER than that. Best case, the starter would be stored between 72-76 degrees Fahrenheit and that will slow down activity to reduce the number of feedings you have to do in a day.
Keep at it and it will continue to get stronger and more predictable!
Hi Laura thank you for helping us. my room temperature is 78 f . I keep my starter in the fridge and I bake once a week. After I use my starter I feed it, leave it on table until it doubled in size, then I put in the fridge.Before I bake I feed my starter twice. I use rye flour and bread flour for feeding. I remove my starter from the fridge 9:00 p.m. I wait until it comes to room temperature,then I feed it at 10:00pm, after 5 hours my starter double in size, then I need to do second feeding middle of the night, so I get up around 3:00 a.m. to feed my starter. Then in the morning around 7:00 am my starter is ready to use to bake bread. Will you tell me please how I can feed my starter, so I won’t get up middle of the night to feed it. I need to start it in the morning so I can go church at 7pm. Thank you in advance.
Sorry for only just replying! I would simply remove it from the fridge much earlier in the day, and adjust your feeding ratio so that you can go 10-12 hours between feedings (not sure what your ratio is, but this can always be adjusted to tweak timelines!). This would enable you to feed just before going to bed, so it doesn’t reach peak activity until the morning when you’re ready to bake.
This might require some tinkering. Your ambient temperature is warm, so that, combined with potentially your ratio, is causing it to peak in a very short window of time (5 hours). The way to combat that is to change up your ratio, use colder water for feedings, reduce ambient temperature somehow, etc. All of these variables can be played and experimented with to make timelines work for you – instead of working AROUND your starter’s schedule. Hope this helps!
hi, i made my starter from scratch around three weeks ago and i have been feeding it twice a day with 90% bread flour and 10% rye flour. it’s been rising and falling but the rise does not reach a double and the top of my starter is matte even though i have covered my mason jar tightly, any tips on helping it rise to a double or even a triple?
It sounds like it’s drying out – but it should NOT be covered tightly (or sealed, it could explode!). I would try to figure out an alternative storage solution – a new jar or lid? And see if that helps things. In addition, you might just need to give it more time as it’s still a relatively young starter and it can take some time to establish strength, as frustrating as that sounds.
I would switch to a 80/20 ratio (bread flour to rye) or 50/50 ratio (bread flour to rye). Rye has more nutrients, so it might just need a boost to gain more activity! See if that helps?
This is simply a thank you. I had been feeding my starter for over a week. The starter was initially grown a month and a half ago. But due to time commitments, I had to put the scrapings in the refrig until this last week. I had made two loaves of sourdough bread initially that looked fine. And a couple days ago, made baguettes. But never did my starter ever double in volume. I used a 1:1:1 ratio of starter to Rye to water.
After reading a great deal of your blog, I came to the conclusion that I needed to add bread flour to my Rye. Immediately, after the first feeding with 50% bread flour and 50% Rye, my starter doubled in volume in six hours.
Thank you thank you thank you.
Hi Laura, thanks so much for this awesome guide. I’ve read it about 40 times! One thing I am still trying to work out- I have a starter that’s about 3 weeks old. I have been feeding it 1:1:1 (60g starter, 30g bread and 30g whole wheat, 60g warm water) and its now doubling consistently in about 6 hours in my kitchen and looking good.
However when I try to take some for leaven (I’m terrified of messing with my seed starter ha!) and feed it 1:2:2 (40g starter, 80g bread flour, 80g warm water) at 8pm to rise overnight, the 1:2:2 leaven isn’t doubling in 12 hours- it’s maybe gaining about 1/4 in size. I know it’s definitely not peaking because I keep waking up at 2am to check 😂 Would this just be because my seed starter is too young to consume that much food and more patience is required? I’m assuming I could still scale up my seed starter using 1:1:1 and bake with that anyway as it’s become predictable? Love your thoughts!
Hi Mel, sorry for the delay in responding to your questions. Your starter is still quite young (as frustrating as that may sound to hear!), so you may still need to work on strength building. Maybe try replacing the whole wheat flour with rye flour and see if that helps. Rye has more nutrients than whole wheat, and can be really helpful for building a strong starter. Also, if you can find a warmer spot, try that too!
I don’t think your starter is too young to change up the ratio, but it will certainly take much longer if it still takes 6 hours to double with a 1:1:1. For perspective, my starter can more than double using a 1:5:5 ratio in about 10 hours.
You could certainly try baking, but if it’s taking quite some time with a 1:1:1 ratio, I think it might cause similar problems with your dough and fermentation (it will take too long for the dough to develop and if it takes too long, the dough can start to break down). I would encourage you to keep at it with feedings and try switching to rye and see if that helps!!! Again, it took me a solid month for my starter to make a decent loaf, so 3 weeks is still somewhat young.
Hi Laura, on day 5 of making the starter, do I feed it, and how do I move on to using it in a recipe?
Hi Donna! I’ve linked to multiple resources in this post, as well as answered many of these questions in the article itself – if you are following a sourdough starter guide (this is not that, just a troubleshooting article), it should guide you through that process. Again, I have linked to MANY resources and videos in this post that go into the process in detail. Unfortunately I can’t answer such broad questions in the comment section. Please also check out my sourdough resources post for even more!
https://www.abeautifulplate.com/sourdough-bread-tools-and-resources/
Hi,
I have a question regarding the starter, every day after around 18-20h after the feeding the starter becomes very alcoholic smell and on top it appears like dried out, it is not mold (I hope), it’s just looks dried.
The jar I use is lightly closed, and starter is made of 50% rye 50% wholemeal flour. I’m not sure, but I have a feeling that is the reason the bread doesn’t fully proof.
Yep – that’s a very long time between feedings, especially if you’re using whole grain or rye flours and keeping your starter at room temperature. It sounds like it has risen and fallen substantially in that time frame, especially if it smells alcoholic and is very very thin and liquidy. Ideally, you’d feed it at peak activity and well ahead of this happening to keep it healthiest and prevent the acid levels from increasing a lot.
Maybe also try a lid that rests on top, it might also be drying out slightly due to whatever vessel/lid combo that you’re using. If your bread dough is struggling, I think it’s a combination of the high acid levels and the fact that you’re probably not using your starter in your dough when it is at peak or just past peak. Using a starter that has fallen substantially is not ideal – you’d be better off feeding it again and waiting once more until it reaches peak.
usually I use the starter once it at least doubles the size (depending of the feeding ratios). I will try to feed every 12 hours and to follow what will happen. Thank you very much for your answer. Will reach out if I have other questions.
You should definitely follow your starter’s lead (not a random time) but it sounds like it has fallen, based on your description that it is very alcoholic in smell.
When feeding a starter and waiting, do i leave uncovered or tightly covered.
Covered, but it should NOT be airtight! A glass jar top or a lid not completely screwed are good examples, some air needs to be able to circulate or it could explode.
Hi Ashley! My starter is now 29-day old. It’s taking forever to double, almost 24 hours! It’s all bubbly. I am using 30g rye 30g spelt, 60g starter and 60g water for each feed. Should I feed on a regular basis (every 12 hrs) even it’s not doubled? Or should I wait for it to double and collapse before I feed it? Even when it’s doubled or almost doubled, it didn’t pass the float test. Is my starter still not ready? 🙁 Thank you for your tips!
Hi Kate (my name is Laura 🙃). Happy to help. Is there a reason why you’re feeding it with 50/50 spelt and rye? Spelt and rye are 100% whole grains and very unique wheat strains that behave much differently than the type of wheat used for bread flour, etc. I would recommend using only a portion of rye and mostly bread flour for feedings, especially when first starting out and you’re getting familiar with how a starter should behave. Even small things like that can cause issues with things like the float test (which isn’t 100% reliable). I use an 80/20 ratio (80% bread flour, 20% rye) and would recommend switching to something like this and seeing how things go.
I have a feeling it’s that factor – plus the 1:1:1 ratio – that is causing a lot of confusion. Are you sure it’s not doubling? With that much starter (to flour ratio) in each feeding, it could be rising and falling VERY quickly if it’s a few weeks old, to the point where you’re missing it. If it smells very acidic or alcoholic, that could be a tell tale sign. Keep me posted and don’t hesitate to email me if you have more questions!
My starter (1:1:1) is mature and seems To be strong. It will double in about ten hours. I need to use it i a recipe that wants me to feed it using a 1:5:5 ratio. I did that and it isn’t doubling at all. It gets bubbly and passes the float test but it maybe rose only 40%. I tried to feed it again using a 1:5:5 ratio to see if I could get more action but nope. Any thoughts as to what i should do next? Thank you!
Hi Linda! It sounds like your starter is quite young based on this description. Ideally, it should be able to double in size with a 1:3:3 or 1:5:5 feeding ratio in less than 10-12 hours. If it’s taking a solid 10 hours with a 1:1:1, it sounds like it isn’t quite strong enough. If it’s not doubling, it sounds like it just needs more time. You might want to play around with keeping it at a warmer temperature and using a combination of bread and rye flour to boost the activity.
I recently purchased the bröd and Taylor proofing box and thought I would love it but no matter what I do it cooks my sourdough starter. I placed and ambient thermometer in with my starter and the box was set to proof at the lowest setting which is 70 degrees Fahrenheit but the thermometer read that the temp was well over 100 degrees. The machine is has only been in my possession for less than 24 hours. I don’t understand what could be wrong. Help?
Hi! Do you accidentally have it on the slow cooker setting?! Also, how are you monitoring the temperature inside, and is your sourdough starter literally hot to touch? This sounds incredibly unusual, so I would definitely reach out to their customer support team and they should be able to help you out! I don’t work for the company, so I can’t help with this type of issue other than to say I’m sorry that it’s happening!
I truly enjoy your knowledge on so many different questions and scenarios. I had a good first batch but it went moldy. I had my Weck jar next to a fruit basket where the fruit becomes over ripe. I moved the jar to a second location but I think that it might be drafty at this new place. I have two questions: 1) should I use the seals that came with the Weck jars? This seems like it would be an anaerobic environment which might not be healthy for the starter but I believe that this would prevent the mold that I experienced. 2) When combining the 1:1:1 or any other combination, should the wet ingredients be combined with the dry ingredients followed by the started? In other words, what are the correct steps for combining the starter and new ingredients? Also, should they be folded or truly mixed together? Many thanks in advance!
Thanks so much for your feedback and questions! You do not want to use the seal if you’re using a weck jar. You want to just use the glass lid, and never want it to be airtight. When you’re doing feedings, it really doesn’t matter which order you combine the ingredients. I tend to measure water first, because if I overshoot the flour slightly with my scale, it’s easier to remove some (rather than the other way around). You want everything to be mixed very well so there are no dry bits of flour, and the starter is evenly incorporated through. Thoroughly mix always!
Thanks so much for your reply.
Hi, my starter was so active on day2
,3 and day 4,, but on day 5 it barely rising between feedings.
What should I do?
My ratio is 1:1:1
P.s: on the first 4 days my starter rose and doubled its size.
Hi Somaya! It is common that a starter will have a false amount of activity a few days into the process and then taper off (it confuses a lot of people!). Unless you’re mixing up other things, it should get back to real activity in the coming week or so. Keep me posted!
Hello! I started my starter with king arthur whole wheat flour and after a few weeks it started bubbling and rising beautifully but I bake with all purpose flour so I wanted to change the feedings over to king arthur all purpose. I did that 4 days ago and now it’s not rising and barely bubbling. It looks thick like cake batter where it used to resemble mouse with the webbing pulling away from the jar. What can I do to get back to that?? Please help! I would like to continue feeding it all purpose flour. I do 50g starter 50g water and 50g flour
Hi Ashley! Sorry for not getting back to you sooner. You can feed your starter whole wheat and still bake with it to make a loaf that utilized all-purpose, and your starter will be stronger, so I don’t recommend switching to a 100% all purpose feed. Though it isn’t unusual that it takes some time for a starter to adapt to a big change like that, so that is part of it!
Did you accidentally switch to a bleached all purpose flour? [That would definitely cause issues!] I might need some more details to help out, but I would go back to at the very least an 80% all purpose and 20& whole wheat flour mixture at the very least, and strongly would recommend baking bread with bread flour as opposed to all purpose. The higher gluten/protein content is ideal!
Hiya! I made a wonderful starter that gave our family many loaves over a year or so. I let it die after I had my baby and have struggled to get a strong starter since. I’m on day 30(?) now, and although it has activity it has stayed consistently llimited. Within 12hrs it will bubble and rise, but will not double in size and will not pass a float test. It sinks down and has slide marks 10-15hrs after feeding.
I started it with 60g locally harvested whole wheat flour & 60g organic white bread flour : 120g filtered water. I have tried playing with my flour ratios and also tried slowly added in rye flour.
I am currently maintaining the feeds with 120g flour, 120g warm filtered water and 136g of starter.
I keep it in a warm place and have tried moving it to different areas.
I have tried letting it get extra hungry and tried feeding it as soon as it starts to sink down. I’ve also tried different water temperatures.
None of the above has made any changes.
I would appreciate any guidance and tips you could offer. I don’t want to give up on it and rrestart but I am slowly running out of patience.
Thank you in advance !!
Hi Kaylee! I’m assuming you threw out your old starter, but if you didn’t, definitely try reviving it again (assuming there is no mold or strange smell). You’d be surprised how resilient strong starters can be, even after lots of neglect.
Hmm, it does seem a bit odd that it is taking this long to show much activity – but sometimes they can be VERY sluggish, particularly in the winter months if your house is kept at a very cool temperature, etc. Also, that is a LARGE amount of starter in a feeding, so I am almost wondering if you’re missing its activity altogether? I might try reducing the overall amount of your feeds/starter size just simply to avoid extra waste – especially if it isn’t strong enough to bake with yet. I would try 80% bread flour and 20% rye flour (or 90% bread/10% rye) and give it some time to adjust to see if you start seeing some changes. For ex: 20 grams starter, 40 grams bread flour, 10 grams rye flour, 50 grams slightly warm filtered water.
Keep me posted!!!
Starter not bubbling. I read your instructions. Frustrating.
Hi, not sure what to advise unless you provide more information! This post is a troubleshooting guide, not a recipe for creating a starter. I’d need more details to help you. If your starter is young, be patient. It took my starter close to 3 weeks to become active and reliable.
Love this blog!!! I have it bookmarked. 😌. My sour dough was started 6 days ago. Overnight it developed a brow layer. What is?
If it’s liquidy and smells a little alcoholic or very acidic, it’s hooch or potentially a slight separation! Hooch means it ran out of food a while back. Pour off the liquid layer and do a normal discard/feeding. If it’s moldy or smells very odd, thats the only time to get rid of it – which is uncommon unless you live in a super warm environment.
My starter gets over active and oozes out of the large jar. What are a going on with it?
Hi! There’s no such thing as over active per say. It just means that maybe you have a jar that’s too small for the quantity of starter / feed ingredients. Ideally, you’ll always feed your starter when it runs out of food (reaches peak activity level, but before it falls). I recommend scaling down your starter or changing up your feeding ratio (see this post for more details!) if you want to slow it down or avoid it over spilling. That will take care of it!
Thanks, very useful guide. One more question: shoukd one always use a clean jar for every new feeding? If not, how frequently should a clean jar be used? Thanks.
Nope! You can totally keep using the same jar too, I just find it to be a bit messy sometimes over time and prefer to switch out for clean ones every now and then – also just makes cleaning the jars easier. As long as the starter on the sides isn’t getting too crusty, etc. you can keep the same one. It is a personal choice!
My starter rose nicely and later in the day deflated. I had a rubber band making the level before it rose… now it’s back to the marked level. That’s about 3/4″. What now?
Hi Kathy, this is normal and what will happen if an active starter runs out of food (and has been sitting for a while after a feeding). Ideally, you want to feed a starter at peak activity (when it rises and levels – but doesn’t fall yet), and repeat.
If your starter is very active, you probably want to change up your feeding ratio accordingly to try to come up with a manageable a daily feed schedule. I cover all of this in this FAQ!
Hi! I have a starter thats just about 7 months old, it has worked wonderfully up until now and produced beautiful loaves. I have made over 80 loaves of bread with this starter as I was selling the bread. However, recently my starter has been very sluggish and not very active. It no longer doubles in 4 hours and has very little bubbles. What do you think is wrong and what should I do? Also, thanks for your site, I have really been enjoying it.
Hi London! Sometimes starters can behave a bit differently in different seasons – I’m guessing your house or environment is colder and that’s why it’s being a bit more sluggish. Mine recently has a bit less active as well, so I decided to go back to adding a bit of rye flour into my normal feedings (80% bread flour, 20% rye flour) and it has picked right back up.
Alternatively, try to find a warmer spot in your kitchen!
Hi Laura,
Wow, thanks for this great resource! I have about a 1 month old starter and followed another bloggers recipe where she never mentions it rising on the counter and I’m realizing I think my starter may not be ready/strong enough yet to bake bread?? It will get bubbly after feeding it, and for a while there was a lot of hooch forming, within an hour sometimes. I have been feeding at a 1:1:1 ratio with whole wheat flour, maybe I should switch to rye? If my starter isn’t ever doubling in size on the counter does that mean it’s not strong enough yet and I should leave it out for awhile and try feeding daily on the counter instead of keeping in the fridge? I’ve tried bagels twice and the dough never rose much once they were formed, and they came out very dense.. other recipes that use the discard have turned out fine, but not much leavening was required for them. Thanks for any tips you may have for me, I am loving venturing into the sourdough baking world!
I started a new sourdough starter from scratch exactly 12 days ago. I used the King Arthur instructions, except I started using all-purpose, unbleached flour. I saw more activity with bubbles the second and third day, and barely anything since. It is not rising at all. It doesn’t smell or taste even slightly acidic. I get a few tiny bubbles. I feed it twice a day. My apartment is around 65-68 degrees. I though this might be too cold, so I would warm my oven just slightly, turn it off, and keep my starter in there so it at least got a few hours of warmth (I don’t have any other consistent heating sources). I was also wondering about maybe keeping it wrapped in a towel in my slow cooker on the “warm” setting. Do I just need to keep being patient? I don’t want to waste my flour and my time. I can’t figure out if I’ve done something wrong.
My starter smell like acetic acid. Is this normal?
Hi, my starter rises to 3x in bout 3 hours. Temperature of my kitchen is about 30 degrees Celsius. I was wondering if this effects the bulk fermentation too (shorter BF) in the case that I leave it to BF in the same temperature?
Absolutely!!! It will have massive impacts on fermentation – it’s going to be hard to control, to be honest, in that high of temperatures. You’ll need to make a lot of tweaks (colder water, less starter, etc) in order to ensure it doesn’t over ferment and it might still be a huge challenge in that environment. I wish I could be more specific, but sourdough is not exact and temperature is a massive variable!
I lightly oiled the bowl before putting my sourdough in to rise. (I do this with yeast breads). Is this a problem?
You can definitely do this! I don’t personally do this and it isn’t necessary, but it is totally up to you!
Hi! I have a question regarding the time my SDS takes to be ripe. Let’s suppose it takes about 8-10 hours for my SDS to reach peak, this means two things: feed again or make levain. Does this mean my levain will take the same time to be ripe and ready to be used ?Meaning I would have like a 2 day preparation for baking?
Also, should I rely more on the float test or on the doubling size of my SDS? I’ve been having trouble noticing when it is perfectly ripe, meaning it has doubled in size and also floats. And how can I now if it is overripe? If I make levain out of a overripe SDS, will this levain work properly?
Sorry for all the questions. Just trying to get it right! Been at it for weeks?
Hi Mariana,
Ideally, yes, when your starter has reached peak activity, it’s time to give it another feeding. That time will vary depending on the feeding ratio you use (amount of starter discard to flour/water), as well as temperature, flour type, and a lot of other factors.
I personally choose not to create off shoot levains for my breads and just use a portion of my sourdough starter in my bread dough. This works with my feeding schedule and bread recipe schedules (see this recipe for more details: https://www.abeautifulplate.com/artisan-sourdough-bread-recipe/). With my method, I would scale up my starter (you’ll need to account for a tiny bit of leftover to maintain your mother starter) the night before and start my dough in the morning/it gets baked up the next day after that.
I would always rely on your sourdough starter and use it at peak activity (this can even be more than doubling, it really varies based on your starter, but double is the minimum that I would look for in a starter to bake with and produce strong leavening). If your starter is strong and doubling/tripling, it will almost always pass the float test, and the float test can be a bit unreliable if you’re using different types of flour in your starter, etc. You can use both tests though to be sure!
You can use a sourdough starter at peak activity or when it’s barely barely starting to fall. If it has fallen completely, that means it has been sitting for a long time and is completely out of food and the acid level has increased. I wouldn’t personally use a completely fallen starter in my bread dough, but you should definitely feed it and you can hold off on baking until you have a better idea of your starter schedule.
Hope this helps! I would check out my other sourdough resource posts, as I have a few that might help clarify these points, along with a YouTube walk through video: https://www.abeautifulplate.com/guides/cooking-technique-guides/homemade-sourdough-resources/
Thanks for your reply Laura, I will try your recipe. I did stay up well after midnight and cooked the loaves I made, they were pretty good afterall (with some oven spring) but they need to rise more. My son was up too and ate half of one before I could get to bed. My starter seems awesome now and so active. (i started with red grapes in all purpose flour then removed after a week then cycled thru 2 doses whole wheat then one dose rye, maintained with APF.. . its a great color)
signed,
DS (that mad scientist)
Have what appears to be perfectly active starter but my dough isn’t rising much. I suspect the recipe had too much flower. Please confirm!! I used this recipe:
INGREDIENTS
For the leaven:
1 tablespoon active sourdough starter
75 grams all-purpose flour or bread flour (1/2 cup)
75 grams water (1/3 cup)
For the dough:
525 grams water (2 1/2 cups), divided
1 tablespoon salt
700 grams all-purpose flour or bread flour (5 1/2 cups). (700 grams flower seems a lot.)
From
https://www.thekitchn.com/how-to-make-sourdough-bread-224367
Thanks!!
Signed,
DS, A mad neuroscientist making anything fermented
Hi Dan, I don’t think the flour quantity sounds crazy (although it is a bit high for a one-loaf recipe). The biggest red flag to me is following any sourdough recipe that includes volume measurements, particularly for sourdough starter. Ideally, you would only use gram measurements for every process of sourdough, otherwise it could be wildly inaccurate. Salt density varies TREMENDOUSLY by brand, so tablespoon measurements for salt could be having a major impact on your bread (depending on what brand and type you use in your kitchen, etc.) just to name one variable, etc. Water should list the temperature and so forth.
Have you tried my sourdough bread recipe? https://www.abeautifulplate.com/artisan-sourdough-bread-recipe/ I would recommend starting there, because I’m much better at troubleshooting issues with my own recipes than those from other sites without a lot more information.
I have made perfect starter in Wyoming but here in Wisconsin I can’t seem to get it active. It is thin and watery with very few bubbles. I have been leaving it out on the counter feeding it everyday. Could it be getting too warm? It has been 5 days.
Does it smell super acidic and almost alcohol like? If so, it is getting too warm. Though, if the starter is only 5 days old (and I understood that part of your comment correctly), that’s a very young starter and you’ll need to give it a lot more time. It took me 2-3 weeks to establish a starter with a predictable rise/fall schedule.
I would feed it once a day max at this stage, and maybe even give it more time between the next feeding.
What a great site you have, definitely excited to start using the starter that my mom gave me in April. I have been feeding it regularly each week and keeping it in the fridge. I would love to try out your pizza dough recipe and my question is the specific sequence of events prior to measuring out the starter for the recipe. Do I take it out of the fridge, feed it, leave it our overnight and then measure? Or do I feed it, leave it out for the usual 2-3 hours to get it active and then measure and use in the recipe? I am always a little unclear as to what constitutes starter vs discard…..thanks in advance for some guidance!
Hi Sarah! Happy to help. By starter, this essentially just means the main starter that you feed regularly. Sometimes it goes by the name levain, etc. Whenever you do any sort of feeding, you discard a portion (hence the name discard), as otherwise your starter will just turn into a monster (in size, etc.). You can literally discard that portion (compost, etc.) or if timed appropriately, use it in your bread/dough recipe.. Some people create what are called “off-shoot levains or starters”, which are essentially separate starter feedings that are used for a recipe. This can be great if you want to experiment with different flours or need more control over baking schedule.
I prefer to simply scale up starter quantity before baking, so the excess portion (essentially the discard) can be used in my dough, as it works with may normal feeding schedule. This is the same concept, but you do need to be mindful of making enough so that you have a portion of starter left to maintain and keep going as your “mother” starter.
When you’re making a naturally leavened baked good, such as my sourdough pizza dough, you would use a portion of starter ideally when it has reached peak activity, ie. it has risen to its full capacity and the natural yeast has run out of food but it hasn’t started to fall yet. I cover this a bit more thoroughly in this guide, so I recommend reading through or brushing up on what that means. In my bread recipes, you’ll always notice that I write “ripe sourdough starter” under ingredients and the word ripe means starter that has reached peak activity.
If you’re simply using sourdough starter to add flavor to a baked good (such as in a pancake or muffin, which normally uses a chemical leavened as well, you can generally get away with using discard at various points in the process).
If you’re storing your starter in the refrigerator, I recommend removing it from the fridge at least 1-2 days before attempting the dough. Allow it come to peak activity, feed, and proceed with another 1-2 normal feedings while keeping it out at room temperature. Starter hibernates in the fridge, so if you haven’t really observed your starter when it’s at room temperature before or have never baked with it, I really recommend doing this, otherwise it is hard to understand what “peak activity” means and none of this will make sense.
You’ll most likely have to scale up the last feeding prior to making the dough (you can keep the ratios of flour, water, and starter the same) as this recipe requires a lot (250 g) of sourdough starter. For me, that usually means the night before I make pizza, my sourdough feeding = 130 grams flour, 130 grams water, and 20-30 grams starter give or take. This gives me enough starter for the dough, while leaving a small quantity for my “mother” starter. Hope this helps clear some things up and doesn’t cause more confusion! I definitely recommend reading through all of my sourdough resources if you have additional questions.
I’ve looked everywhere on the net for what to do when the starter has fallen too much.
I’ve tried using it because I figure that if the starter is hungry, putting it in the autolysed dough will give it food.
What’s wrong with that? It will rise again right? If I leave it in the fridge overnight?
but do I then need to add more autolysed dough to keep it feeding during the bread making process?
Just now I used half of the fallen starter for a ciabatta, then fed the rest. I’ve coil folding the ciabatta dough and hope by the time I finish, the starter will have grown again (it hadn’t fallen completely) and I’ll add more.
Any ideas?
You can definitely use fallen starter in sourdough – ideally, it’s used more at it’s peak activity level, than before it falls, when there’s no more signs of activity, but it hasn’t lost its volume and sank (that usually doesn’t happen for hours after it’s peak activity). A true fallen sourdough starter has been out of food for a long time, and the acid loads can be quite high, which can affect the flavor of the bread, etc. It really depends on what you mean by fallen and for how long.
You also need to reserve/feed a portion of your starter to keep it going. You don’t typically add more starter to a dough, you add it once and you’re done. I’m a bit confused by your questions, so would need more guidance to understand what you mean better!
Thanks Laura,
Well, it was almost at it’s peak, maybe 3/4 more than original volume, when I had to go out, so I put it in the fridge thinking when I come back it will be doubled. Then put some flour and water to autolyse.
When I came back some hours later and took the starter out of the fridge, it had fallen to about quarter of the original volume.
I decided to pour the right percentage into the autolysed dough. It’s been there now for about four hours and I’m doing coil folds every half an hour. It’s not bubbling as it usually is.
In the meantime, I put more flour and water and discarded half the remaining starter. It’s now about 2/3 more than original volumecoil and I’m waiting for it to reach it’s peak to put it into the coild folded dough so I can then put it in the fridge overnight for a long bulk rise.
It’s 10/15pm here so in another half hour or hour the starter will be at it’s peak and I plan to put it in the dough, coild fold maybe once more to mix it in then put it in the fridge.
What do you think?
Usually starters should be doubling in height before you want to use them in your bread dough – obviously this will vary depending on the starter, but it should ideally be doubling (or more) at peak activity. Truthfully, I can’t give you much advice because I’ve never made sourdough the way you’re describing where you’ve added starter twice. Without seeing photos, without seeing a recipe, etc. it’s really impossible for me to troubleshoot. I wish I could be more helpful! I recommend following my recipe next, and then I’d be able to give you better advice: https://www.abeautifulplate.com/artisan-sourdough-bread-recipe/
Thanks anyway Laura.
To be honest I asked only because surely I’m not the first person who has let their starter go too long and it’s fallen. Of course we all want to follow the recipe but some days are hotter than others, some days you go out and miss the peak.
The question is a simple one. do you have to begin the starter all over again from the begining or not? I understand if it’s fallen slightly no problem. Mine had not fallen slightly but a lot.
My thinking is that you can rescue it without waiting four more hours, when probably you want to go to sleep, and that you can add it to the autolysed dough because this feeds the starter in any case.
Thank for doing your best to respond in any case Laura.
If it’s fallen, you can definitely add it to dough, just know it might impact the flavor and timeline if it’s fallen for a significant period of time (if it’s incredibly liquid-y and has hooch on the surface I wouldn’t personally use it in dough until it’s been fed again). That part I feel confident giving an answer on! As for how the dough is behaving, I would say follow the dough’s lead and see how it’s doing versus other bakes.
Thanks Laura,
Actually I made ciabatta with it and it was delicious and the crumb was very good!
I added the fallen starter to the autolysed dough, coil folded it about 8 times waiting for the refed starter to be ready, and it wasn’t ready by the time I wanted to go to bed do I put it in the fridge, with the fed starter.
In the morning the starter was ready and I added it to the dough, waited about two hours, coil folding again and it went all bubbling. then I just baked it and it was yummy.
The thing I don’t know is if I didn’t add the second lot of fed starter, would it still have worked? I guess I can only try it next time!
Hi Laura, may I ask, My starter is just over a month old but it does not ever doubles in size. After feeding it does rise but does not ever doubles in size. Im using all purpose flour. What would you advise? I was thinking of changing the flour, maybe use bread flour but Im scared. Please advise.
Hi! Sorry for the late reply. I would recommend switching to bread flour and/or (preferably) a combination of bread flour and rye flour (the whole grains can help strengthen a weak starter!) – perhaps an 80/20 mix by weight. Give it a few days, as it will take a bit to see some changes, but it should start to improve!
Also, be sure to do regular feedings! There could be other reasons why it’s struggling along, but it sounds fairly young to begin with and that it needs a little boost with these tips. Hope this helps!
Hello!
I have just found your post and it is really helpful. I have a 4 year old starter which I may have neglected fairly recently and I am trying to revive it and it just isn’t bouncing back like it usually does. There are signs that it is still active. Small bubbles on the surface and when I stir it you can see structure from bubbles underneath. It also smells fine. It just isn’t rising at all. I have given it about a week now of daily/ twice daily feedings. Any suggestions? Thanks!
Hi Lucy! Does the texture feel like it did when it was very active? Just trying to check a possible issue, but I definitely would NOT throw it out. I would give it another few days, and if it’s still acting slow add some rye flour as a part of your feeding blend (I would do about 80% unbleached bread/AP and 20% rye) and that might help kickstart things. Keep me posted!
Hi Laura,
Thanks for getting back to me!
It is potentially ever so slightly more elastic in texture than it was. It also now smells sweeter than it did, although not unpleasant. I have been keeping up with the twice daily feeding and there are still signs it is active but it isn’t getting any better. This morning I added a small amount of rye flour to the feed to see if that helps
Hmm ok! Keep up with the small amount of rye for the next few days and see if that helps (it should!)
Thanks so much for the informative post and all those who commented. I have a very young 1wk old starter that unfortunately was forgotten to be fed when I went away for 2 nights. Now there is no activity and quite a lot of liquid on the top. Should ditch it and start again, or restart with 1:1:1 (AP flour) feeding? My kitchen is very warm (we’re in late summer here in New Zealand), around 26-30oC and around 20oC overnight even with all the doors open. Thanks!
Definitely don’t ditch it, but feed it as soon as you can. The liquid is hooch and a sign that the starter is completely out of food (and has been for some time).
You never want to ditch a starter unless it is developing mold or you just don’t care to keep one anymore, no matter the age!
I’ve read so many “starter tutorials” I feel like my head is spinning. What is funny is most of them say it is easy and making a viable and strong starter is almost a guarantee given enough time and patience. Yet, all you have to do is read the comment sections to see so many people who are struggling after a month or two with a mildly active starter that isn’t strong enough to bake bread. Obviously, creating a strong starter is not as easy as people would have you believe.
I’m only on day 8 so I’m not too worried yet. I started off using bread flour in a 1:1:1 ratio for the first 2 days. Once I found some whole wheat and rye flour I switched to a 1:1:1 using 50% WW and 50% Rye. Then I became concerned that the Rye would impart flavors I eventually wouldn’t want in my bread (which I don’t believe to be true now) I switched to a 1:1:1 ratio with 50% bread flour and 50% whole wheat.
My house is cold, like every nook and cranny is just below 70 degrees with most spots being around 67-68. I think this has made my progress slow. The first day nothing happened. The second/third day I noticed some tiny bubbles and a bit of liquid and rise and it had a gross smell. I think this was the bad bacteria that is talked about. The fourth , fifth and sixth day nothing really happened. Maybe a tiny bit of rise and tiny bubbles. On day seven I saw more bubbles (still rather small) and it rose around 50% to 75% of it’s volume. I’ve just recently learned the oven trick and I will say this….be careful if your oven has two lights! Mine does and it ended up heating to around 93 degrees! I decided to unscrew one of the bulbs and now it is around 82 degrees which I’m good with. However I think I did some damage at the higher temps last night because the starter looked really strange. It was almost all “foamy” with tiny, tiny bubbles throughout. I started it up again with a 1:1:1 feed this morning and hopefully it will get back on track.
The one piece of advice in this article that I have not seen elsewhere is to feed your starter at it’s peak or just barely after. Most have said to feed it X2 or X1 or X3 . I like the idea of feeding at peak. From here on out I will keep the temp between 72-80 by turning oven light on and off to regulate and will feed 100 grams of starter at peak with a 1:1:1 ratio of 50% bread flour and 50% whole wheat. Hopefully over the next week or two I end up with a starter that had big bubbles/air pockets and more than doubles in size in 6 to 12 hours. I don’t want to be stuck in this weird active but not strong enough scenario so many others are finding themselves in with no real cause to point to.
Oh, and one more thing (I realize this post is crazy long but I know it might help others reading this comment section) my starter has passed the float test since yesterday (day 7). There are a ton of tiny bubbles but still not strong enough with big bubbles and doubling or tripling like I hope it will.
My starter is now 17 days old and has not doubled in size even after feeding twice a day! Does not pass the float test either please help! Even started another and change the area where I placed it in hopes that would make a difference, it has not. Please help!!!!!!!!
Hi, Laura! Thanks a lot for this guide! I still have a couple of questions though 🙂
I made my starter about a month ago using 100g ww flour and 100 g water. As lots of recupes suggest I then started feeding it with ap flour but it wasn’t growing at all so I decided to switch to ww flour. When I started feeding it with ww, it immediately became bubbly and started growing and falling each day which made me very happy. However, it’s been a month and it still doesn’t double in size, it only grows about 1/2 of its volume in 7 h and then starts falling. It looks good, lots of bubbles, big and small, passes the float test, smells great, but just doesn’t grow as big… Do I just continue feeding it every 12h and wait? Or is there anything I can do to boost its growth? Do I need to feed it more often? Should I change the feeding ratio?
I also thought that since my starter is now alive and bubbly I might try make a levain that I would feed with ap flour and see if that works. So when I fed my ww starter I put half of it in a different jar and fed it 1:1 ap flour. It only grew a little bit, about 1/4 of its volume, could it be the change of flour that affected it? I’ve tried making starter with ap flour in the past and it just never worked… I live in Russia so I wonder if maybe russian flour is all bleached and that’s the reason, but it’s not indicated anywhere whether it’s bleached or not, so I don’t know. I heard about fruit water yeast starters, if I feed my starter with fermented fruit water, can I help it grow more? How will it affect my starter?
Hi Daria! Thanks for your comment and questions, they’re great and I’m happy to try to help – thanks for providing so many additional details about your situation and ingredients, etc. It’s immensely helpful when I’m trying to help people troubleshoot. Here are a few pointers:
1) I do wonder if the issues could be due to Russian all-purpose flour or just differences in flour to begin with. Every country’s everyday flour blends vary a lot. You definitely never want to use bleached flour for any type of sourdough starter, but I don’t think bleached flour is common or even allowed outside the United States. I’m not sure about this, and you might have to do some more digging. If you can’t get around this, the best option would be to use a combination of non-bleached all-purpose or whole wheat flour, as you said.
2) Ideally, it’s best not to constantly switch up the flours between feeds, because there can always be an adjustment period. I experience that as well, so it will usually take a solid number of feedings before things level out and you can have a better idea of how the starter is behaving on a certain flour. Try making an off-shoot levain with your bread flour, but give it more time (another week or so) of solid, regular feedings and see if that helps things.
3) You should feed the starter once it peaks – before it has fallen. Once the starter begins to fall, it’s the sign that the natural bacteria/yeast has run out of food for a decent amount of time. Allowing it to continuously peak and fall for extended periods (where it has collapsed and not been fed) will increase the acid load of the starter and create some consistency issues over time. If it’s peaking too early for your desired feeding schedule, you can change up the feeding ratio to slow the activity a bit.
4) A great blend of flour for feeding is 80% unbleached bread flour + 20% rye (or whole wheat flour) – not sure if your bread flour is bleached (that is extremely unusual and I wouldn’t suspect it is).
5) It really should double before you try baking it. You can certainly try baking with it before this, but the fact that it’s not rising more than that makes me concerns that it wouldn’t be abler to leaven dough enough.
Thank you for all the tips! I didn’t know that the starter should be fed when it peaks, I will definitely try this.
Love this blog!
So I started my starter about a week ago and it’s now doubling in size roughly 2 to 3 hours after I feed it. Is this too quick of a rise? It passes the float test and smells wonderful but I’m afraid that maybe something went wrong since it’s so active.
Hi Marcus! Thanks so much for the kind words. Sounds like you have a strong starter, but the time in which it will double will also be determined by your feeding ratio and the temperature that it is held at. If you feed 1:1:1 and it’s relatively strong/held a warm temperature, it will peak VERY fast!
So, it sounds like you should play with your feeding ratio, maybe try 1:4:4: or 1:5:5 (starter:flour:water, by weight) and that will slow down the activity, giving you a larger window between feeds and peaking.
If your starter is passing the float test and reliably doubling or tripling, you can start making bread!
Hi Laura,
I am on day 5 of my maiden sourdough starter journey =)
I live in Darwin, Australia and currently dealing with daily temps of anywhere between 31-35°C plus 70% humidity…
I am using unbleached white bread flour at a 1:1:1 ratio.
I had heaps of bubble activity on days 1-3, but now my starter seems to be very liquid on top and barely any bubbles… What would you recommend? Possibly storing in the fridge during the hottest part of the day?
Any advice is appreciated!! Thanks you!
Hi Nada, congrats! Your starter is still very, very young, so I wouldn’t stress too much about how it is behaving thus far. However, those are VERY hot temperatures to deal with and you might encounter issues (is that the temperature that the starter is being STORED at? it’s the ambient temperature that matters a lot!).
If it’s very liquidy, I would pour off and discard any liquid – stir well – and proceed with another feeding. You may need to do two feedings a day (or use much colder water) to help control things in your environment. Do not refrigerate the starter at this stage, it is just too young to do that at this point.
Hi – I am a complete novice and have just started making a sourdough starter. Should the container it’s in be completely air-tight/sealed? I’ve just fed it for the first time and don’t know whether to completely seal it, or allow for a little CO2 seepage? Any feedback would be much appreciated, thanks, Jade 🙂
I use a Weck jar, which comes with a glass top. It can be mostly sealed, but as long as its covered (so it doesn’t dry out), that’s the most important thing. I prefer to not have it be completely air-tight at the beginning when it’s being established, but most of the bacteria that you’re establishing is in the flour that you’re using, not in the literal air (that’s a bit of a myth), so it won’t matter much either way.
My starter is 2 months old doubling in 10-12 hour range, passes float test but still will not leaven bread. Any ideas on what I am doing wrong? I have tried three different recipes.
It should definitely leaven bread! Are you working with a cold kitchen? If so, you’ll need to extend your bulk fermentation time significantly. Stay patient and keep watching the dough for the right signs that it is well fermented!
My oven had fermentation function. Can I put my sour dough starter into oven m turn on fermentation function ?
Never heard of that function, it sounds more like a proofing option. Definitely an option, but I don’t know what the temperature is, so I can’t really offer any advice!
I have a 10 month old starter that I use regularly a few days ago I fed it and when ready I made my recipe. When it was time to divide and shape I noticed the dough had a strong sulphur smell. I fed the starter to try again and now 12 hours after feeding the starter smells the same, rotten eggs when stirred. Nothing has changed except I used a new batch of flour from the mill I get it from. Same type just different batch. What can I do? Is it salvagable? Please help
Hi Nicole! I’ve never heard of that type of smell – that is very strange. Are you noticing any type of mold or discoloration? If not, I think it’s fine, but have never heard anyone describe that type of smell before with a starter. Sounds like maybe there is some bad type of bacteria in there. Not necessary unsalvageable, but I would recommend switching to a completely new jar and using a different bag/brand of flour for several feedings to see if it improves or resolves itself.
Hello and thanks for the tips. I’m on my seventh starter, ready to give up. I have tried all purpose flour, bread flour and whole wheat flour. I’ve used the 1:1:1, 1:2:2 and 1:5:5 ratios. After the second day the starter no longer rises, it isn’t dead but it’s unlikely it will leaven the bread. I keep the starter in my cabinet up high, temp is between 75-80 degrees.
When I first began I was using cups to measure the first 2 starters, then I begun to measure using grams. Using cups the second day was like a bad science experiment that overflowed by jar, then the starter did nothing.
I’m wondering if I’m not feeding it enough, I don’t mean time intervals I mean enough flour. My last starter which I threw away this morning I would take 20 grams of the existing starter and add 100 grams of water and 100 grams of flour.
Thoughts?
I have been trying to grow a healthy starter for a LONG time. Like maybe two months! I’m in Denver, and I figure that we have less wild yeast in the air here, because of our dry climate. It is becoming discouraging! I have some activity, but I have never made it past the starter doubling in size. Usually it is less than that.
Today I began a new regimen – I am using 20-25% organic rye flour along with my wheat flour for feeding.
Do you have any other suggestions for me?
Hello, Thanks for this post! I saw on a youtube video, this guy saying we should taste the starter and if it is too sour then don’t use it as it will fight with the gluten. My starter is pretty sour as is… How do I fix this starter to make it less sour so I can bake with it? Or can you confirm that that is really true… to not use a starter that is too sour? Thanks!
Hi Laura,
Thanks for this post – I’m so excited to explore your website further, once I get this starter active! I’ve been doing a lot of guessing/checking…it seems like every site has a different “recipe.” It’s been a little over 2 weeks and my starter smells good and has small bubbles on the top, but just will not double! I think I may try feeding it with a 1:2:2 ratio for a few days and then a 1:3:3 and see if that helps. Then do I have to get it back to a 1:1:1 before I bake?
Thanks so much,
Julia
Hi. Started my starter yesterday with King’s Arthur Organic Whole Wheat at 1:1:1. Today, day 2, starter is very very active and is smelling very strongly and acid. Not at in a pleasant with notes of sour way. Anything wrong? Maybe my kitchen is too hot and humid? I’m in FL
My 2 month old starter is healthy, doubling or more at only 2-3 hrs then sliding down a bit, at room temp. I have plenty of discard for the week so at what stage can I just put it in the frig for a week? After I feed it and let it rise & peak, or do I feed it & put directly in frig? Thank you for your precise explanations, it has been very helpful.
Hi,
I have a two week old starter that ONLY rises in a warm (~90°) oven. At room temperature (75°-77°) it might rise 25-30% After 12 hours. I refuse to keep my oven on all day just to make it happy. I saw in a couple comments above you said to feed it at its peek?? Do you think this will make it more happy and active? Thanks for any tips.
Hi Andrea! Your starter is still relatively young – and it sounds a bit sluggish based on your description. There is no such thing as a starter that will only be active in 90F temps (that is actually very warm, and I don’t recommend holding a starter or dough at that warm of a temperature ever, because it is hard to control and manage).
Your starter will always rise more slowly at cool temperatures, which just means that if you’re keeping it at room temperature, it will need more time to reach peak activity. Peak activity means that the starter has run out of food, and you’ll start to see a flattening of the surface and it will not expand/grow any more – that is when I feed my starter – and regardless of what temperature you keep it at, you still want to follow that guideline. The time it takes will vary based on the temperature, hope that makes sense.
However, if your starter is only increasing 20%-30% and that is it’s “peak” – it just means you need to continue to build up its activity and get it stronger before baking. Use as slightly warmer water (90F) with feedings, hold it at 75-78F (ideal environment), and use some whole grain flours (which will help increase activity). Hope this helps!
Hi, thanks for the post! My starter is 8 days old and is doubling in size within 4-6 hours after feeding but it’s not passing the float test. Does that mean it’s still not strong enough and I should just continue with the feeding schedule?
Thank you!!
Hi I also have the same problem I keep the starter in fridge, I took it out to feed it , it’s more than doubling in volume but not passing float test. I had used this before I usually take it out feed it keep it overnight on my counter it used to work. How do I fix this?
My starter rises (doubling in 10 hrs or so), but there are hardly any bubbles to be seen, and they’re really tiny. The starter passes the float test, but baked bread does not rise very much. What’s going on? Thanks.
Hi Kaaren, I have this exact same issue and have been scouring the internet for an answer, but I have not had any luck, have you?
Thank you
Judy
Laura, my starter doubled and floated. Good bulk fermentation,rise. Proofed for 2 hr with dent tesr,shaping OK. Loaf didn’t get much oven spring, no ears and gummy crumb.
Any thoughts for my next bake ? Gwen
It sounds like an under proofing issue, but I would need more details about the crumb to know. Potentially related to your temperature – there is no set bulk fermentation time, so 2 hours proof doesn’t really mean anything or help give me an idea, total bulk fermentation time is all dependent on your ambient temperature and other variables – I only am able give a rough estimate based on one specific temperature in my recipe).
I recommend reading this troubleshooting post and watching my full Youtube video for visuals to maybe given an indication of where things might have gone wrong.
Hope this helps!
My starter seems to be a bit of a dud after four days. Just small bubbles. But my question is about whether I should be cleaning my jar at the feedings. All the photos I see of starters have a nice batch of starter at the bottom of a very clean glass jar. I’m probably doing something wrong, but I don’t see how it’s possible to pour out this stuff and then add more flour/water and stir without coating the inside of the glass. For that matter, I don’t see how anyone can precisely measure out, say, 113g of flour and water, when there’s always extra sticking to the jar, spoons and whatever bowl is being used.
Four days is very young and it is normal not to see much activity at that stage. As I’ve mentioned, it usually takes up to 2 weeks for the starter to become reliably active and produce decent activity.
If you want, you can transfer your starter to a new jar once it becomes reliably strong (I like to do this pretty often sometimes because the jar will inevitably get kind of messy – it isn’t necessary, it’s just my personal preference and that is also why I can maintain a very accurate amount of carry over) – but definitely scrape down the side of the jar after each feeding.
The way that you can precisely measure it out is by measuring your vessel (without any starter), seeing its weight once you’ve removed your discard, and then taring the container with your scale. Taring is how you know exactly how much you’re adding.
Hello! This post was really knowledgeable ?
I recently started with my sourdough starter. Day 1 ans day 2 i fed it once . Day 3,4 and 5 I fed it twice. And day 6 and 7 I fed it thrice. The temp here is arounf 38-40 degrees. I am not following specific time but feeding it when i feel that it’s beginning to fall after reaching its peak.
Is this the right thing to do or should I wait for the fixed time of the day to feed it..
My starter is doubling in size since the 2nd day itself. But post day 7 it is but still hasn’t passed the float test.
Really not understanding what should be done?
Your suggestion would be of great help! Thanks ♥️
Hi! Yes, my starter maintenance preference is to ALWAYS feed your starter when it reaches peak activity (not some arbitrary schedule) – this will lend itself to maintaining a very healthy, strong starter.
It sounds like you’re working with extremely hot temperatures, so you’ll need to be very careful with it as it will have the tendency to peak and fall very quickly if it’s strong. You can change the ratio to slow it down, use cold water for feedings, or find a cooler area of your home to store it in.
Float tests aren’t necessarily fool proof, because if you’re using different flours to feed your starter, the density of the starter will be different. As long as the starter is doubling in volume in roughly 8 hours or so (or faster), it *usually* is strong enough to leaven bread. However, you really won’t know for sure until you try baking a loaf!
Thank you soooo soo much ! This makes me more confident about the whole process ♥️?
Hi Laura
Thanks so much for the post.
I’ve tried twice with my sourdough starter. The first wasn’t very active and wouldn’t float, and the second just became completely inactive after around day 4. I ended up throwing it away on day 7 because it hadn’t moved, even when housed in an warmer cupboard. (The cupboard was dark though. Is that a problem? A couple of people have mentioned oven with light on…)
You can see some pics of my attempted starter on Instagram @rosalindskitchen
I’m very confused as I’m following instructions pretty closely!
I was using 115g tap water to 100g strong unbleached bread flour for the feeds and I was keeping 70g I’d started each time.
You mentioned don’t feed it before or after the rise?
Perhaps also some rye flour would help?
If you had any insight or suggestions they would be most helpful as I muster the energy to try again!
Thank you! Rosalind x
Hi Laura,
Thanks for the lovely post – you’ve explained things really clearly!
My starter is pretty young and slow, so I want to continue feeding its ready. Based on your post, is it correct that I can I scale back to a smaller amount of starter, flour and water at each feeding to limit waste even during this “maturation” period (Ex: 20g starter to 20g flour and 20g water)?
Absolutely!! You can always scale down the total quantity (at any time), just be sure that you’re using the same ratio for the starter, flour, and water in those feedings (1:1:1, for example) if you want it to continue to maintain a similar feeding schedule as to what you have now. Hope this helps clarify! If you have any follow up questions, don’t hesitate to ask.
Thanks for the fast response Laura 🙂 One more question – my starter looks rather stiff and dry, even towards its peak (currently being fed with white rye flour, all I could get a hold of asides from All purpose). Is this normal?
Hi Laura. I am on my attempt two at sourdough starter journey (whole wheat). Its currently day 7 already but the starter doesnt seem to be quite ready yet. After the initial burst of activity till day 3 with 24hrs (1:1:1) feed regime, the starter barely showed any bubbles when i switched to 12 hourly feed. On moving back to 24hrs feed on day 6, i could finally see the bubbles again and the starter rising by 25% of its mark. I am little skeptical now on how should i proceed next.
That is still a very young starter, so just stay with it! Also, be sure not to feed it if it is not at peak activity – I’m not sure if you switched to 12 hour feeds because you increased the amount of starter in each feed or just because? It took my starter a good 2+ weeks to get fully active and double. Just continue as is and be sure that you’re feeding the starter when it hits peak (not before and not after it has fallen). If your kitchen is very cool, try to place it in a warmer spot. It will strengthen over time.
Hi Laura, thanks for your insights. I wanted to update you that after two days of switching back to 24hrs feed, my starter began to double up within 12 hrs. While there wasnt a fall noticed, taking the rise as a cue, i have started feeding the starter every 12hrs now.
Hi there – do you have any recommendations specifically for gluten free sourdough resources?
Thanks so much
Hi Andi,
I haven’t tried these myself, but I know Traci of Vanilla and Bean blog has a gluten free sourdough starter guide, and King Arthur Flour does as well. It is very different, so would probably require a lot more additional research, but I’ve heard it can work quite well. Hope this helps!
Laura
Hi! Thank you for this post, it is wonderful! My starter is 23 days old, and is finally rising consistently. Feeding schedule is 10g starter: 20g H2O: 20g WW flour every 12 hours. My question is what should the consistency of my starter be? It is definitely not pour-able, I have to spoon it out of the jar. Should I adjust the feeding to create a less viscous starter or is high viscosity okay? Thinking I will start with waffles or pancakes before I try bread, but curious if high viscosity is a problem when is comes to baking/ if I am doing something wrong? Thanks for your help!
Hi Dana! So happy to hear that it’s helpful. So, I would consider your starter still pretty young if it takes about 12 hours to peak using a 1:2:2 ratio (10 grams starter, 20 grams water, 20 grams flour) using whole wheat flour. Temperature is really important too, so I don’t know that variable, but I’m assuming your kitchen is around 70-72F?
You have a 100% hydration starter (equal parts water and flour at each feeding), which is common and I would recommend sticking with that. The texture should change from when you first feed it (thicker) to when it peaks in activity (airy and active, and not quite as thick), so viscosity is not quite that simple. If it peaks and falls for a long time, it will become very soupy. You might want to watch my YouTube video for more visuals as to what my starter looks like at peak: https://www.youtube.com/watch?v=KkulM98briI
If it’s doubling or more in that time span, you *could* try baking with it, but I would personally build up its strength more.
Yep! I would definitely recommend using the discard for a recipe like that as you continue to build up its strength. If you need more help, feel free to send me pictures at laura@abeautifulplate. It’s hard for me to judge how a starter is behaving without some visuals.