A Kitchen Tour: One Year Later
It’s been just over a year since we wrapped up our kitchen renovation. If you follow me on Instagram, you’ve likely seen snippets of the space—but if not, welcome!
I originally intended to share this tour sooner, but there was an unintended (and very useful) perk to holding off. After cooking hundreds of meals here, I’ve deeply familiarized myself with every choice we made. Because of that, I can firmly stand behind my recommendations.
I’m beyond grateful to work here every day, and I’m excited to finally share the tour, along with sources, details, and major takeaways from our project.
The Before and the ‘Why’ Behind the Renovation:
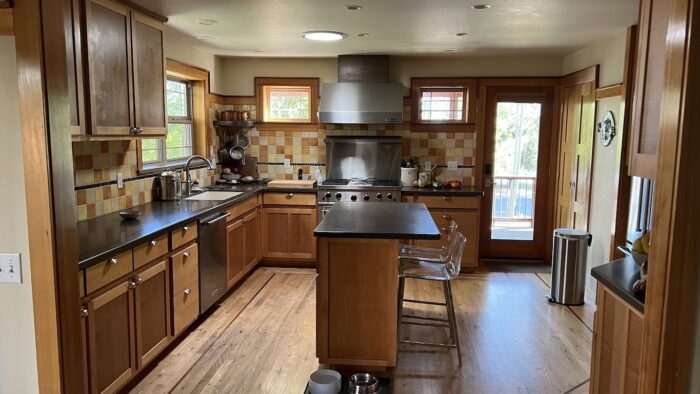
Our original kitchen was hard-working and the layout was actually quite good, but several major factors ultimately prompted the renovation:
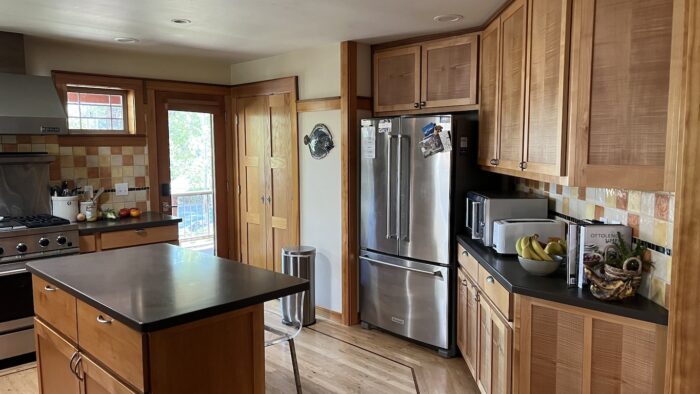
- Aesthetics: While charming, the space was dominated by yellow and orange tile—which unfortunately are my least favorite colors.
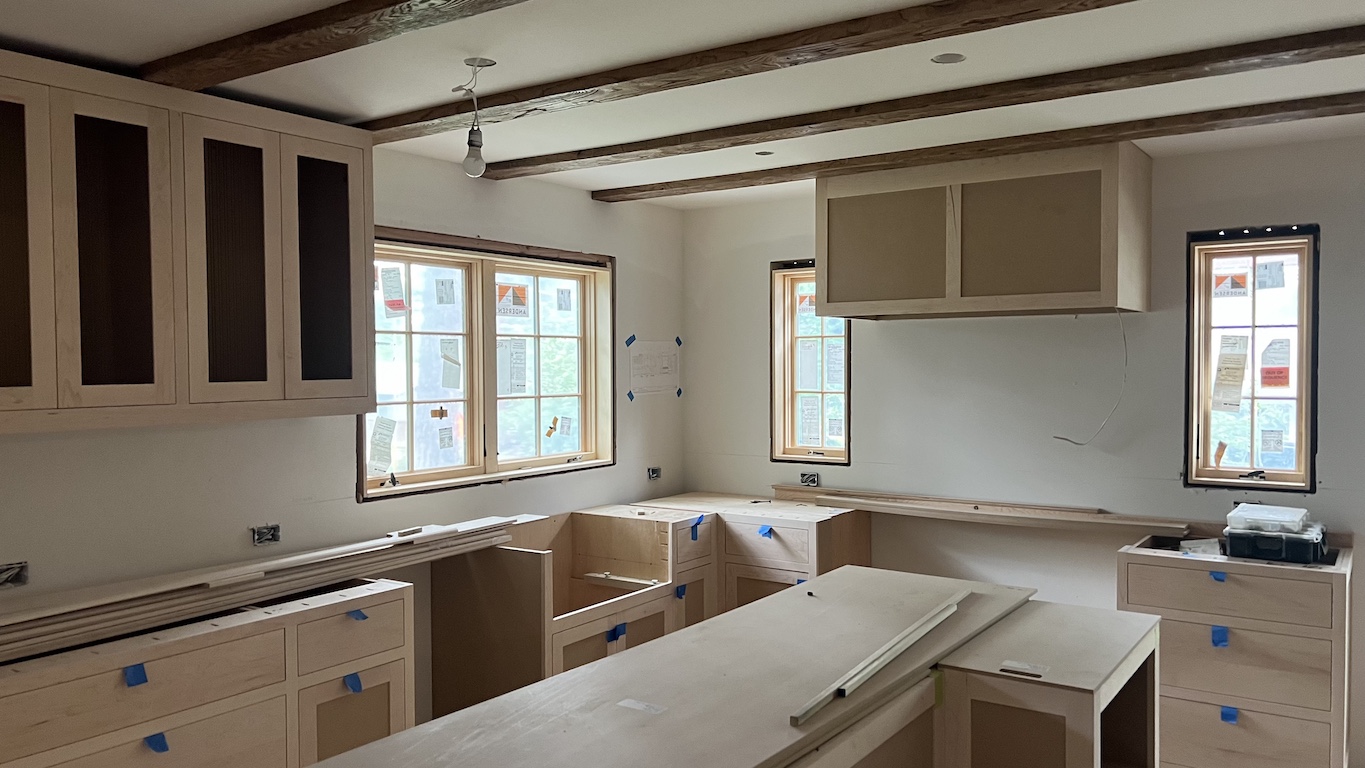
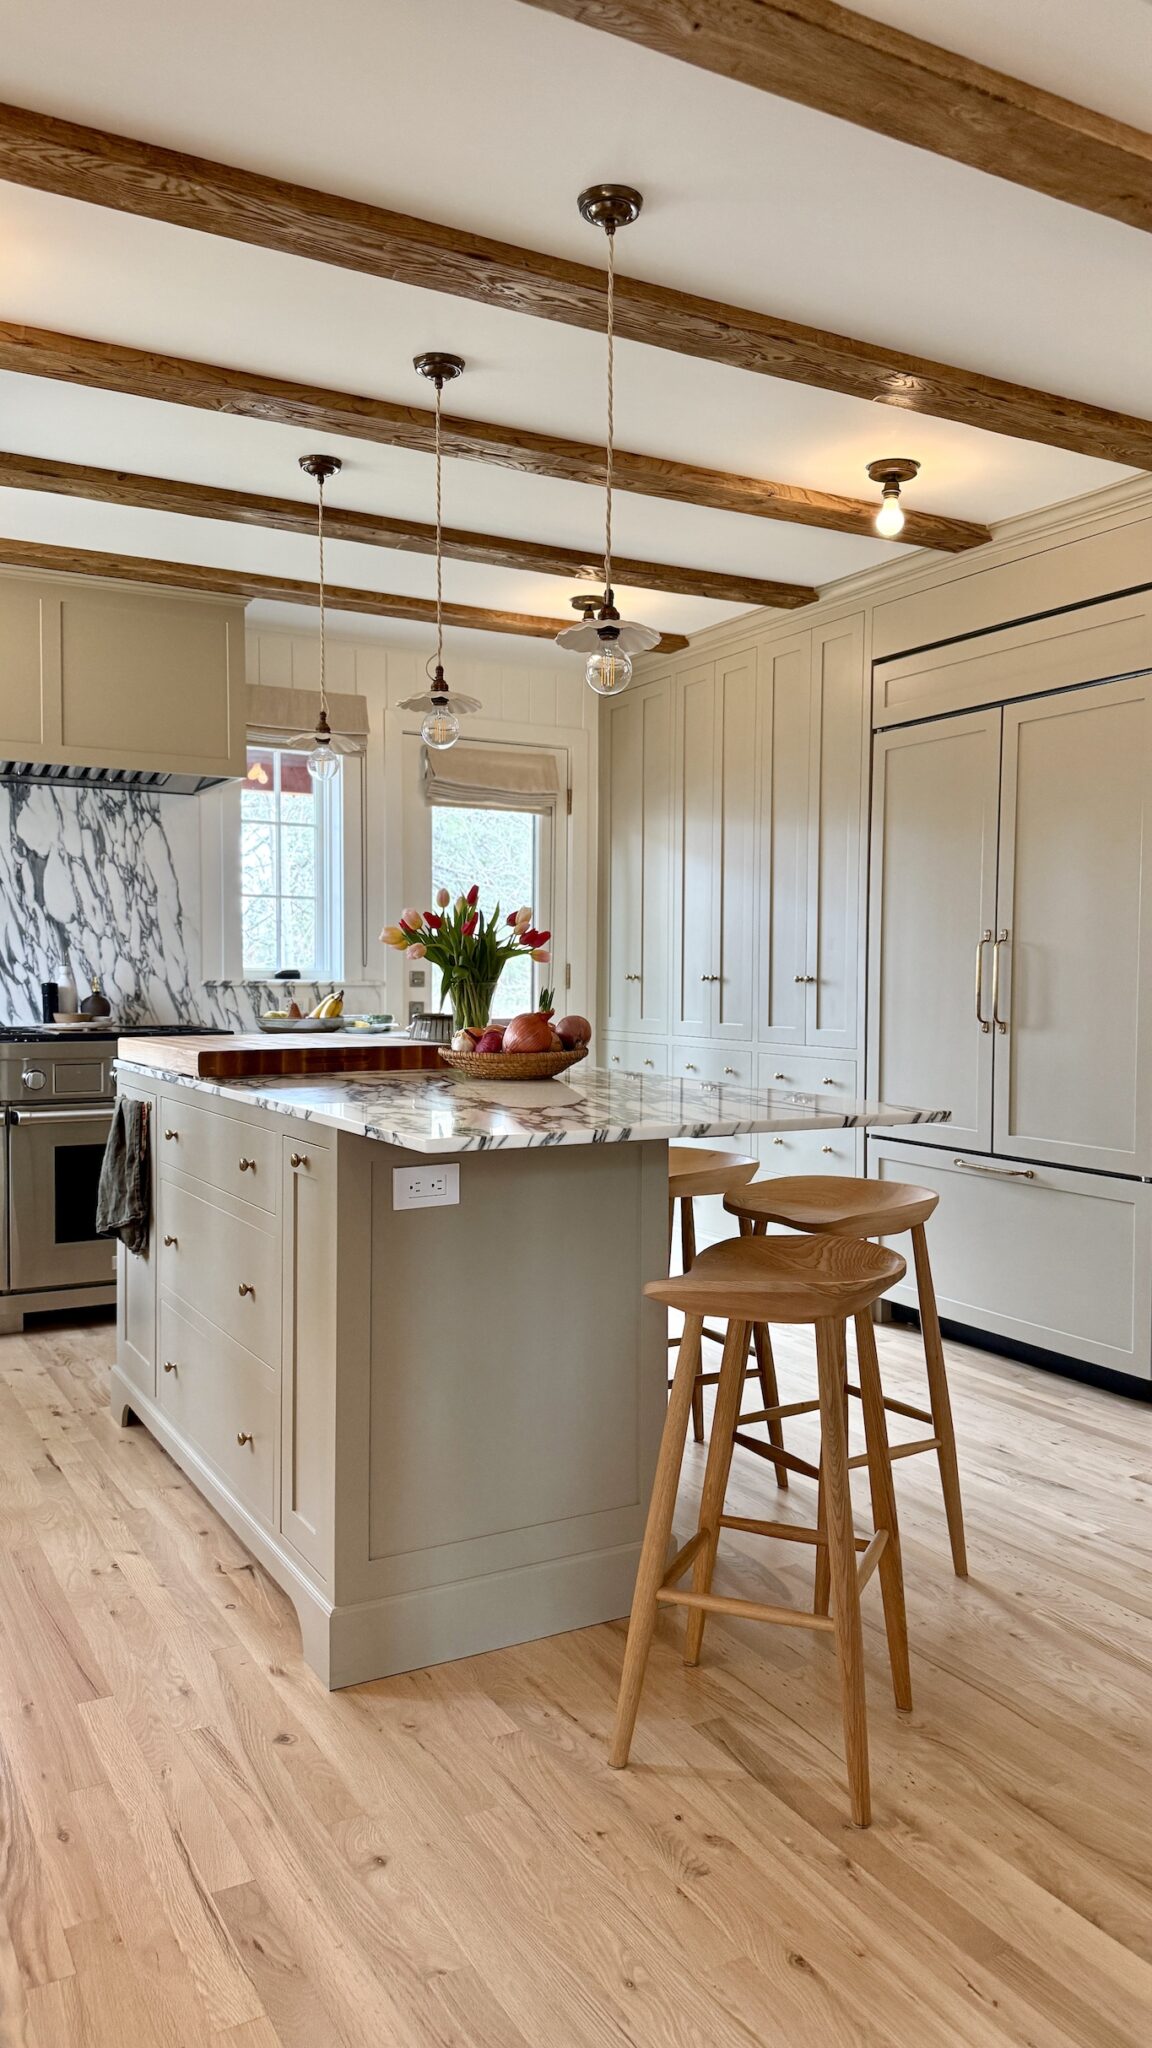
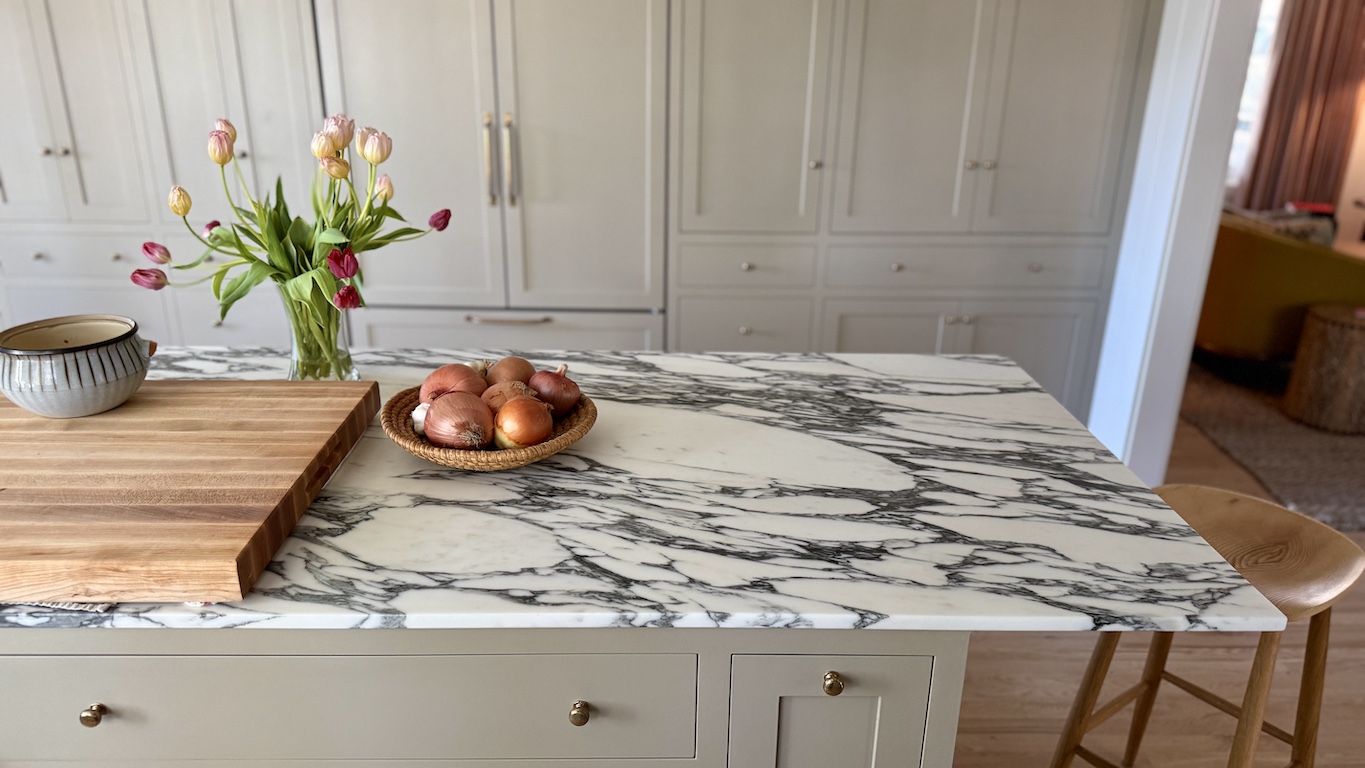
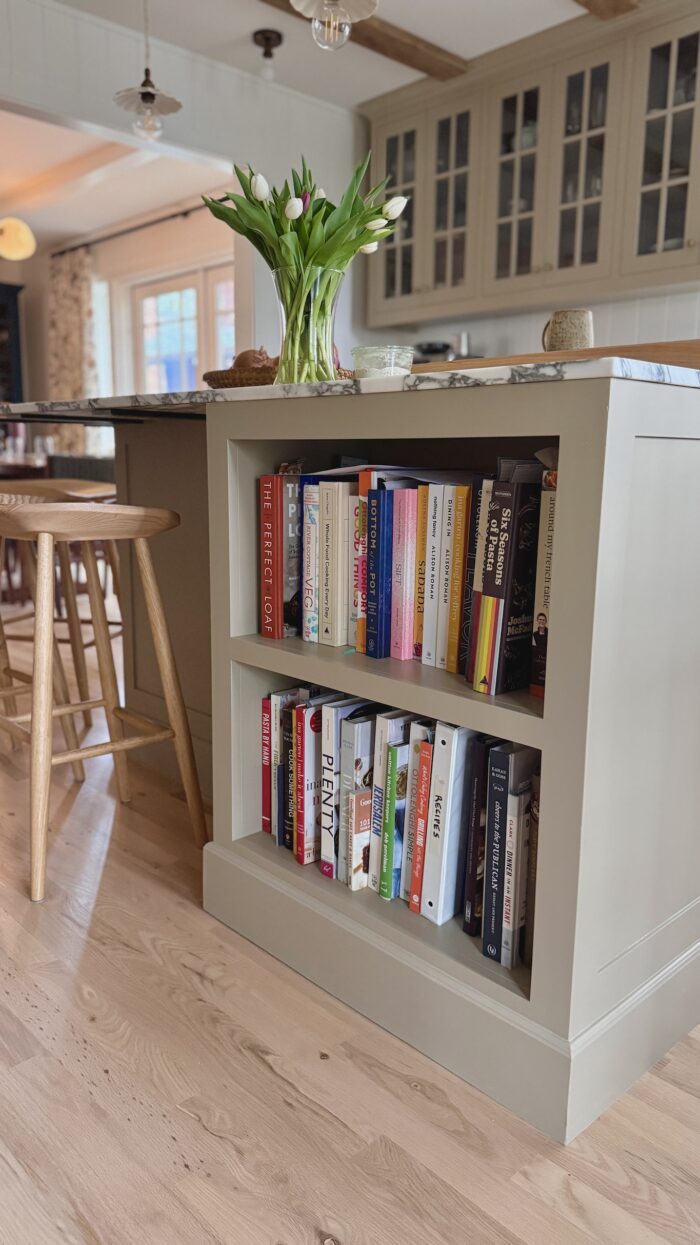
- Layout: An odd 45-degree angled wall on one side limited our island size and created an awkward flow into our living room. Squaring the room off added significant space and completely transformed the adjacent spaces. We were able to add in a much larger island (36” x 78”) and create more room for seating.
- Flooring: We knew the hardwood floors throughout the main level desperately needed to be refinished, which is a major undertaking on its own. Once we changed the layout of the space, we removed the inlay and weaved new wood into the existing.
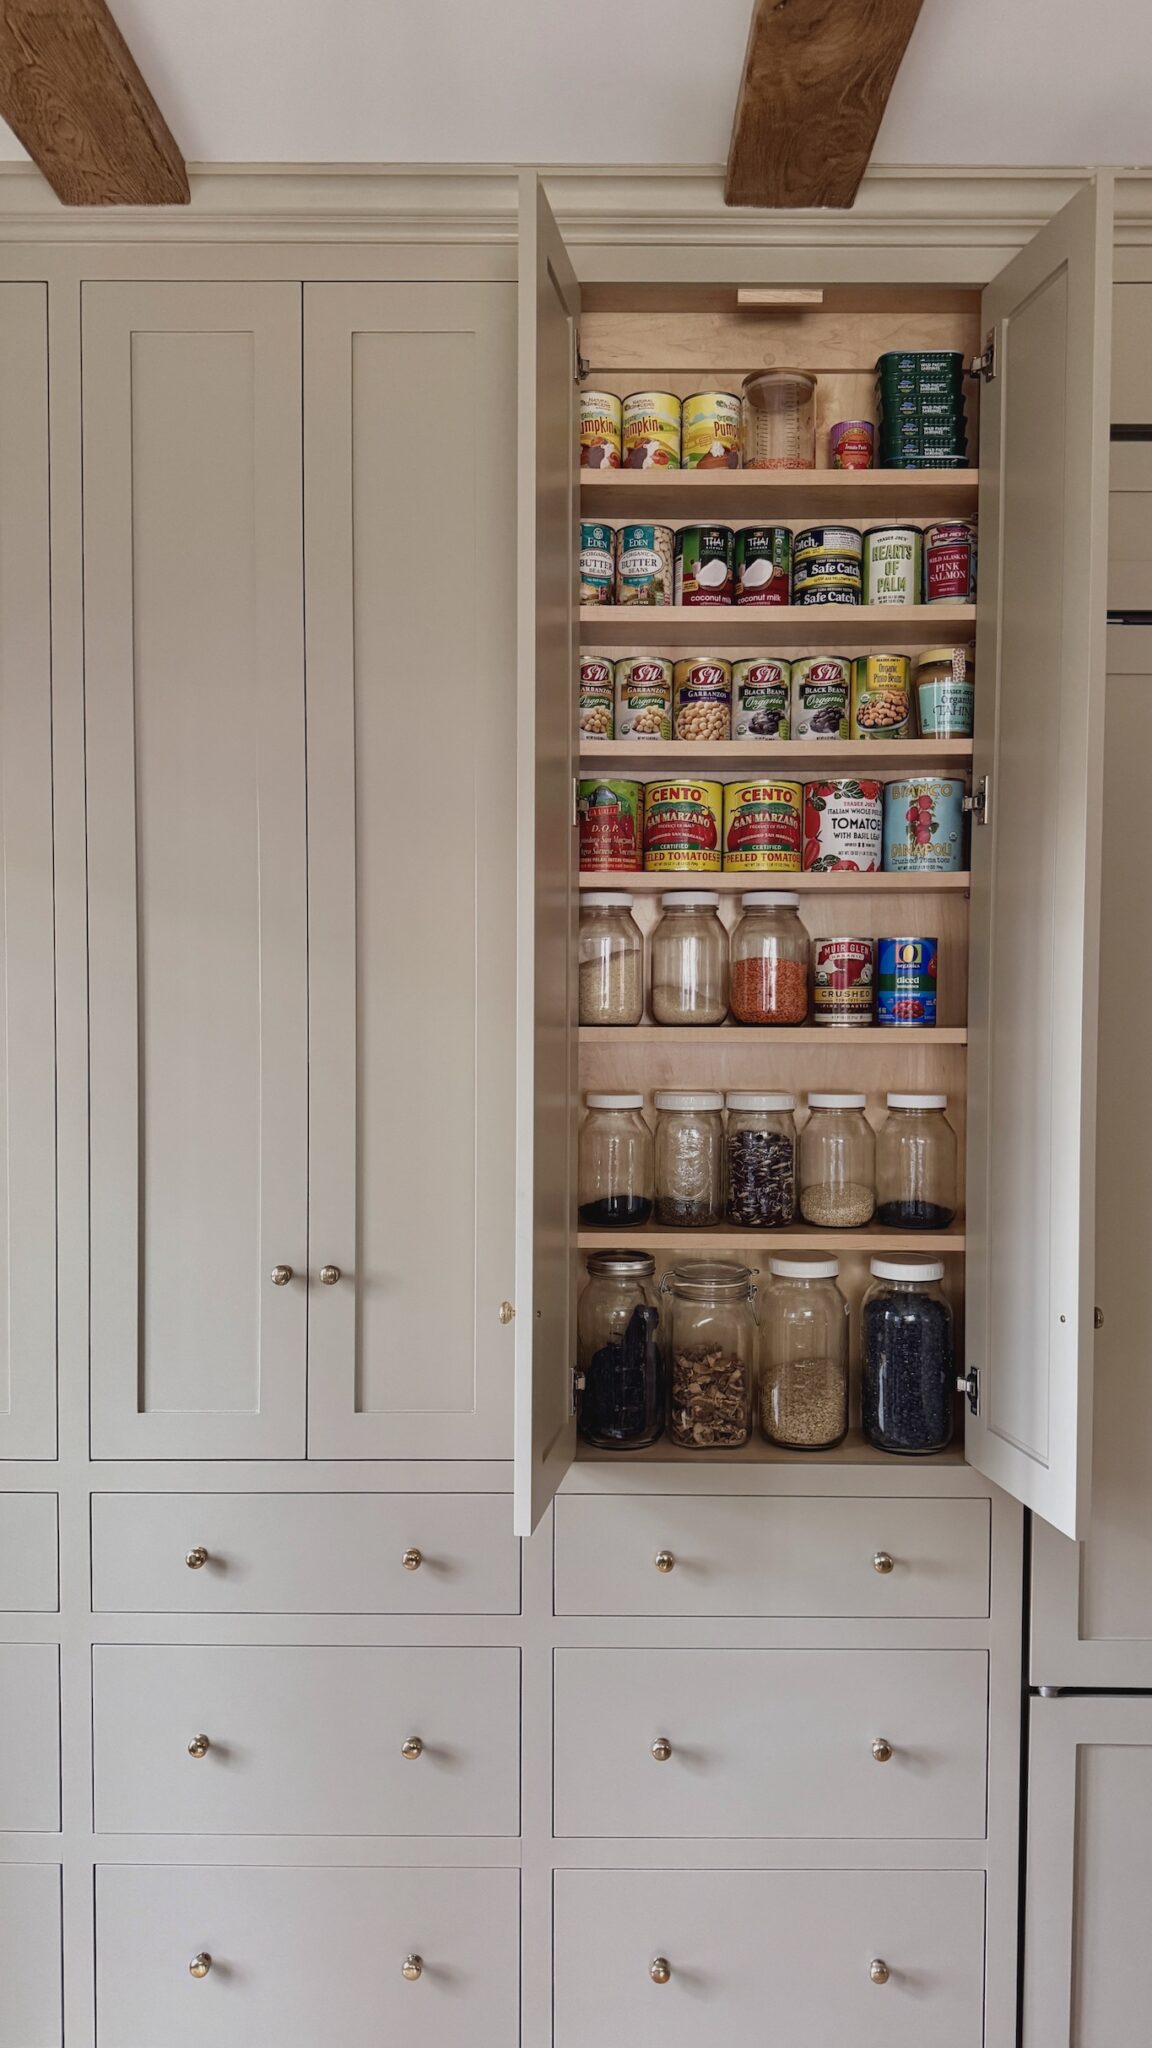
- Functionality: While the storage was solid, we knew it could be improved. There were also several “small” but critical missing elements—like a lack of outlets on the island and not enough dedicated circuits for high-powered appliances.
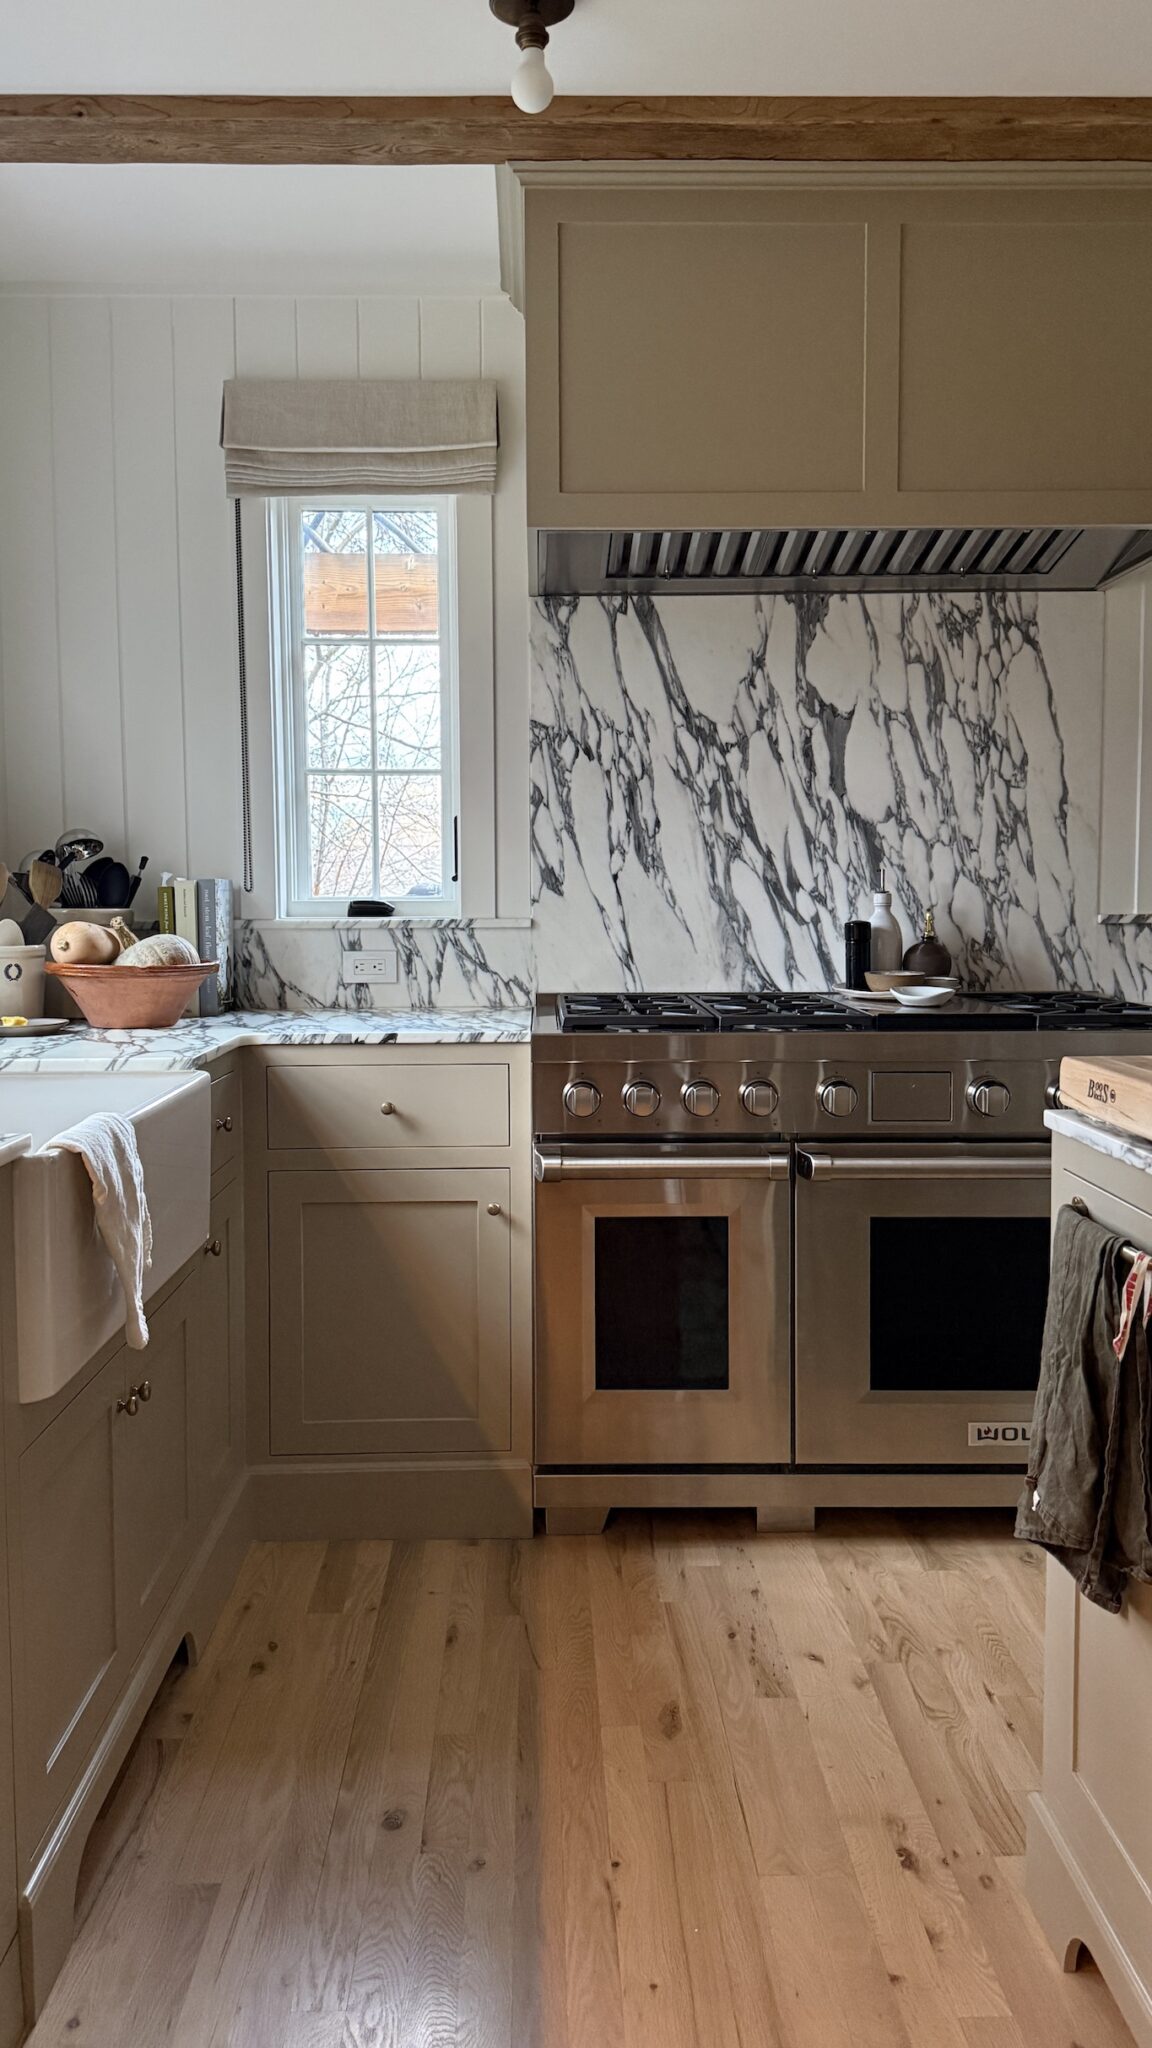
- Appliances: The existing range was half-broken with no replacement parts available due to its age, and if replacement was necessary, my dream goal was a wider range with two ovens.
- Light: We really wanted to bring in more natural light through new, larger windows. This ended up making such a massive difference in the overall feel of the home.
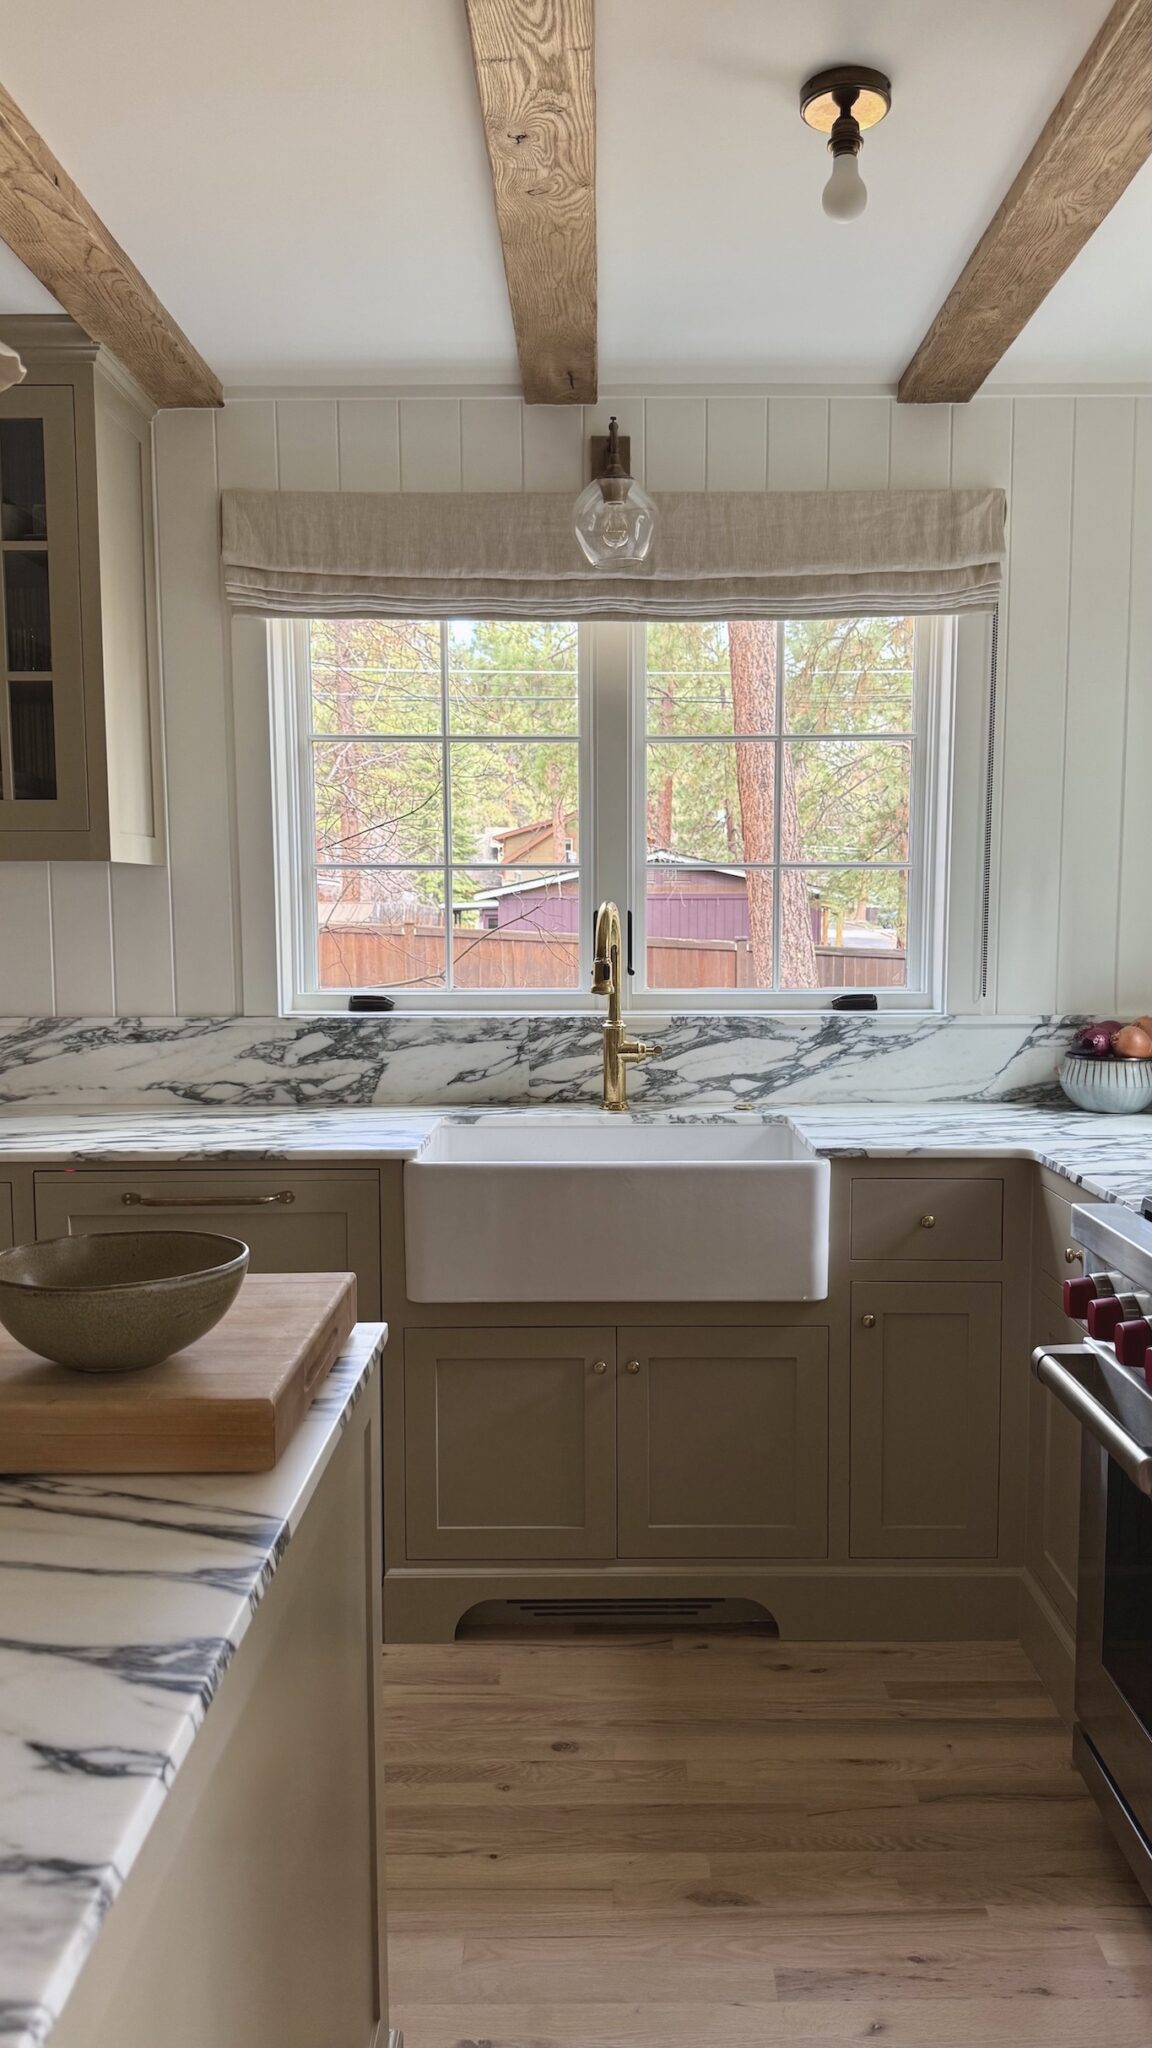
Once we decided to embark on the renovation, I immediately knew my goal was a very classic, English-style kitchen. I am very drawn to the design philosophies of brands like deVOL and Plain English. I was interested in some bold elements (eg. veined marble), but my goal was to create a timeless kitchen.
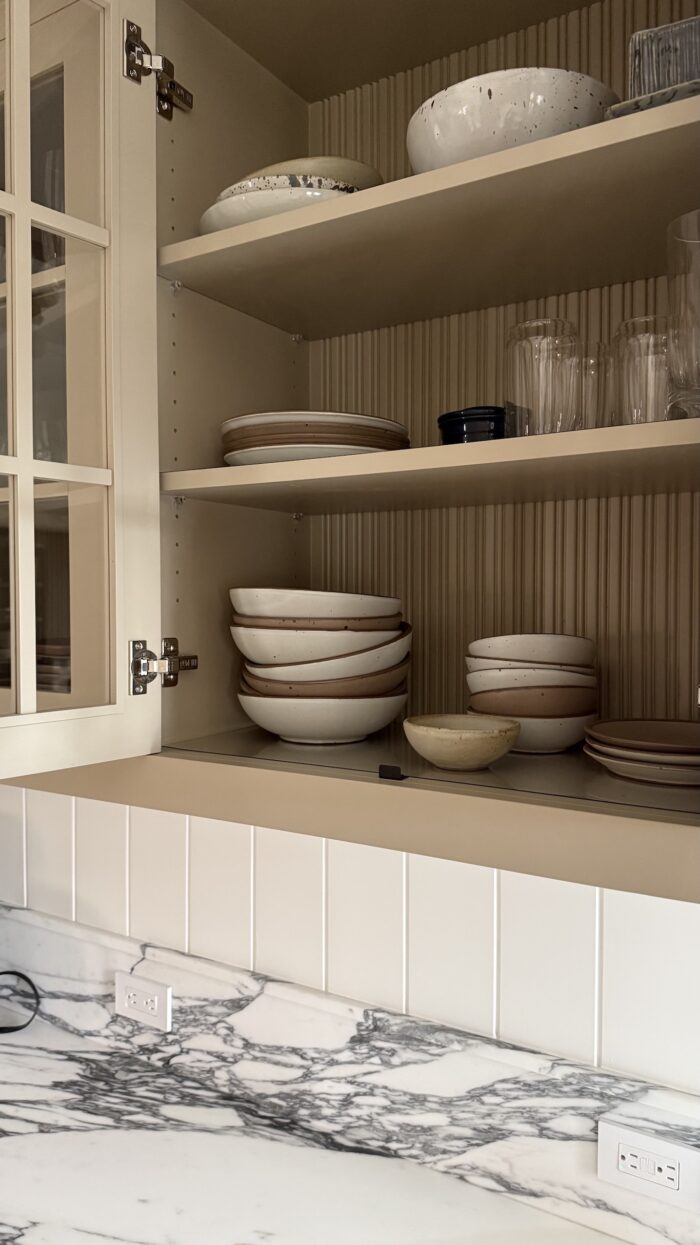
We focused on bringing in materials that could bring much needed character and depth to the space: natural stone, glass upper cabinets, tongue-and-groove paneling, unlacquered brass, and wood beams (one of my favorite elements!).
The After: Renovation Lessons and Take-Aways:
The new space is so much brighter, and somehow, the ceilings feel significantly taller than they did before—even though we have very short ceilings (just under 8 feet). It really was a massive transformation, and we are so happy with how it all turned out.
I won’t lie: a gut kitchen renovation is a very disruptive and big undertaking. Ours was part of a much larger home project, so the entire process was very long and undeniably stressful. Looking back, I can honestly say it was worth the stress—though I’d prefer not to do it again for a very long time (if ever).
As someone who deeply values functionality, I am grateful that this space works exactly as I’d hoped it would. It’s a beautiful and cozy place to cook, but it’s also highly intentional. I wrestled and overthought every decision to make sure my daily tasks here feel as efficient and frictionless as possible.
I attribute this to four key things:
- Patience: We took our time with every aspect of this project. We lived in the original kitchen, really learning what we needed before even contemplating any changes, let alone a full renovation. This required an enormous amount of delayed gratification. Some of this was forced—contractor waitlists and long lead times—but I am deeply grateful we didn’t rush or make concessions just to finish “quickly” or do a quick flip. Renovation construction is a blip in the grand scheme of the time you will actually live in your home, especially if you consider it your “forever” home – famous last words, I know, but true.
- Planning: We spent months and months poring over details before a single hammer was swung. Working with an established local builder, skilled subcontractors, and an interior designer meant we had detailed floor plans and schedules for every last thing—down to the exact hardware and lighting locations. In my experience, the more specialized people you have on your team, the fewer mistakes will happen. They all bring different skills and mindsets to the table: an interior designer is an expert on layering lighting, materials, and scale—elements that builders and subcontractors might easily overlook. Conversely, tradespeople excel at the logistics: scheduling timelines, installation specifics, and the practical “mess of reality,” like knowing exactly where an outlet can or cannot go according to code. Having both perspectives is extremely helpful. You will still have to juggle an enormous mental load, but having a team you trust allows you to bounce ideas off different experts, which reduces decision fatigue significantly.
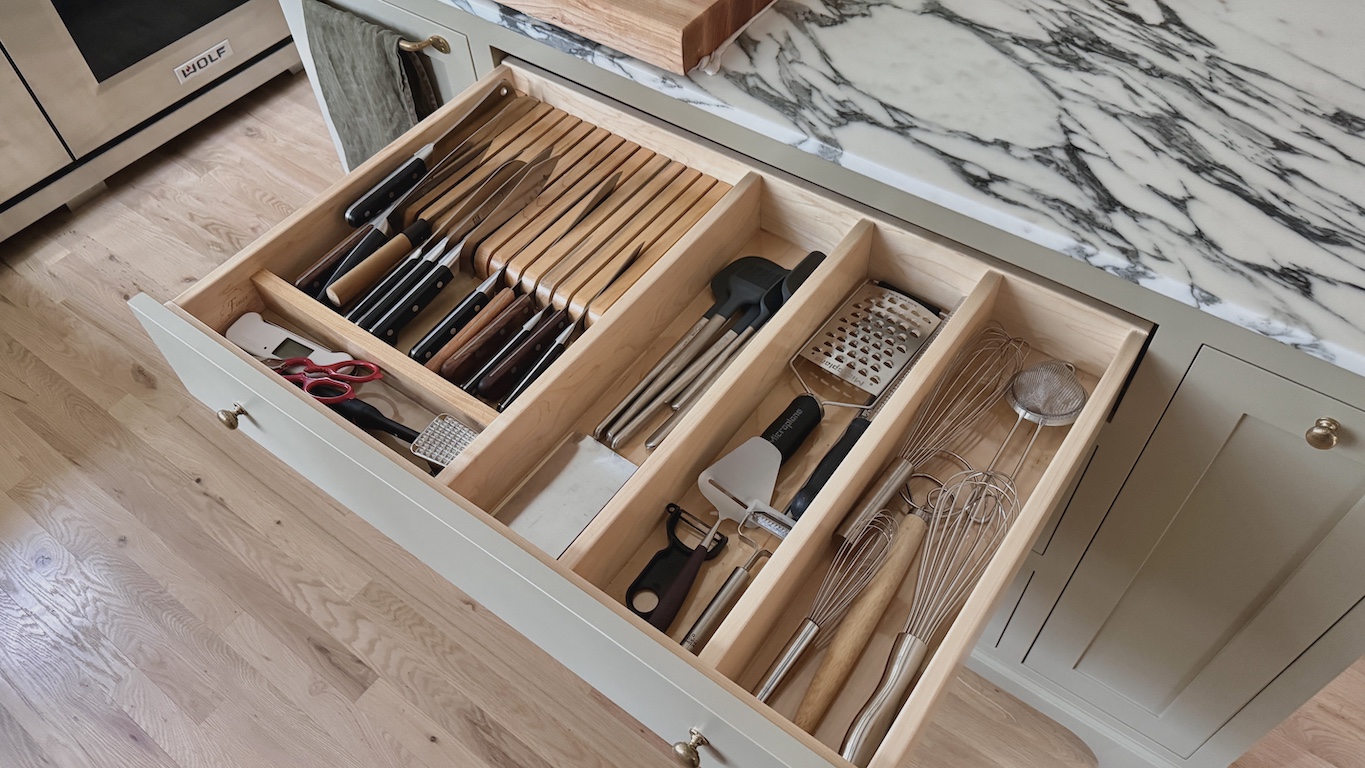
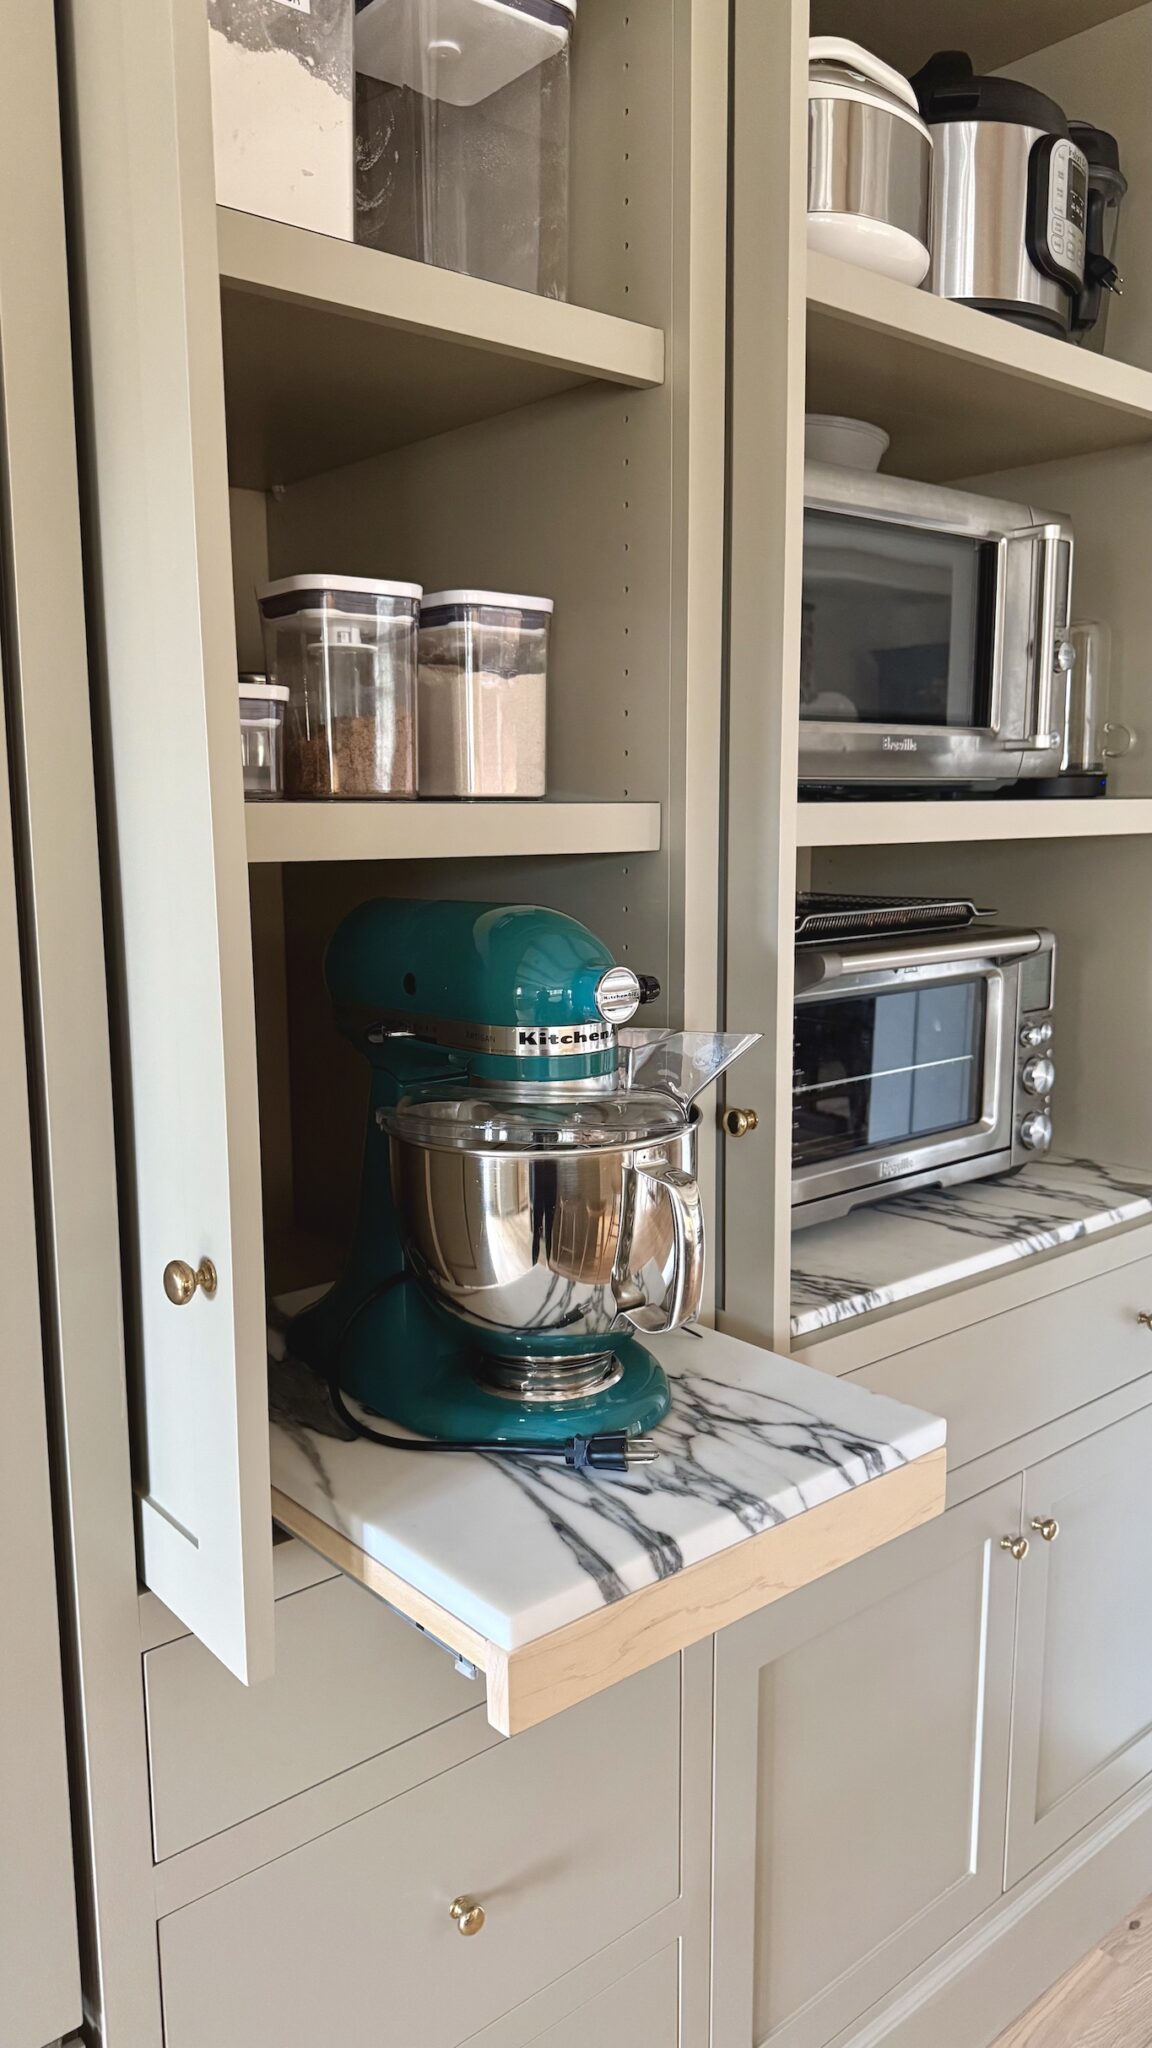
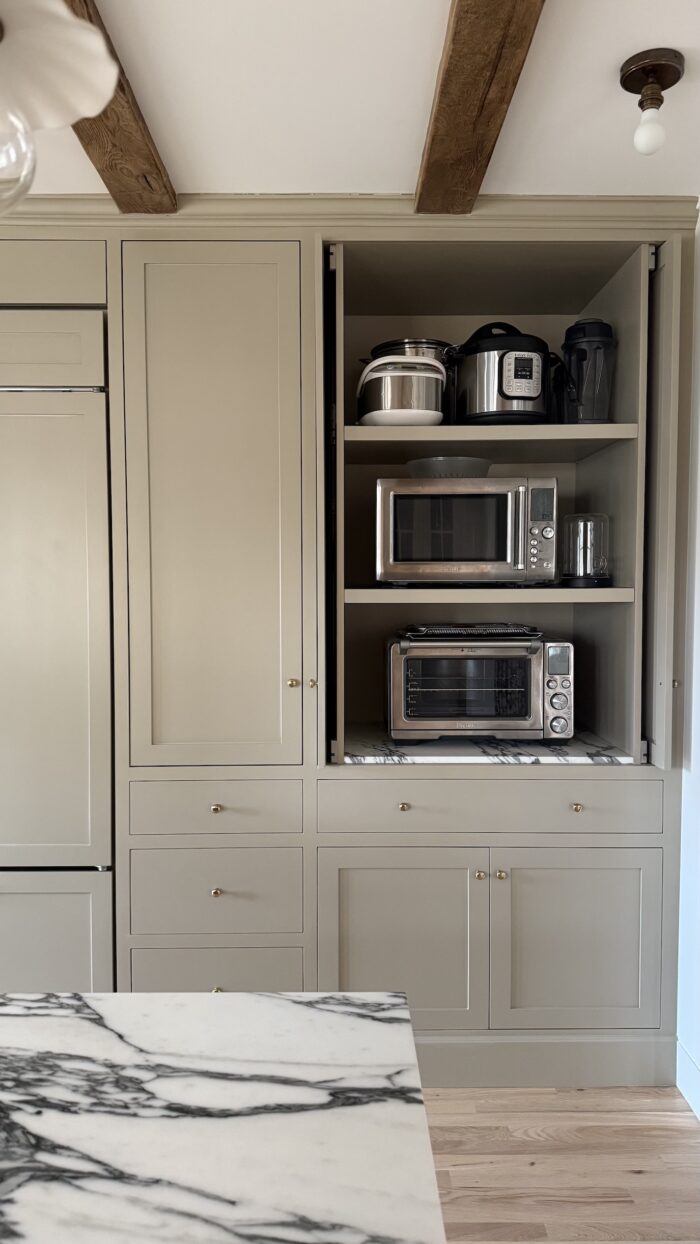
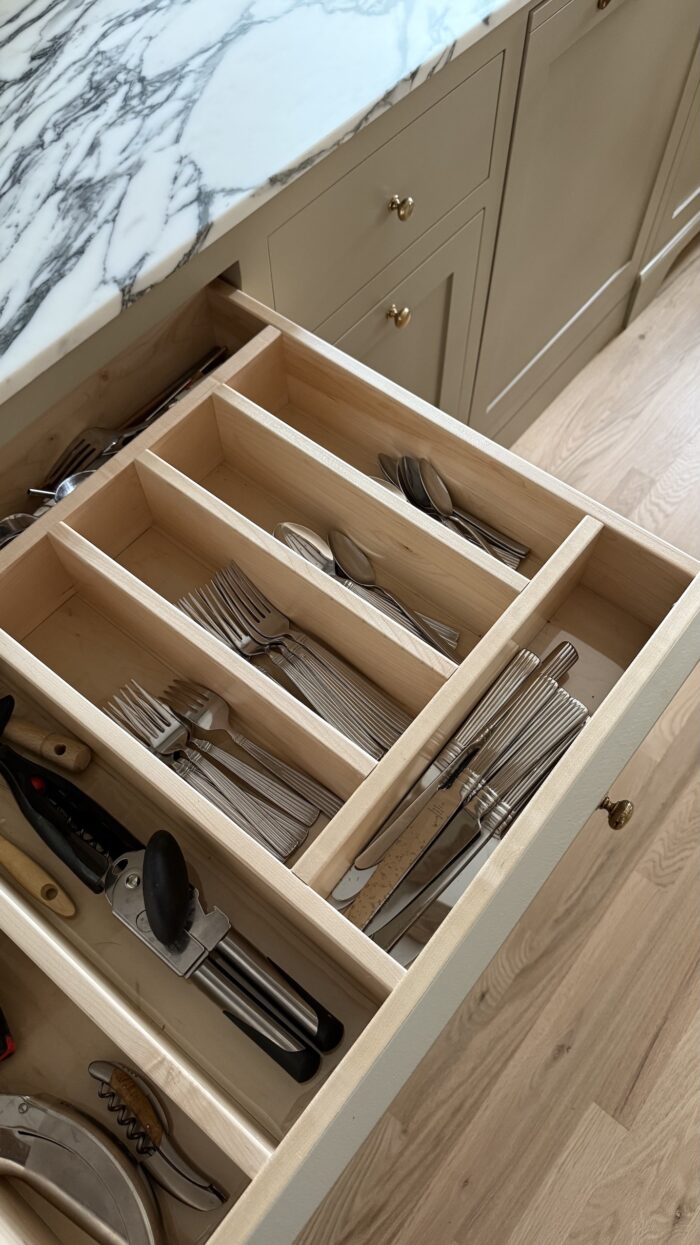
- Oversight (aka. Micro-Management): Staying deeply involved in the day-to-day management was rarely “fun”, but I’m grateful I was able to do so and I do think it was critical for the end result. The simple truth is that no one will care or think about the tiny details as much as you, the homeowner. Even with the most meticulous plans, an enormous number of last-minute decisions will arise that simply cannot be foreseen. You can certainly allow other people to make those choices for you, but they aren’t the ones who have to live with the results every single day. I’m an over-thinker by nature, and while that trait led to an enormous amount of stress during the renovation – I will say, it actually paid off for once in my life? One area I absolutely pored over was the cabinetry and how it would work best with my kitchen equipment and tools. We were lucky to work with an excellent local custom cabinetry team, but I spent a lot of energy and time reviewing every last detail—pocket doors to hide appliances, drawer widths, custom insert details, toe kicks, and upper cabinetry depths. If you are choosing cabinetry inserts, I strongly recommend seeing them in person before making a final selection; some look or sound great in theory, but are very clunky to use (ie. those skinny Rev-a-Shelf spice pull-outs, for example).
- Instinct: One of the hardest parts of this process was learning to hold my ground on the functional and aesthetic choices that mattered most to us. Throughout the process, I was frequently advised against certain decisions by various subcontractors—usually because it wasn’t “popular,” it was more complicated, it would be more expensive, or it simply wasn’t the standard material they were used to. My advice? Do not budge on the things that are most important to you. Often, these biases are less about the merits of the idea (especially if other parties, such as interior designers, stand behind them) and more about the fact that subcontractors and other tradespeople generally prefer doing things the way they are used to or most comfortable. That said, it’s just as important to learn when to trust a skilled tradesman over a visionary when it truly matters. Listen to their advice, do your own research, and come to a decision that you are ultimately comfortable with.
Kitchen Sources: Paint, Hardware, Fixtures & Other Details
- Cabinet Paint Color: Portola French Beige (Satin Enamel). It’s a warm khaki with subtle green undertones that feels incredibly dynamic throughout the day. I strongly, strongly recommend getting paint samples from your cabinetry or painting crew. If you’re using specialized or less familiar brands like Portola (Farrow & Ball is another example), the application and curing process can behave differently than the standard brands most subcontractors are used to.
- Cabinet Style: We chose inset cabinetry (classic Shaker doors) with a furniture base. I’ve always loved traditional English kitchens with these features. Not having a standard toe kick in most areas of the kitchen hasn’t created any comfort issues, despite several subcontractors trying to dissuade me from doing this. However, in front of major work areas, specifically the island and sink, we added arched toe kicks. For drawers that hold heavy cookware, our cabinetry team used heavy-duty glides and bases to accommodate the extra weight. Thinking about where you plan to store things is critical prior to finalizing cabinetry!
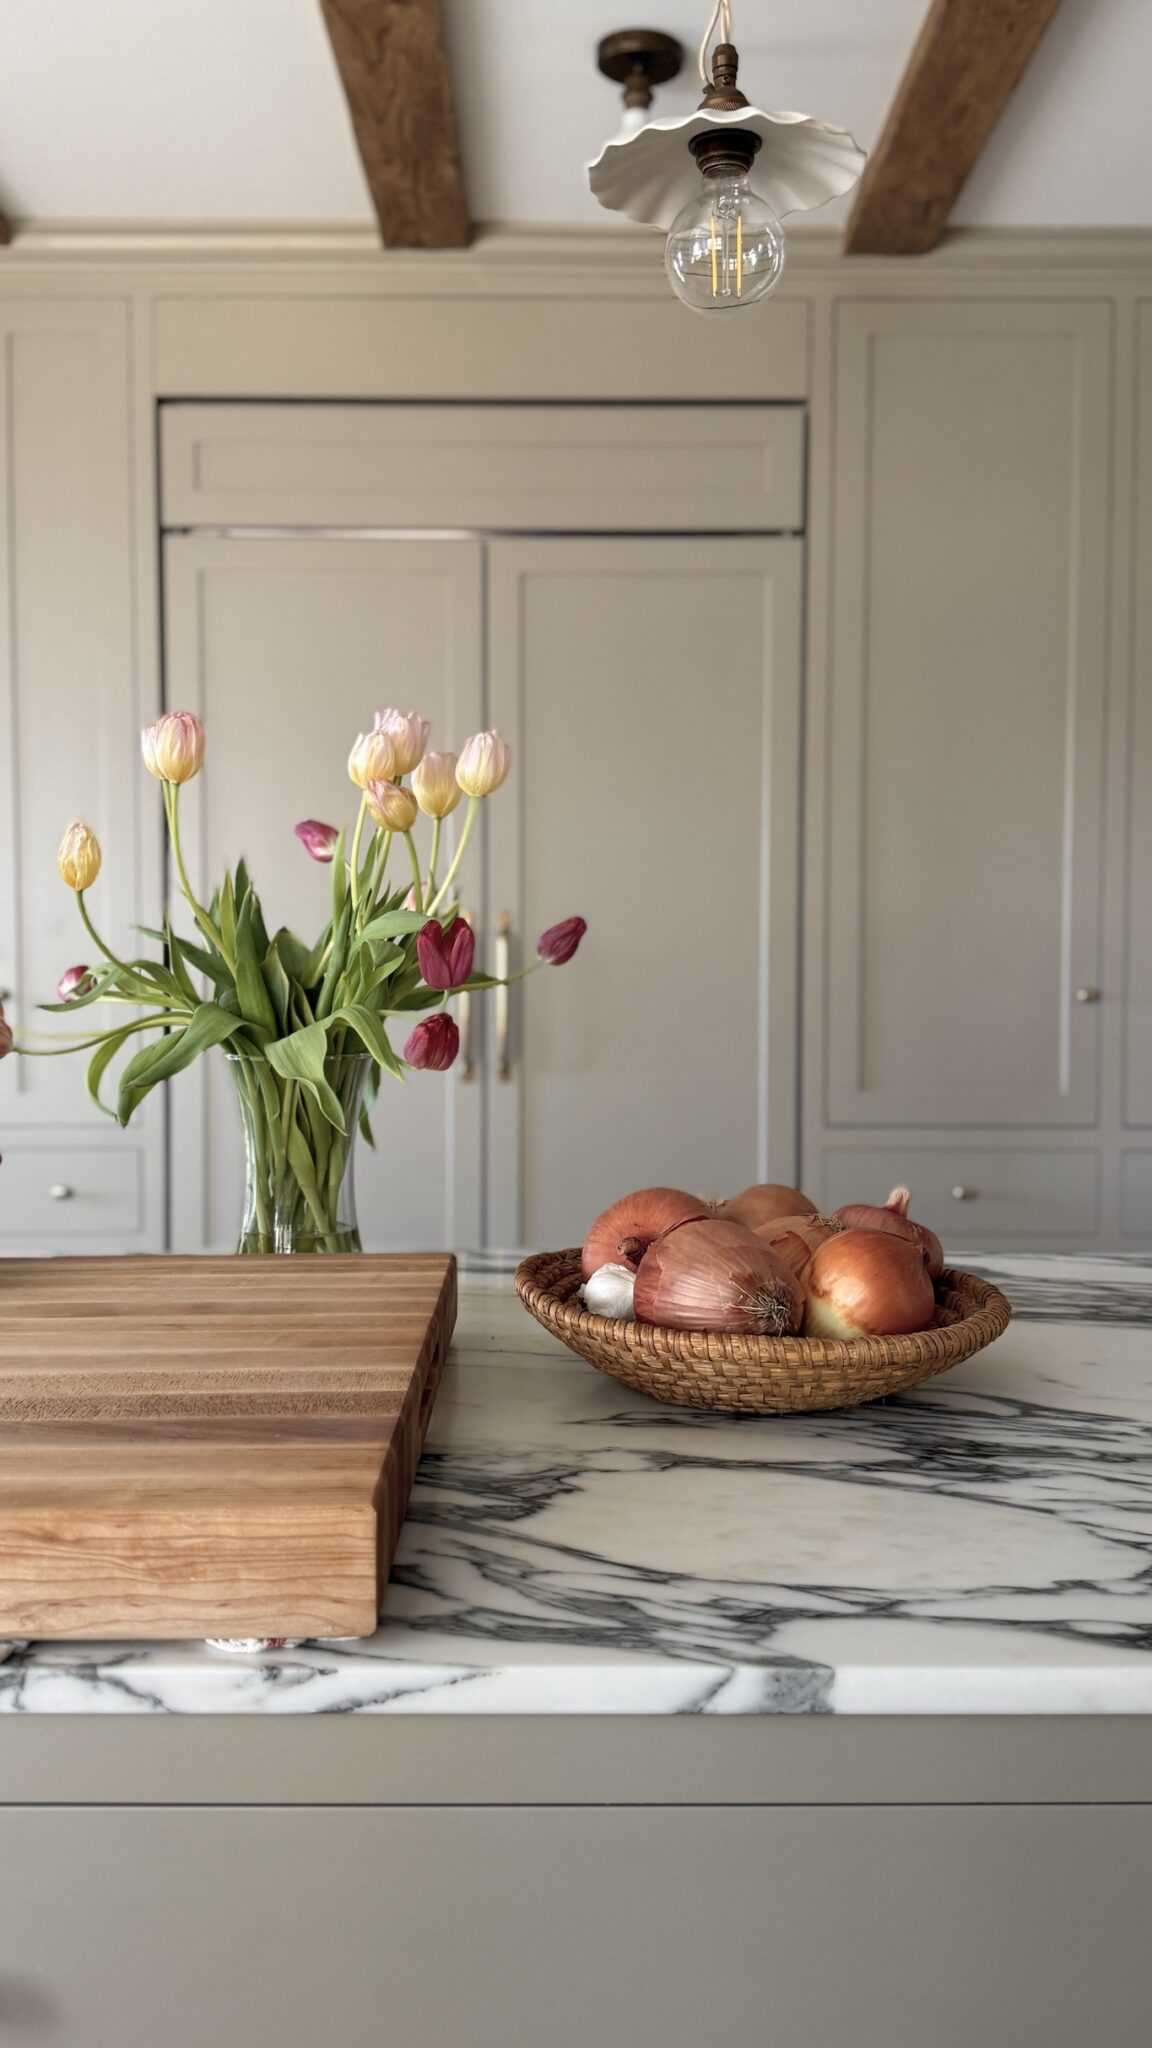
- Countertops: Calacatta Arabescato Corchia Marble (sourced from Pietra Fina in San Francisco). In terms of veining, this marble differs widely from slab to slab. I contacted several slab yards throughout the country to find ones with a specific look. Most slab yards ship across country, but this does come with additional fees (shipping, insurance, holding fees from local fabricators, etc.). Our shipping fee was very reasonable and cheaper than sourcing from our local fabricators, which had little to no marble inventory.
- Countertop Protection: The marble is protected with MORE AntiEtch, which is a special UV treatment that protects the stone from etching and staining. The company has certified applicators all over the country. This was a huge investment, but is one of the best decisions we made. While I adore marble and natural stone (it was a design priority), I know myself and wanted to avoid feeling like I had to hover over anyone who stepped foot in the kitchen (you think I’m kidding, but alas, I am not).
- Appliances: Wolf 48-Inch Dual Fuel with Griddle, Wolf Hood Liner, SubZero 42-Inch Classic French Door Fridge (Panel Ready), Miele G7366 SCVi AutoDos Dishwasher (it looks like our specific model is no longer available). I spent a significant amount of time researching not just the performance of these brands, but also their customer service reputations and the availability of local service technicians in our area. I even brought my ceramic dishes into the appliance store to test how they fit in our dishwasher model (this was SO helpful!). After a year and a half of daily use, I’ve been extremely happy with our choices!
- Trash & Recycling Pull-Outs: We actually have two (double-bin) pull outs for trash and mixed recycling. One is located on the far left side of our island, which is ideal while prepping. We added another on the opposite cabinetry wall, to separate glass and a separate compost bin. It’s been extremely helpful to have two dedicated cabinets for these items.
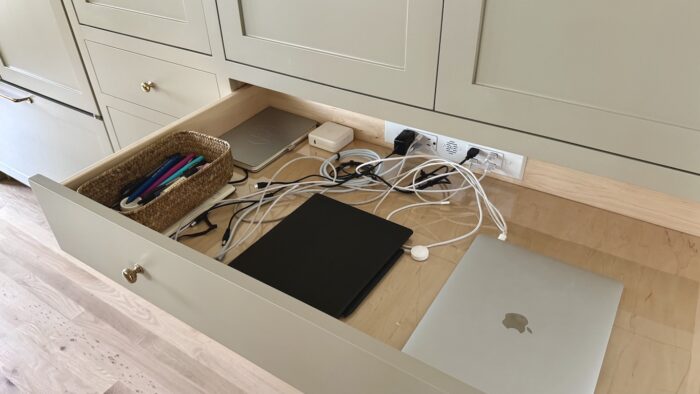
- Electrical Details: All of our lights are on dimmers and use 2700k bulbs. Our cabinetry sub used minimalist under-cabinet lighting for our upper glass cabinets, which I absolutely adore and use on a daily basis (more than almost any other light!). I spent a lot of time considering plug locations (this is critical for the cabinetry team as well, so do not leave this planning detail to the last minute) to ensure we had enough dedicated circuits to accommodate high-wattage countertop appliances, such as an electric kettle, countertop oven, etc.
- Hardware: deVOL – we used a combination of Classic Knobs for drawers and Pull Handles for appliances and one pull-out cabinet. We have their heirloom brass finish, which is a warm, sand-cast unlacquered finish (otherwise known as ‘living brass’). It is gorgeous up close and has only improved with time.
- Faucet & Sink: Newport Brass Gavin Pull Down Faucet (Uncoated Brass) and 30-Inch Fireclay Farmhouse Sink (Signature Hardware). I prefer the convenience of a pull-down faucet, but for aesthetic reasons, I might have preferred deVOL Aged Brass Bridge Faucet.
- Pendant Lights: deVOL Large Wide Pleat Porcelain Lights
- Ceiling Flush Mounts: Mullan Bexter Vintage Flush Ceiling Lights (Antique Brass) with Tala A19 Porcelain Bulbs (2700k). I prefer to avoid canned or recessed lighting, particularly when used in a traditional design setting, so this was a really nice balance. They offer just as much light as alternative options.
- Kitchen Sink Sconce: O’Lampia Paris Wall Light (Old Brass)
- Stools: deVOL Bum Stools (for backless stools, these are very comfortable).
Organization Sources:
- Drawer and Cabinet Liners: We have ExactMat (Crystal Finish) liners in nearly every drawer and cabinet. These are custom-made vinyl liners cut to your exact dimensions (I measured all of our drawers the first week after moving in). I used 40mil thickness for basic drawers and 80mil for drawers that contained heavy cookware. This was an investment, but I love them! They are easy to clean, lay flat, and nearly impossible to detect, which allows us to enjoy the maple finish of our drawers. Cutting standard drawer liner rolls is the bane of my existence (especially when the dimensions don’t line up) and I’m so glad this company exists. Strongly recommend.
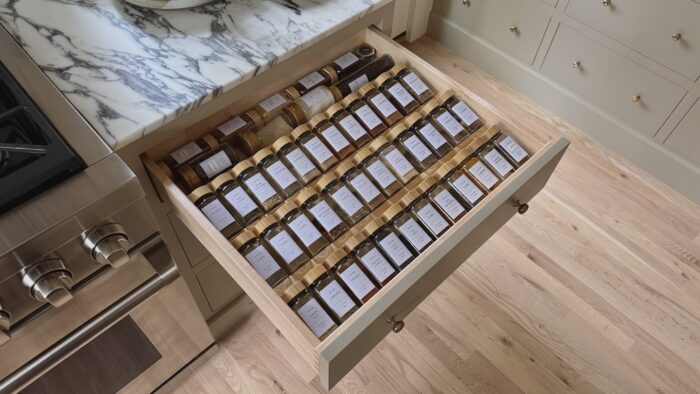
- Spice Containers – I ended up with a few sets of these from Amazon. I’ve been happy with the quality. The label options were generous and have held up well over time. Keep in mind, they cannot fit a standard round tablespoon (a very common problem). If you don’t want to deal with custom spice containers but appreciate visual organization, I’d simply replace spices with Simply Organic brand and refill with bulk spices.
- Pot & Pan Protectors – I bought a set of these. They work well and are affordable, but could be a bit thicker.
Feel free to ask any additional questions in the comment section and I’ll do my best to answer them!
One Comment on “A Kitchen Tour: One Year Later”
Beautiful and thoughtful design!! I am wondering if you can share high level dimensions? I am in the midst of designing a similar size kitchen, with hopes of using the same paneled sub-zero 42″ fridge as you – so curious about your island size and how much space you left between the island and fridge. Any info you can provide would be great!!