Artisan Sourdough Bread Recipe
My favorite everyday artisan sourdough bread recipe. For more visuals and guidance, please watch my step-by-step YouTube video and reference my other sourdough resources.

While it requires patience and dedication, bread baking has become a serious passion of mine. I created a sourdough starter nearly two years ago and bake bread (and sourdough pizza) at least once a week. I absolutely love it.
Recipe Note: This sourdough bread recipe offers a rough timeline, but will need to be adapted to meet your specific conditions. Ambient temperature, starter strength, and flour type (as well as other variables) affect fermentation and play a very important role in bread baking.

Sourdough Starter: The Basics
To make homemade sourdough bread, you’ll need an active, mature sourdough starter. I recommend The Perfect Loaf’s sourdough starter guide or Baker Bettie’s beginner guide.
You can also ask a fellow baker or bakery for some starter or even buy it online. Starters are active organisms and require daily feedings, unless they are refrigerated for short periods. The time commitment and work is minimal, but absolutely necessary for its viability.
If you have any questions, please read my Sourdough Starter Troubleshooting Guide for tips and guidance.
For more guidance and tips, check out my complete guide with my favorite sourdough tools and resources.

Common Mistakes To Avoid:
Once you have an active sourdough starter and a few basic tools (see a list below and complete guide here), you can start making sourdough bread. How exciting is that?!
How do I know if my starter is ready to use?
- You will need an active, mature sourdough starter to make this bread. It should be on a predictable feeding schedule. This will vary, but it should double or triple in volume between feedings.
- Ideally, your sourdough starter should require at least one, preferably two, daily feedings on 1:5:5 ratio. For more information on feeding ratios, please review my Sourdough Starter Troubleshooting Guide. While you can make bread with less active starters, you’ll need to watch the dough carefully and most likely have to extend bulk fermentation significantly.
- The most common mistake for new sourdough bakers is poor fermentation and under-proofing, which is often the result of a weak or young sourdough starter. Under-proofing produces dense, gummy, and poor crumb structures.
- If your sourdough starter is sluggish, I recommend building up its strength with another week or two of feedings before baking again. Sourdough bread baking is a learning process and requires a lot of patience, as well as trial and error.
Troubleshooting Issues:
If you’re experiencing troubleshooting issues with this recipe or other sourdough baking, please check out my Sourdough Bread Troubleshooting Guide.

How to Make Artisan Sourdough Bread:
Important Note: Many sourdough bread recipes call for preparing an off-shoot levain (eg. starter) for baking. I prefer to use a portion of my ripe, just peaked starter. This eliminates one extra step, as well as works better for my normal feeding schedule and preferred baking timeline.
This choice is up to you and can be tweaked/adapted to fit your schedule or starter feeding schedule, but please plan accordingly. Either way, you’ll need to account for the starter amount in the recipe below (90 grams), as well as the normal amount required to maintain your mother (main) starter.
To prepare to bake the following morning, I scale up the previous night’s feeding to the following:
- 12 grams ripe starter
- 60 grams flour
- 60 grams water
*Note: This is a 1:5:5 ratio. You will need to adapt or tweak this to ratio to fit your own starter activity level.

*Note: Before getting started, please watch my YouTube step-by-step instructional video. For a printable recipe and example baking timeline, please scroll down to the recipe box at the bottom of this post.
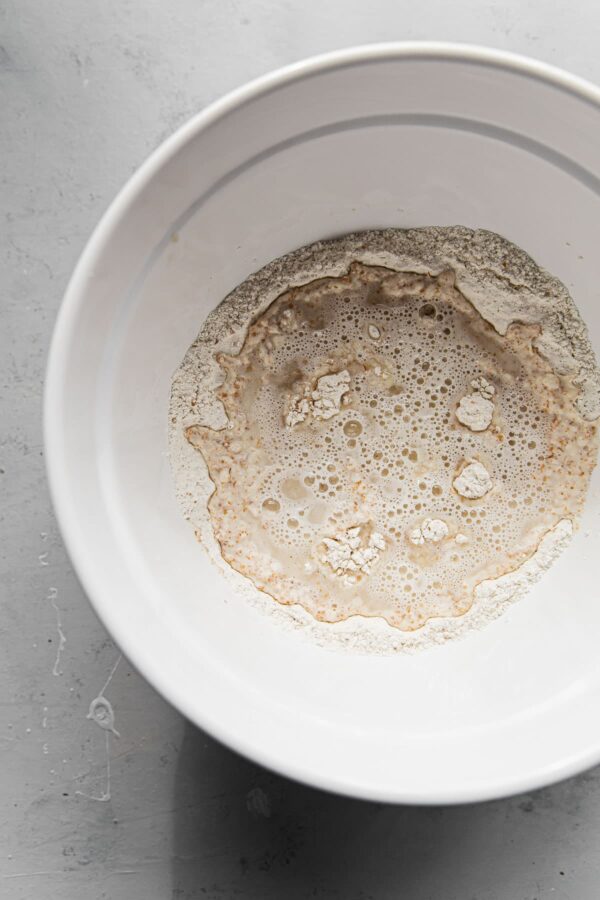
STEP 1: PREPARE THE AUTOLYSE
In a large mixing bowl, whisk together the flours. Add the filtered water (90°F/32°C) and mix with your hands until thoroughly combined and no dry bits are visible. It will be sticky. Cover the bowl with a clean shower cap or plastic wrap and rest at 80°F/26°C for a minimum of 1 hour or as long as 2 hours. This step hydrates the flours and helps with gluten development and dough structure.
I use my Brod & Taylor Proofing Box to maintain a relatively high ambient fermentation temperature. It is an amazing tool, but not necessary for sourdough baking. However, I recommend finding a warmer spot in your kitchen (was 74°F-76°F) for resting your dough. Cooler ambient temperatures will slow down fermentation and might extend bulk fermentation significantly.
*Planning Tip: Since this recipe doesn’t call for preparing an off-shoot levain, I mix and prepare the autolyse roughly one hour before my normal morning starter feeding time (ie. when my starter is ripe and has just peaked).
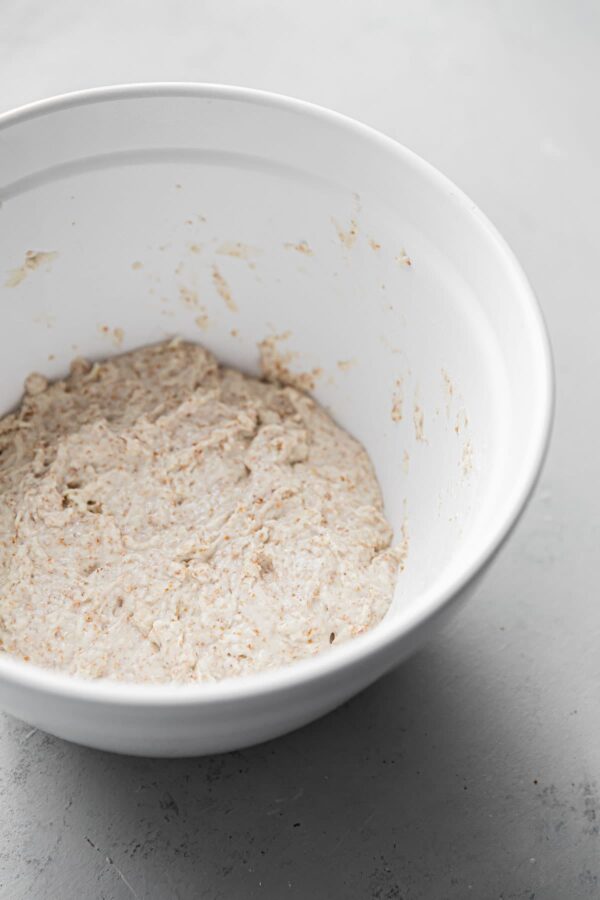
STEP 2: ADD RIPE STARTER AND REST FOR 30 MIN
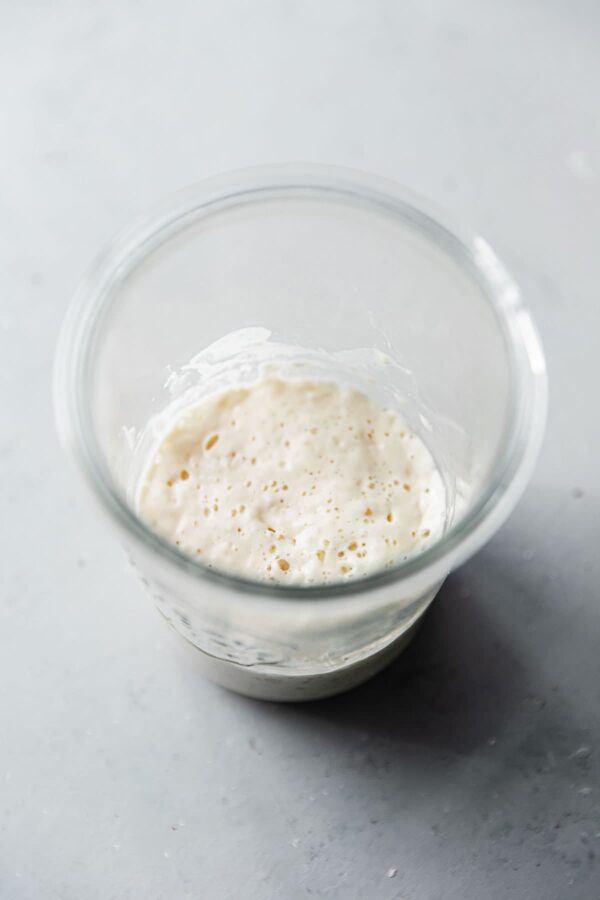
While this test isn’t fool-proof, your sourdough starter should pass the ‘float test’ when it’s ready to be used in your dough. Place a tiny spoonful of your ripe starter in a jar of water, it should float. If it sinks, it is not ready to use and usually requires additional time. Check and test again 15 to 20 minutes later.
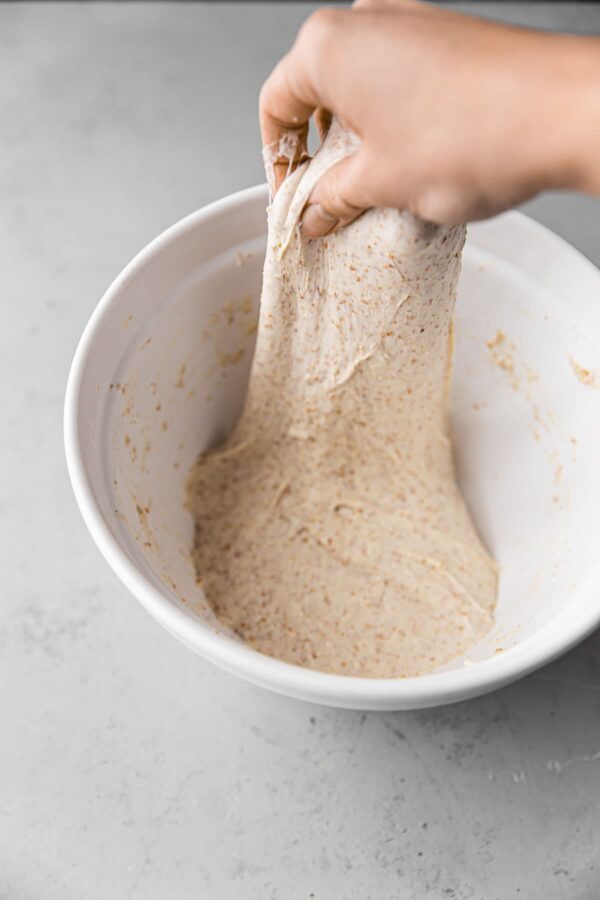
Add the ripe, just peaked sourdough starter. Use your fingertips to spread the starter over the autolyse mixture. Fold the edges of the dough into the center to fully incorporate the starter.
Use your thumb and fingers to pinch the dough (pincer method) repeatedly until the starter is well incorporated. Don’t be delicate. You want to work quickly, but fully incorporate the mixture. Cover once again and rest at 80°F/26°C for 30 minutes.

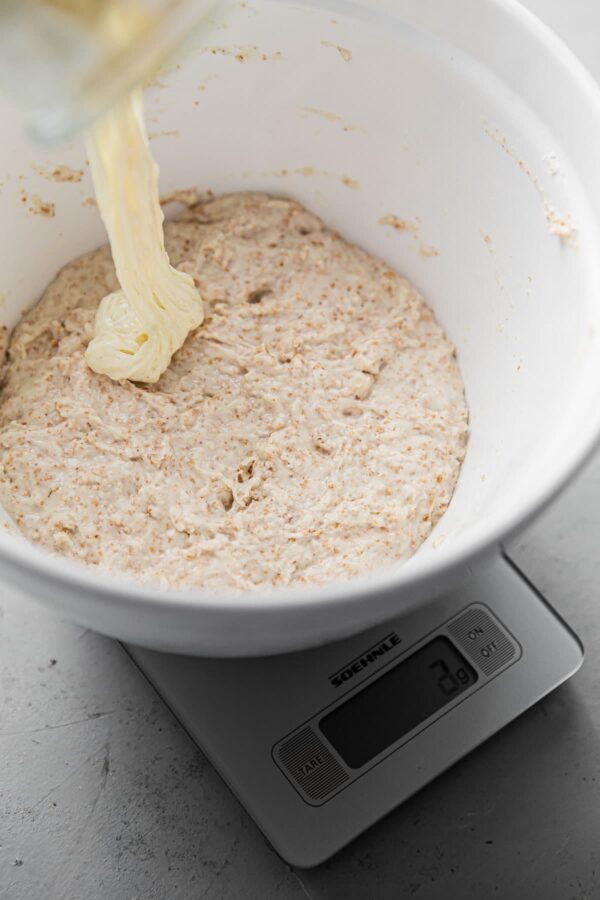
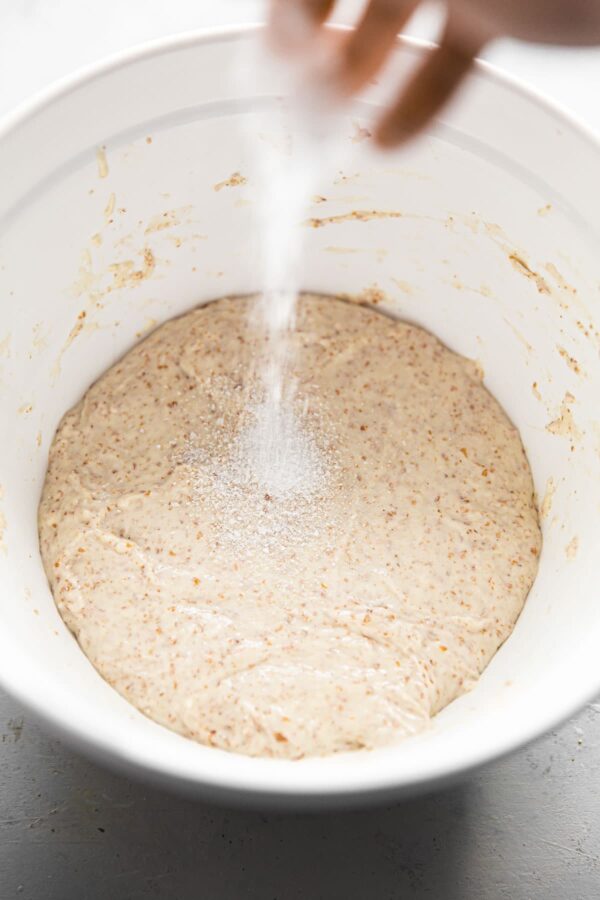
STEP 3: ADD SALT AND REST FOR 15 MIN
Sprinkle the salt over the surface of the dough. Use your thumb and fingers to pinch and incorporate the salt into the dough (you should not feel any granules at the end of mixing). Be thorough. Depending on the coarseness of the salt, this mixing step usually takes about 3 to 5 minutes.
If you’re struggling with higher hydration doughs and dough strength, there are two additional mixing methods that can try: slap and fold or the Rubaud method. Please see the full video included in this post for visual demonstration.
Cover and rest at 80°F/26°C for 15 minutes before preforming the first stretch and fold set.
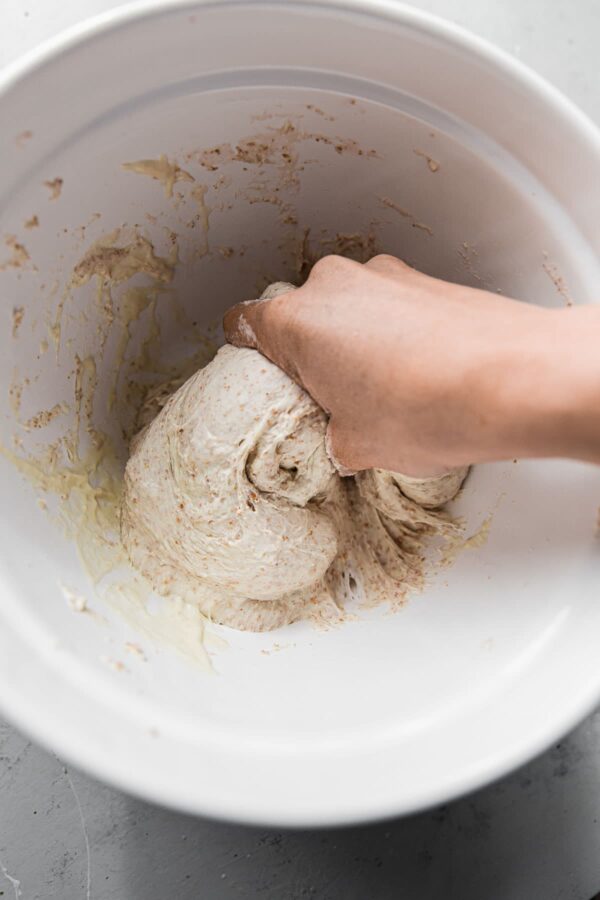
STEP 4: BULK FERMENTATION (6 SETS OF STRETCH AND FOLDS)
We’ll preform a total of six stretch and fold sets during the first two hours of bulk fermentation. The first three will take place in 15-minute intervals. The remaining three will occur in 30-minute intervals. Stretch and folds help build strength and extensibility in the dough, and encourage good crumb structure.
To complete a stretch and fold, dip you hands lightly in water (*this will help the dough from sticking). Be careful not to incorporate much water as this is already a high hydration dough. Grab the top portion of the dough with both hands. Gently pull and stretch it upwards (without tearing) and fold over the opposite edge. Rotate the bowl 180 degrees and repeat from the other side.
Rotate the bowl 90 degree and repeat once again on both sides. This entire process is one stretch and fold set. After performing the stretch and folds, I like to gently lift the dough to round it nicely in the bowl (see video).
Cover and rest the dough at 80°F/26°C between each set.

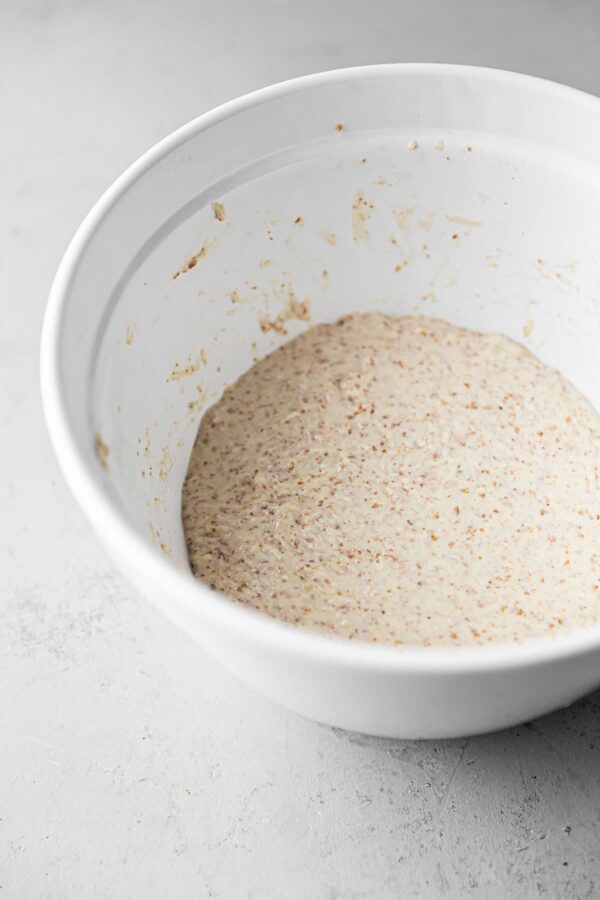
The dough will be very slack at the beginning of bulk fermentation. You’ll notice it building more and more strength as you complete more stretch and folds. Note: The dough will not rise or expand much during this first period.
If your dough is lower in hydration or starting to fight you, stop performing stretch and folds and allow it to rest for the remainder of bulk fermentation. The purpose of stretch and folds is to build strength, but if the dough is already strong, additional sets can have an unintended effect of pressing out gas bubbles.
STEP 5: BULK FERMENTATION (continued)
After you have preformed the stretch and folds, allow the dough to rest, covered, at 80°F/26°C for an additional 1.5 – 2 hours, or until it has nearly doubled in size. The total bulk fermentation time will vary tremendously based on your ambient kitchen temperature, dough temperature (FDT), flour type, and several other factors, so watch it carefully. Always follow the dough’s lead!
Judging the right point to end bulk fermentation and move to the pre-shape period requires practice and trial-and-error.
At the end of bulk fermentation, the dough should be well aerated and there will be many gas bubbles on surface, as well as on the edges of the bowl (see video). The dough should be slightly rounded on the edges of the bowl, if the dough is flat, you most likely didn’t build enough strength in the dough.
Generally, I like to end bulk fermentation when the dough is just under double in size. This has produced good results for me and this guideline works well for this specific sourdough process and timeline.

STEP 6: PRE-SHAPE
Carefully transfer the dough, without degassing, onto a clean countertop. It will be sticky. Use a bench knife to gently shape the dough into a round, pulling it gently towards you on the countertop to create some surface tension and strength.
As you do this, you’ll notice that the dough comes into a shape and starts to feel bouncy (see video). The key is to do this step quickly and as gently as possible. Rest the dough, uncovered, for 15 to 20 minutes, or until it has relaxed slightly for the final shaping.
STEP 7: FINAL SHAPE
Dust the lined banneton basket lightly with rice flour. Lightly dust the surface of the dough with bread flour. Use a bench knife to gently lift it and flip it flour side-down onto your countertop. Shape into a batard (oval) (see video) or shape into a round depending on your basket and baking vessel.
Gently pick up the shaped dough, flip, and transfer into your floured banneton, with the seam side facing up. Drape a linen over the basket (to capture any condensation) and cover the banneton with a plastic bag. Seal with a clip and allow the dough to rest at room temperature for 10 minutes.

STEP 8: FINAL PROOF
Place covered banneton in the refrigerator and retard dough for 15 to 16 hours at 38°F/3°C. This slow and cold fermentation stage helps develop flavor and improves the final crust texture.
STEP 9: PREHEAT THE OVEN AND PANPreheat your Challenger Pan, Dutch Oven, or combo cooker (with lid) in a 500°F/260°C oven for at least 1 hour.
STEP 10: BAKE
Once the oven and baking vessel have preheated for an hour, remove the banneton from the refrigerator and uncover.
Poke Test: Test the dough for proper proofing by lightly flouring one small section (while the dough is still in the banneton). Press your finger lightly into dough. A properly proofed dough should very SLOWLY spring back and still leave a light indentation. That is a sign of a well proofed dough that is ready to be baked. If it springs back quickly and completely, it is under-proofed (return to the fridge, covered, for an additional hour or so). If the dough compresses and doesn’t spring back at all, it is over-proofed. Unfortunately at that point, it’s hard to make up for in that stage of the process – but it will still taste delicious!
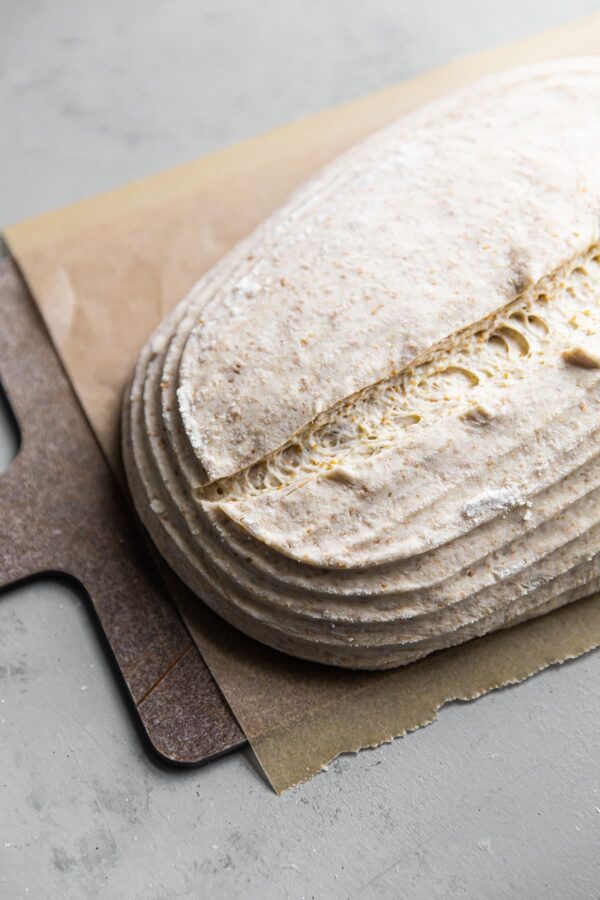
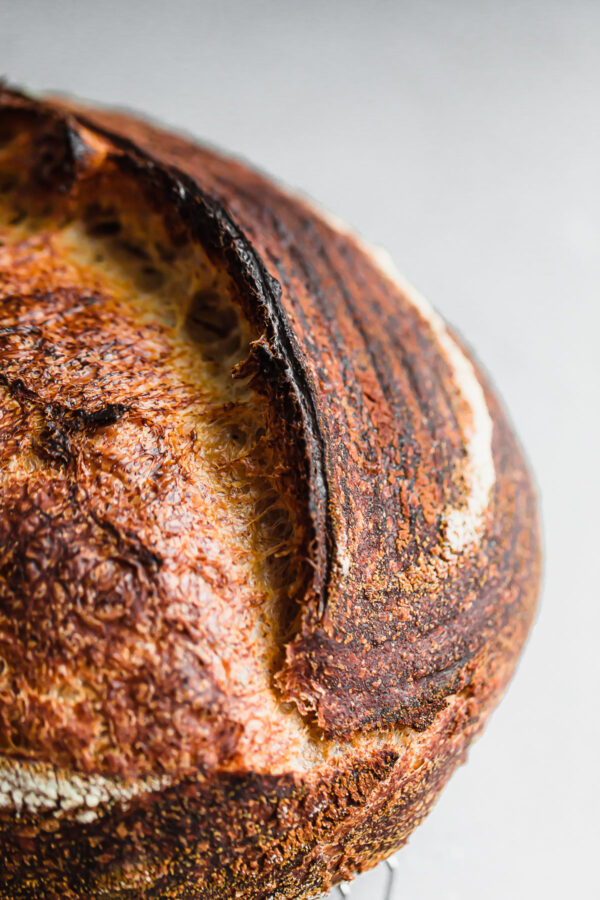
Transfer the dough to the baking vessel – see recipe for more detailed instructions – and score the loaf with a bread lame. Please see recipe video for visual instruction. Bake at 500°F/260°C with the lid on for 25 minutes.
Remove the lid, reduce the oven temperature to 475°F/240°C (*note: if your oven runs hot or your loaves are browning too quickly, reduce the temperature to 450°F/232°C) and continue to bake uncovered for an additional 15-25 minutes or until the crust is deep golden and caramelized. I like to rotate the pan several times throughout baking to ensure even color.
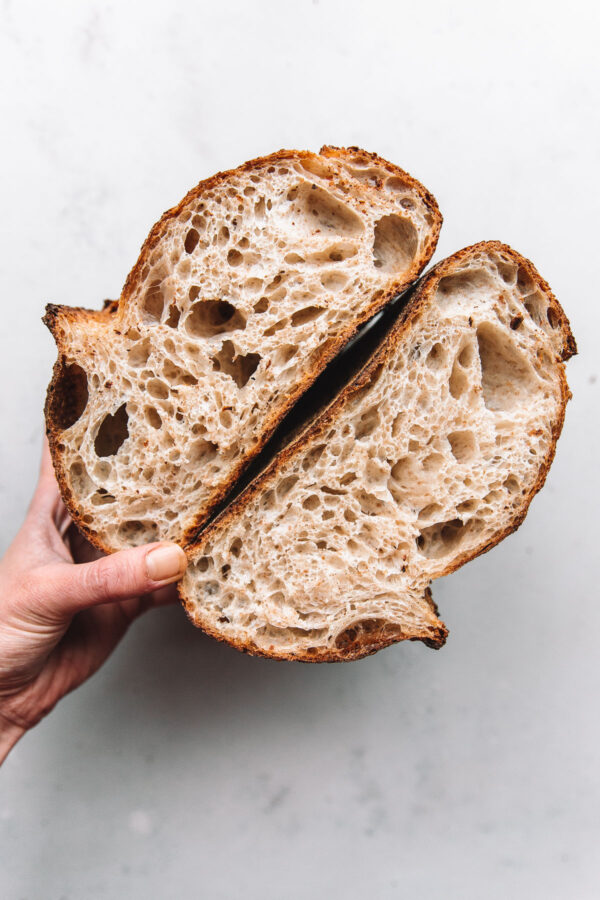
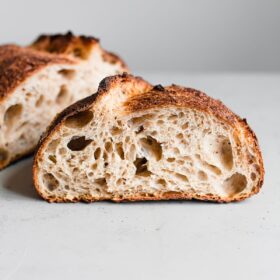
Transfer to a cooling rack and cool completely before slicing. This will take several hours. Enjoy!
Artisan Sourdough Bread Ingredients:
- 350 grams bread flour (preferably organic)
- 90 grams whole wheat flour (preferably organic and stone-ground)
- 350 grams 90°F/32°C filtered water
- 90 grams ripe sourdough starter (100% hydration)
- 9 grams kosher salt or fine sea salt
- white rice flour, for dusting
Baker’s Percentages:
Use the following baker’s percentages to tweak and adapt this sourdough bread recipe to suit your own flour, hydration, or yield preferences. Please know the timeline might change. I recommend sticking to the same salt and sourdough starter percentages.
- Bread Flour: 79.5%
- Whole Wheat Flour: 20.5%
- Water: ~79.5% (*this is a rough hydration percentage – true hydration takes into account the flour and water in your starter)
- Sourdough Starter: 20%
- Salt: 2%

Recommended Equipment and Tools:
For this recipe, you’ll need at least the following. For a complete list, please reference my guide:
- Challenger Bread Pan (a great investment), 5 Quart Dutch Oven, or Combo Cooker
- Mature Sourdough Starter
- Instant Thermometer (I highly recommend Thermopen brand for the highest quality and accuracy)
- Baking Scale
- Bench Knife
- White Rice Flour, for dusting the banneton
- 8-inch Round or 11-inch Oval Banneton Basket (I recommend one that comes with a liner, especially if you are new to sourdough baking)
- Bread Lame (or razor blade or sharp scissors), for scoring
- Serrated Bread Knife
- Advanced Equipment Recommendation: Brod & Taylor Proofing Box
Example Bread Baking Timeline:
Use the example timeline to plan your schedule for weekday or weekend sourdough baking. This timeline can also be found in the printable recipe box below.
DAY ONE:
8:30 AM – autolyse (mix flours and water). allow mixture to rest, covered, at 80°F/26°C for 1 hour, or as long as 2 hours.
9:30 AM – add mature sourdough starter, mix thoroughly. cover and rest at 80°F/26°C for 30 minutes.
10:00 AM – add salt and mix thoroughly. cover and rest at 80°F/26°C for 15 minutes.
10:15 AM – 10:45 AM – stretch and folds #1, #2, #3 (every 15 minutes). cover and rest at 80°F/26°C between each set.
11:15 AM – 12:15 PM – stretch and folds #4, #5, #6 (every 30 minutes). cover and rest at 80°F/26°C between each set.
12:15 PM – 2:15/3:15 PM – allow dough to rest, covered, at 80°F/26°C for the rest of the bulk fermentation period. this period will range from 1.5 – 2 hours (or much longer), depending on ambient temperature, starter strength, and flour variety. generally, I like to end bulk fermentation when the dough is just under double in size. This has produced good results for me and this guideline works well for this specific sourdough process and timeline.
2:15/3:15 PM – pre-shape. leave uncovered at room temperature for 20 minutes.
2:35/3:35 PM – final shape. transfer to rice floured banneton basket, cover with a plastic bag, and seal. allow to rest at room temperature for 10 minutes before transferring to the fridge.
3:45 PM – 7:45 AM – retard dough (final proof) in refrigerator at 38°F/3°C for 16-17 hours.
DAY TWO:
6:45 AM – preheat Challenger Pan, Dutch Oven, or combo cooker in 500°F/260°C oven for at least 1 hour.
7:45 AM – remove dough from the fridge, transfer to preheated pan, score, and bake at 500°F/260°C with the lid on for 25 minutes.
8:10 AM – remove pan lid, reduce oven temperature to 475°F/245°C and bake uncovered for about 20 minutes or until deeply caramelized. allow loaf to cool completely – this will take several hours – before slicing and serving.
How to Store Sourdough Bread:
You’ll be amazed by how quickly you go through a loaf. If you do happen to have leftovers, please reference my guide on how to store bread.
It covers the basics on the best way to store, refresh, and freeze artisanal sourdough bread.
Troubleshooting Issues and FAQ:
If you’re experiencing troubleshooting issues with this recipe or other sourdough baking, please check out my Sourdough Bread Troubleshooting Guide.
Artisan Sourdough Bread Recipe
Ingredients
- 350 grams unbleached bread flour preferably organic, plus more for dusting
- 90 grams whole wheat flour preferably organic
- 350 grams 90°F/32°C filtered water
- 90 grams ripe sourdough starter 100% hydration
- 9 grams Diamond Crystal kosher salt or fine sea salt
- white rice flour for dusting your banneton basket
Instructions
- New to sourdough baking? I highly recommend reducing the hydration in this recipe if you are new to sourdough baking. This is a high hydration dough and can be challenging to work with (and build strength in) if you're not an experienced baker. If you're looking for an easier to handle dough, I recommend reducing the water to 310 to 330 grams total. If you're working with a lower hydration, you may be able to get away with just 3 to 4 sets of stretch and folds, or even less. Follow the dough's lead!
- IMPORTANT NOTE: I do not prepare an off-shoot levain for my sourdough baking, as this baking timeline and method works well for my schedule, as well as my starter's feeding schedule. This choice is up to you and can be adapted/tweaked to fix your schedule, but please plan accordingly. Keep in mind that you'll need to account for the starter quantity in the recipe (90 grams), as well as the normal quantity needed to continue to maintain and feed your starter.
- Autolyse: In a large mixing bowl, whisk together 350 grams unbleached bread flour and 90 grams whole wheat flour. Add 350 grams (90°F/32°C) filtered water and mix with your hands until thoroughly combined and no dry bits are visible. Cover with a clean shower cap or plastic wrap, and rest at 80°F/26°C for 1 hour or up to 2 hours. This step hydrates the flours and helps build dough structure.
- Add Starter and Rest: While this test isn't fool-proof, your sourdough starter should pass the 'float test' when it's ready. Place a tiny spoonful of your ripe starter in a jar of water, it should float to the top. If it sinks, give it more time (15 to 20 minutes) and test again. Add 90 grams ripe sourdough starter and spread it over the autolyse mixture. Use your fingertips to spread the starter over the autolyse mixture. Fold the edges of the dough into the center to fully incorporate the starter. Use your thumb and fingers to pinch the dough (pincer method) repeatedly until the starter is well incorporated. Don’t be delicate. You want to work quickly, but fully incorporate the mixture. Cover and rest at 80°F/26°C for 30 minutes.
- Add Salt and Rest: Sprinkle 9 grams salt over the surface of the dough. Use your thumb and fingers to pinch and incorporate the salt thoroughly (you shouldn't feel any granules at the end of mixing) into the dough. Depending on the coarseness of your salt, this might take a couple minutes. Be thorough. Cover and rest at 80°F/26°C for 15 minutes. Important Note and Tip: If you’re struggling with higher hydration doughs and dough strength, there are two additional mixing methods that you can try: slap and fold or the Rubaud method. Please see the full video included in this post for visual demonstration.
- Bulk Fermentation: We will preform a total of 6 sets of stretch and folds (see article above for further instruction) in the first two hours of bulk fermentation. The first three will take place in 15-minute intervals. The remaining three will occur in 30-minute intervals. Covering and rest the dough at 80°F/26°C between each set. The dough will not rise much during the stretch and fold period, but it should get considerably stronger. Dip your hands in water (to prevent sticking) before each fold. I like to rub my hands together to avoid incorporating much more water, as this is already a high hydration dough. How to Preform a Stretch and Fold: Grab the top portion of the dough with both hands. Gently pull and stretch it upwards (without tearing) and fold over the opposite edge. Rotate the bowl 180 degrees and repeat from the other side. Rotate the bowl 90 degrees and repeat once again on both sides. This entire process is one stretch and fold set. After performing the stretch and folds, I like to gently lift the dough to round it nicely in the bowl (see video). *If your dough is developing quickly, you can reduce the total number of stretch and folds to 3 or 4 sets, 30 minutes apart.
- Bulk Fermentation (continued): Allow the dough to rest, covered at 80°F/26°C, for an additional 1.5 - 2 hours after the last stretch and fold - watch it carefully. Generally, I like to end bulk fermentation when the dough is just under double in size. This has produced good results for me and this guideline works well for this specific sourdough process and timeline. The total bulk fermentation time will vary tremendously based on your ambient kitchen temperature, dough temperature (FDT), flour type, and several other factors, so watch it carefully. Judging the right point to end bulk fermentation and move to the pre-shape period requires practice and trial-and-error. At the end of bulk fermentation, the dough should be well aerated and there will be many gas bubbles on surface, as well as on the edges of the bowl (see video). The dough should be slightly rounded on the edges of the bowl. If the dough is flat, you most likely didn’t build enough strength during mixing, stretch and folds, or bulk.
- Pre-Shape: Transfer the dough, without degassing, onto a clean countertop. It will be sticky. Use a bench knife to gently shape the dough into a round, pulling it gently towards you on the countertop in a circle to create some tension on the skin of the dough. As you do this, you’ll notice that the dough comes into a shape and starts to feel bouncy (see video). The key is to do this as quickly and gently as possible. Rest the dough, uncovered, for 15 to 20 minutes, or until it has relaxed slightly for the final shaping. Pre-shaping gives the dough some extra tension and strength (and is particularly important if you are doubling the recipe and preparing two loaves, as you'll need to divide it prior). Allowing it to rest allows the gluten to relax slightly before preforming the final shape.
- Final Shape: Dust a 9-inch round or 10 or 11-inch oval banneton basket with rice flour (be extra liberal if you are not using a cloth or linen liner). Dust the surface of the dough lightly with bread flour. Use a bench knife to gently lift and flip it flour side down onto your countertop. Depending on your preference, banneton, or baking vessel, shape the dough into a round or batard. *Tip: Please watch the video above for visuals on how to shape a batard (oval loaf) or my latest video on how to shape rounds (boules) and bake in a Dutch oven. After shaping, gently pick up the shaped dough, flip, and transfer into your floured banneton, with the seam side facing up. Drape a kitchen linen over the banneton and place the banneton in a plastic bag (*I use a clean plastic produce bag). Seal with a clip and allow the dough to rest at room temperature for 10 minutes.
- Final Proof: Place covered banneton basket in the refrigerator and retard dough for 15-16 hours at 38°F/3°C. This slow and cold fermentation stage helps develop flavor and improves the final crust texture.
- Preheat the Oven: Preheat your Challenger Pan, Dutch Oven, or combo cooker (with lid on) in a 500°F/260°C oven for at least 1 hour.
- Poke Test for Proofing: Once the oven and baking vessel have preheated for an hour, remove the banneton from the fridge and uncover. Test the dough for proper proofing by lightly flouring one small section (while the dough is still in the banneton). Press your finger lightly into the dough. A properly proofed dough should very SLOWLY spring back and still leave a light indentation. That is a sign of a well proofed dough that is ready to be baked. If it springs back quickly and completely, it is under-proofed (return to the fridge, covered, for an additional hour or so). If the dough compresses and doesn’t spring back at all, it is over-proofed. Unfortunately at that point, it’s hard to make up for in that stage of the process - but it will still taste delicious!
- Transfer and Bake: If you are using a Challenger Pan or combo cooker, you can skip parchment and carefully invert the basket directly into the preheated base before scoring. If you are using a traditional Dutch oven, please watch this video for visuals: Place a large piece of parchment over the banneton, then top with a thin cutting board. Invert and flip carefully, so that the banneton is upside down, setting it down onto your countertop. The dough should release, right side up, from the banneton onto the parchment. Trim any excess parchment paper, creating two handles on both ends for lifting the dough. Use a bread lame to score the dough (1/2-inch deep), carefully transfer into the preheated pan, cover tightly with the lid, and place in the oven. Bake covered at 500°F/260°C for 25 minutes.
- Remove the lid. The dough should have risen and expanded considerably, and the crust should be set, but only lightly golden in color.
- Reduce the oven temperature to 475°F/240°C (*note: if your oven runs hot or your loaves are browning too quickly, reduce the temperature to 450°F/232°C) and continue to bake uncovered for an additional 15-25 minutes or longer until the crust is deep golden and caramelized. I like to rotate the pan several times during this final stage to ensure even browning.
- Carefully remove the bread from the pan and transfer to a cooling rack. Cool completely before slicing. This will take several hours. Slicing into warm bread will result in a gummier texture and cause the bread to stale faster. For more tips, read this guide on how to store, freeze, and refresh sourdough.
How to Adapt This Recipe:
- Feel free to adjust the flour type percentages and hydration to suit your preferences, using the same total flour weight as a guide. Higher quantities of whole grain flours will yield a denser, less open crumb and will affect total bulk fermentation time.
Example Baking Timeline:
- DAY ONE: 8:30 AM - autolyse (mix flours and water). allow mixture to rest, covered, at 80°F/26°C for at least 1 hour or up to 2 hours. 9:30 AM - add sourdough starter, mix thoroughly. cover and rest at 80°F/26°C for 30 minutes. 10:00 AM - add salt and mix thoroughly. cover and rest at 80°F/26°C for 15 minutes. 10:15 AM - 10:45 AM - stretch and folds #1, #2, #3 (every 15 minutes). cover and rest at 80°F/26°C between each set. 11:15 AM - 12:15 PM - stretch and folds #4, #5, #6 (every 30 minutes). cover and rest at 80°F/26°C between each set. 12:15 PM - 2:15/3:15 PM - allow to rest, covered, at 80°F/26°C for the rest of the bulk fermentation period. this period will range anywhere from 1.5 to 2 (or significantly longer), depending on ambient temperature, starter strength, and flour variety. follow the dough's lead! 2:15/3:15 PM - pre-shape. leave uncovered at room temperature for 20 minutes. 2:35/3:35 PM - final shape. transfer to rice floured banneton basket, cover with a plastic bag, and seal. allow to rest at room temperature for 10 minutes before transferring to the fridge. 3:45 PM - 7:45 AM - retard dough (final proof) in refrigerator at 38°F/3°C for about 16 hours.
- DAY TWO: 6:45 AM - preheat challenger pan, Dutch Oven, or combo cooker in 500F oven for at least 1 hour. 7:45 AM - remove banneton from fridge, transfer dough to preheated pan, score, and bake at 500°F/260°C, covered, for 25 minutes. 8:10 AM - remove pan lid, reduce oven temperature to 475°F/240°C, and bake uncovered for an additional 20 minutes or until deeply caramelized. allow loaf to cool completely (this will take several hours) before slicing.
277 Comments on “Artisan Sourdough Bread Recipe”
nutrition info – 1 serving
how many grams or oz. to 1 serving?
It really depends on how thick your slice of bread are, it’s hard to say a serving because I don’t measure food this way – I would say you get about 10-12 food slices out of a loaf.
Hi!
My bread came out dense and gummy (almost looked undercooked) even though an 8 hr bulk fermentation was done as well as a 12 hr long retard. During bulk fermentation my dough didn’t become too airy and fluffy (?) but since 8 hours had passed already I decided to get into pre shaping. Can the problem be that maybe there was a lack of ripeness and activity in my starter? The bread was a little sour as well but I don’t mind the flavor since I do like the taste of actual sourdough bread. Is it mire likely that I used my starter at its underripe stage or at its overripe stage?
Best regards!
Hi Mariana,
Did you follow this recipe? If so, it shouldn’t require an 8 hour bulk fermentation (bulk fermentation is the time from when you add the starter to the autolyse, in this case, to when it is turned out for shaping) unless you are dealing with very low temperatures. If you didn’t make this particular recipe, it is hard for me to troubleshoot without more details. How old is your sourdough starter? If it’s dense and gummy, it usually is often a sign of a very new, undeveloped starter and you’ll need to give it more time before baking. I recommend checking out my sourdough starter troubleshooting guide for more information on what to look for: https://www.abeautifulplate.com/sourdough-starter-troubleshooting-guide/
Hi! thanks for answering, I think the problem was my starter somehow For bulk fermentation to take longer than expected means that the starter is the problem right?
Is it okay if my SDS reaches peak at 10-12 hrs? I’ve read that for a starter to be a potential starter for baking, it should ripe at 4-6hrs, but I haven’t achieved this.
My starter is about a month and a half old, but between trial and errors, its been predictable and highly active for about maybe 2-3 weeks.
I currently feed it whole wheat only two times a day, because of the result in activity. I’ve been using 75gr of starter, 100 gr of water and 100 gr of whole wheat flour, because I saw a post on The Perfect Loaf that in order to increase activity I should use more starter, but I don’t know if maybe this is too much inoculation percentage?
Would you recommend for me to star a different feeding scheme? A 1:5:5 ratio maybe?
I will be very grateful if you could answer this for me please. Thank you for your time.
Best Regards!
Hi Mariana,
If you’re using such a high level of inoculation, it should be reaching peak faster than 10-12 hours. Unfortunately, there is no specific time I can provide because every starter is different and the inoculation percentage (amount of starter in the feeding) will directly impact the time. For example, I use a 1:5:5 ratio for my feedings and my starter peaks in 10-12 hours max – and that is a much, much lower inoculation percentage (20%) than what you are doing (75%). Bulk can definitely take longer, but if it takes toolong, that’s usually a sign of a weak starter and eventually at a certain point, the gluten structure can sort of degrade at a certain point if its taking too long.
I think you might be confusing the advice on The Perfect Loaf. Yes, you can use more starter in a feeding, but that doesn’t make your starter stronger, it simply means that you have more starter and it will go through the feed faster and need to be fed sooner.
Since it sounds like your starter is still sort of gaining strength, have you tried using about 20% rye in each feed – this can add a boost of activity and help it get more strength. I would personally try a 20% rye and 80% bread flour combo for feedings and see if that helps improve things.
Hi Laura, thanks for the great recipe this was definitely my best loaf yet – I think my kitchen was a bit cold as the bulk ferment took forever but other than that it went well.
I have two questions, although it looked great and airy I feel the texture was slightly on the gummier/chewier side is that just from undercooking?
Do you have any tips for getting that nice brown look without any of it burning, I have found that the top of my loaf will go brown a lot quicker and I have to remove it from the oven (this might also cause the undercooking)
Thanks! 🙂
Hmm, it shouldn’t be overly gummy in the inside. Are you allowing the bread to cool completely before slicing? This is very, very important (though hard to have patience for!) for texture. If you slice into warm bread, it will be gummy and will stale much faster too. I let loaves cool for 3-4 hours at least before slicing.
Yes, removing from the oven early could definitely be a culprit. It sort of depends on the situation and without photos (feel free to send me an email if you have them!), it’s harder for me to know what’s going on. I would reduce your oven temp slightly for that initial bake and with the lid off (maybe 450F?) and see if that helps. Your oven might run hot, which isn’t uncommon.
In addition, occasionally underfermented loaves can brown too quickly..
Thanks! 🙂 I tried again and I think I have two issues, my bulk fermentation just doesn’t seem to be getting the rise I’m after, I waited I think 6 hours this time and it had risen but not double. Its not overly warm in my kitchen.
The second thing is when I get it out of the banneton its quite flat, it just holds its shape I think, is the dough not strong enough? It definitely feels and looks great in all the stretch and folds. I shall keep persevering!
Hi Laura
Thanks a lot for your comment,the sourdough starter is a few weeks old and I feed it regularly,it seems to me that my dough is a bit more fluid and I can’t work with it but in the final stage it is quite sticky.I tried the recipe from the tartine bread book and I will send you the results of the work.
Maybe by the photos you will know where I made a mistake.
I will be extremely grateful if you can help me and advise me how to bake your perfect bread.
Thank you immensely for your time and reply
P.s I look at your site very often and always find new things
Thank you so much for sharing your recipe tips and tricks
Hi
Many thanks for this page and recipes
I would like to ask you a question I am trying to bake bread but I don’t know where I am making mistakes, it is still flat it is not airy enough and it doesn’t rise when baking and it doesn’t have as big air bubbles as yours.If I put it in the fridge it doesn’t rise much either.
Could you advise me where I am making a mistake
Thanks Gabriel
Hi! Sourdough is super nuanced and there are a ton of factors at play. It could be because your starter isn’t strong enough, and there is also a small possibility that its completely over proofed (usually its the former though). Can you share more details via email or write back to this comment? How old is your sourdough starter? Did you make any changes to the recipe? How long have you been baking with the starter, etc.? Is it regularly rising/falling and on a good feeding schedule? I have troubleshoot guides that I recommend you checking out too and those could be helpful!
Thanks so much! It’s so good! That is what I want! If I want to add walnuts and raisin, can I? What time? Thanks
Hi! I recommend following this recipe (just substituting walnuts and raisins in lieu of olives – the weight will vary though, of course!) in terms of timing and method: https://www.abeautifulplate.com/sourdough-olive-bread/
Hope this helps!
This is definately my go-to recipe for sourdough bread but what changes should I make if I wanted to double it? e.g. 180b starter seems an awful lot.
Hi Dave,
I’ve regularly made double batches of this recipe – and yes, you’ll want to double everything! 180 grams starter is a typical ratio for that quantity of dough – I make two loaves, not a massive loaf. You could obviously try reducing the quantity, but that would massively impact the fermentation schedule that I have laid out, and I don’t advise it.
I tried few diff way to get air bubbles in my sourdough. This method worked great!!! My bread had thin delicious crisp crust and beautiful air bubbles inside. Thank you!!! Ill definitely recommend this recipe to my friends!
Hello Laura,
How to maintain the 26 C when it fluctuates daily especially during winter. At this time of the year the room temperature is 20 C and all the resting times before bulk fermentation will vary, how can I deal with it?
Hi, I have a bread proofer which can maintain a set temperature all year round (it’s immensely helpful!), but if you don’t have that tool, you sometimes have to adapt your schedule and technique based on the season. It can require some tinkering and experimentation. If your home is cooler, total bulk fermentation will take longer. You could try finding a warmer spot in your home and see if that helps!
Hi! I just left this same message on my phone and not sure it went through, so sorry if this ends up a duplicate! First thank you for the fantastic recipe and video. I’ve made it many times and it’s delicious. I am a little concerned that I’m still under fermented though and was curious if it has to do with my starter ratio. I feed my starter 1:1:1 in the morning to get my 90 grams. It seems active and doubles in volume in about 3-4 hours. Can you explain why you use a 1:5:5 ratio? Does that change the hydration of your starter from 100% to something else? My house is fairly cold and my bulk fermentation is usually about 6 hours in the winter, and I wonder if that has to do with the starter ratio I am using. Appreciate any feedback and thanks again for the great recipe!
I’ve been making sourdough weekly for several months with a pretty strong starter. I’ve mastered my other recipe so I decided to try something different. This was my first foray into a very wet dough and it was truly a comedy of errors. It rose beautifully but I must not have developed the gluten enough because it was a slack, sticky monster. It felt like I was coaching Flubber into a basket. And then it stuck to my banneton even though I floured like I usually do with my lower hydration dough, so that was another problem. So by the time I coaxed my dough out into my Dutch oven it was a sad, flat mess ☹️ I will try again next week and cut the hydration, do a few more stretch and folds, and flour my banneton more. I’ve also been buying a different bread flour than usual so I wonder if that also contributed. It was definitely character building and humbling, haha. Great, detailed instructions and video though!
Update: I tried this again and did a few more stretch and folds, did a longer initial proof at room temp (~70 in my house right now) for about 4 hours, and floured my banneton better and WOW! By and large the best loaf I’ve ever made. It’s definitely more time consuming than my previous loaves but I’m definitely gonna use this recipe regularly.
I floured the outside a bit more generously than my drier loaves to help me shape the boule, and that worked really well for an amateur like me.
Did not make this recipe but could not believe all the steps necessary to bake a loaf. I tried several times to make a load of sourdough bread but failed. I just made my first loaf by putting 5 cups of good quality flour into a large glass bowl with 1/1/4 cups of water and stirred around several times. I put into the fridge overnight and folded in flour on my countertop. Put into a heated cast iron dutch oven and baked and it came out incredibly delicious. I did not have to go through all of these steps, just sayin’.
I mean this sincerely, but what is the purpose behind your comment? You haven’t made this recipe, nor does it sound like this is the type of sourdough or recipe that you are actually looking to make. I choose to make bread differently and am teaching others how to have similar success with my method – we all make food differently. That’s life.
I’m a pretty beginner bread-maker. The first time I made your recipe it turned out great! Not super pretty but really good. I’m in the process of making it again and this time after the 6 stretch-and-folds and 2 hour rest, the dough was soooo gooey and liquidy, it was nearly impossible to shape into anything. It just spread out over the counter. I definitely warmed up the space I use to rest it. Any advice on preventing this from happening again? Thanks!!
Sounds like it over-proofed significantly – anything super gooey and gloppy indicates that the proteins in the flour just started to break down from significant over fermentation (similar to what happens to a starter when it’s not fed after a super long time, it just has no structure left)! I would go back to whatever you did the first time and stick with that. Or alternatively you’ll have to keep an eye on your dough and cut bulk fermentation time significantly – look for all the same signs as I mention in my recipe (but don’t stick with this last timeline, as it will need to be shortened). Hope this helps!
This looks so good! From a quite some time I was looking for a perfect sourdough bread recipe. Glad I found this. Thank you so much for sharing!
Hello Laura! Thank you so much for sharing this wonderful recipe. I had an amazing sourdough bread because of you. Your suggestion to lessen hydration was very helpful in managing the dough for a beginner like me. My only struggle is that the bottom of my bread/top of my cast iron burned a bit so I had a hard time removing the bread after it is cooked. If you have any suggestions that would really be great. Thank you!
Hi Cristina! Glad to hear that. Sometimes this can vary oven to oven or cookware to cookware, so you might need to do some experimenting. You could try reducing the oven temp by 15 degrees, also, you can try placing the pan on a baking sheet (don’t preheat the sheet) and that should help insulate the bottom a bit in terms of keeping it from getting too dark.
I also know that sometimes loaves can vary in how they gain color – so this might improve as you continue to bake and also work up the hydration level. Hope this helps!
Thank you so much for your swift reply Laura. You’re very helpful with your suggestions. I will definitely be making this again this weekend. I also tried your pizza recipes and they are absolutely delicious. I am such a fan. Thank you so much!
This is an amazing recipe and the YouTube video is excellent! I tried my 2nd legit sourdough loaf yesterday (the first was a different recipe) and this one blew the other out of the water! I didn’t even have any of the tools except for a dutch oven and it still came out amazingly! I can’t wait to get my tools and start experimenting more! Thank you, Laura!
I made my second load with this amazing recipe yesterday and am so thrilled with the results. I had tried sourdough baking before and never had the rise and taste that I get with this recipe. The timeline and accompanying video are such a great help. I needed a win, like I’m sure we all do this year. So proud of myself. Thanks so much for this guide!!
Yay! This makes me so happy and thrilled. I really tried to make the post and accompanying video as helpful as possible (essentially what I wanted when I first got started!) and it’s always so rewarding to hear from others that I may have accomplished that goal and made the process better for them. Happy holidays and thank you for taking the time to leave feedback, it brightens my day!
Hi! how do you adjust the proofing times for a tropical country with an ambient temp ofmaybe 28-31?
Hi Jessica,
I can’t give you a prescribed time because temperature will vary everything by a lot, and every starter and dough behaves differently. You’ll have to keep a watchful eye and experiment a bit. But if it’s that warm, your bulk fermentation will go quickly and I would pay close attention to how it’s behaving / looking (thats the most important thing).
This is the only sourdough recipe I use lately. It’s my go to. It comes out perfect everytime! Thank you.
So thrilled to hear that! Thank you for taking the time to leave a review and feedback. It’s very much appreciated!
Today, baked loaf #4. This bread is so delicious—even my failed first attempt (seriously underproofed) tasted great. Your video is something I have watched a couple times, and pick up more each time. Excellent instruction. I still don’t have the “bouncy” feel — or barely do—when pre-shaping. Not sure why. Maybe needs bulk fermentation even longer? there are bubbles on top, sides, but no really bouncy feel—and is more sticky and spreads out a bit than your video (has it been bulk fermenting too long? not enough?). I do think temperature is kind of critical—it is colder where I am, and found putting in oven with light on during bulk was a game-changer. Oh, that and actually FOLLOWING your directions about the pre-heat for 1 hour…etc.. (mibad!) That made huge difference in oven rise. Thank you so much for your video and your recipe.