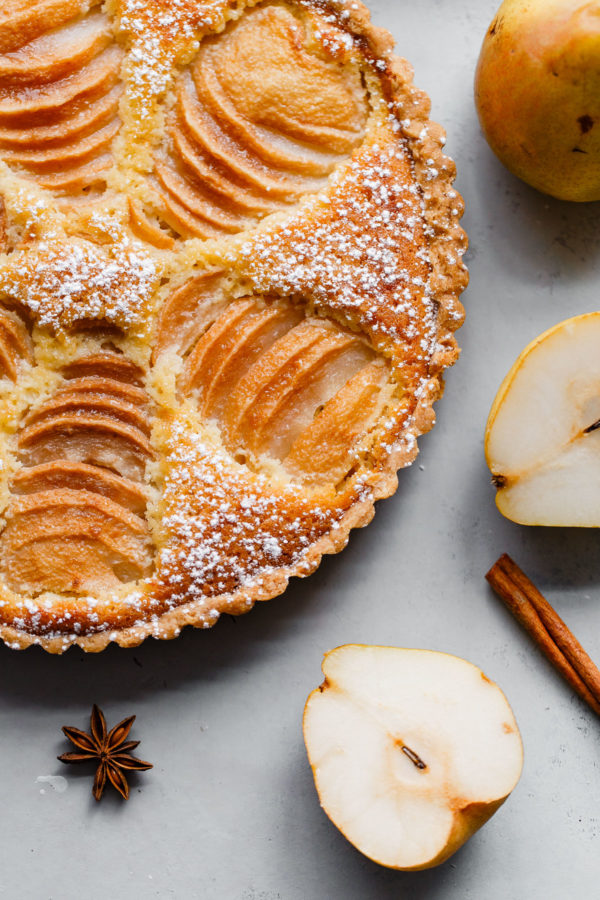
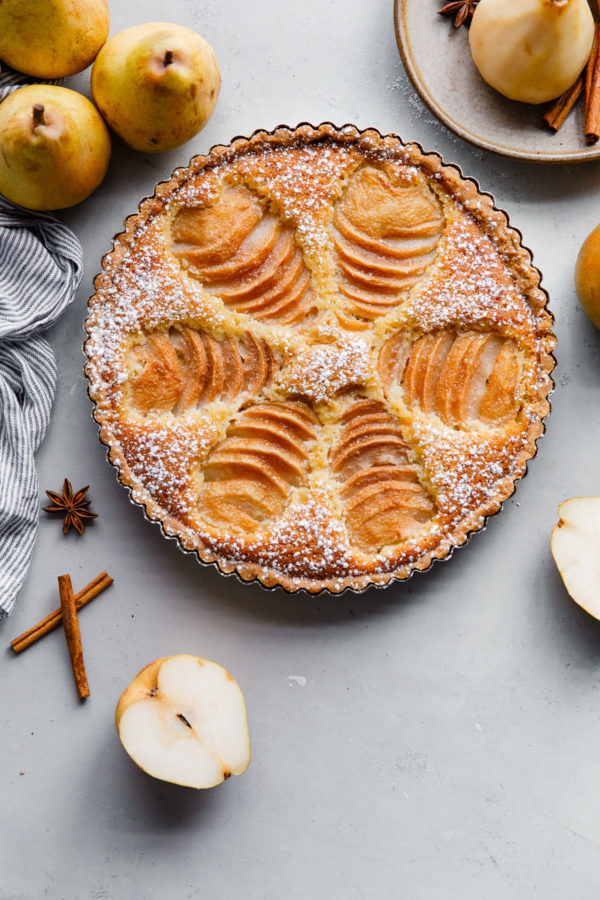
Pear Frangipane Tart
This classic French poached pear tart is made with a sweet tart dough and filled with poached pears and frangipane (almond cream). Serve over the holiday season for a special treat!
. This tart is delicious and is wonderful served on Thanksgiving or over the holiday season! Top with powdered sugar or apricot glaze. #tart #recipe #abeautifulplate #pear #frangipane #poached #French #dessert #pastry")
I’m so excited to partner with Harry & David once again to bring you one of my favorite classic dessert recipes!
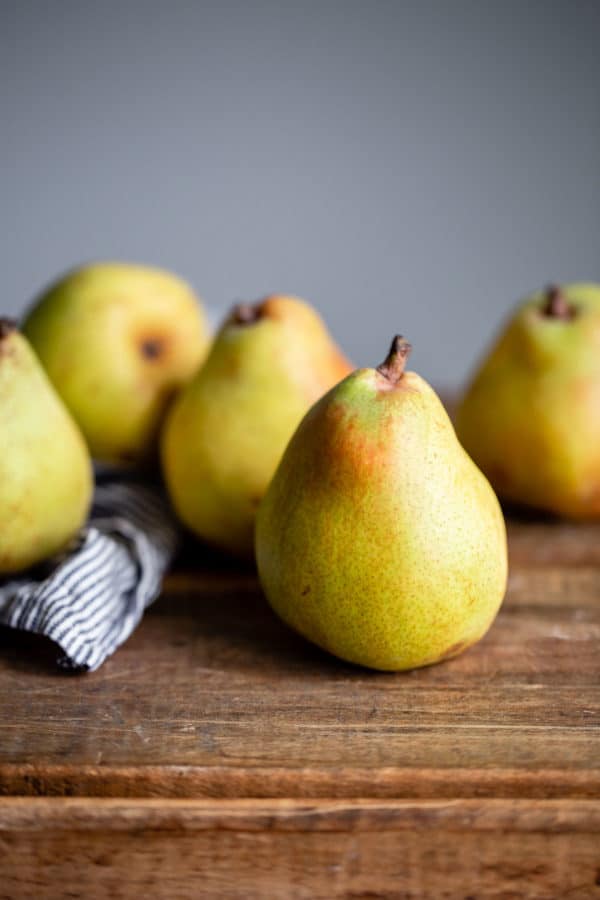
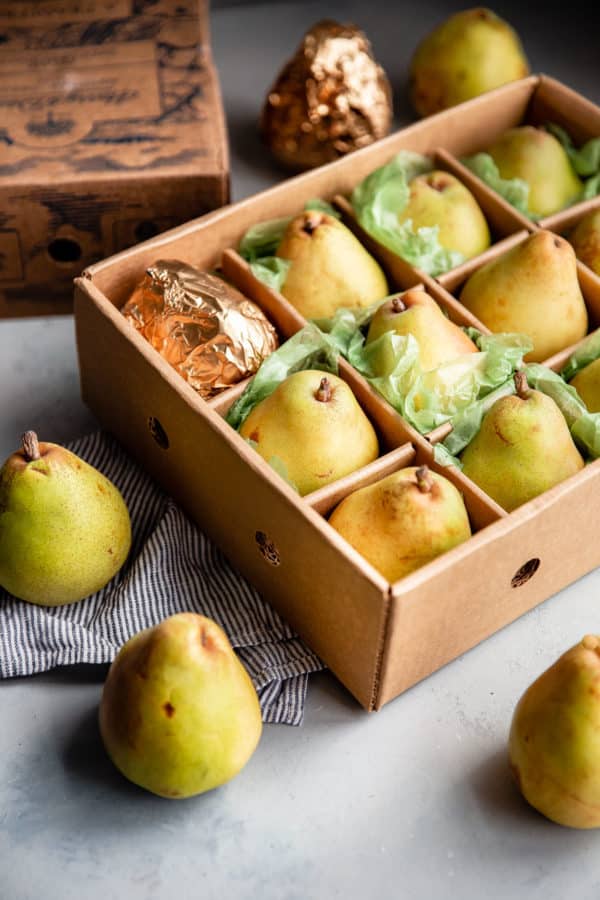
This classic pear frangipane tart uses my all-time favorite Harry & David product: their famous Southern Oregon grown Royal Riviera pears.
My family has been ordering Royal Riviera pears over the holiday season for as long as I can remember. It has become a long-standing tradition and one we look forward to each year.
They make for a wonderful holiday gift to send to friends and family too. I’m all about edible gifts at this time of year.
Ingredient Breakdown: Royal Riviera Pears
Hand picked at peak maturity, Royal Riviera pears are buttery, sweet, and incredibly juicy. Like, so juicy that you’ll have to stand over a sink while you eat them. They’re incredible, always arrive in perfect condition, and never ever disappoint.
So you can imagine my excitement when two boxes of my favorite pears arrived on my doorstep, and I was asked to create a fun new pear recipe for you.
I brainstormed a few ideas, but kept coming back to one of my favorite desserts of all-time: pear frangipane tart. Otherwise known as la tarte bourdaloue.
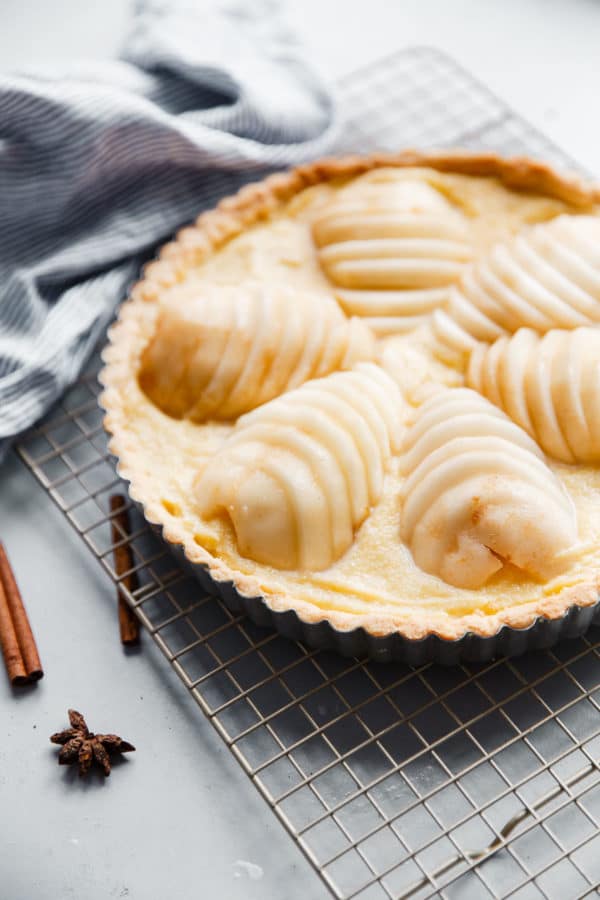
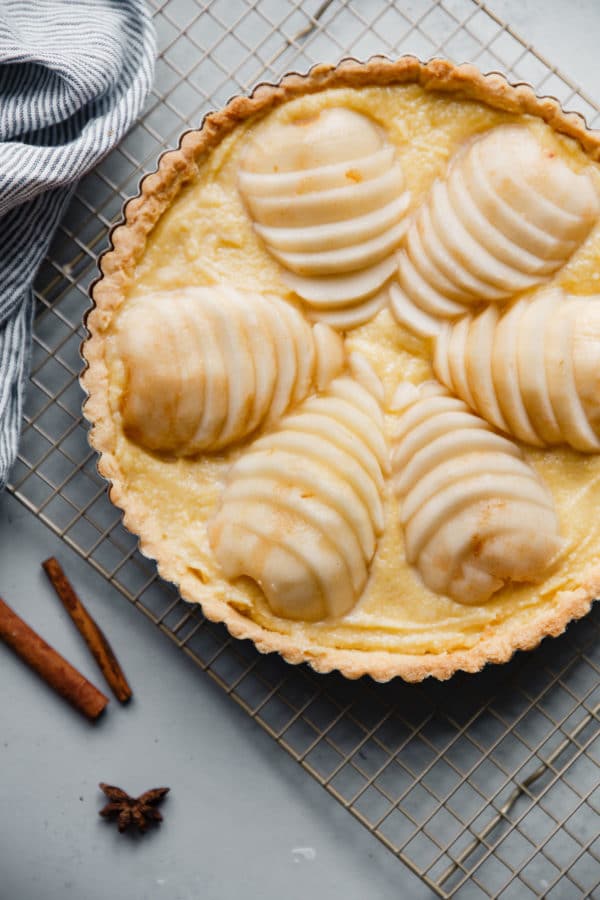
A classic French tart made with pate brisee (sweet tart dough), poached pears, and frangipane (almond cream).
. This tart is delicious and is wonderful served on Thanksgiving or over the holiday season! Top with powdered sugar or apricot glaze. #tart #recipe #abeautifulplate #pear #frangipane #poached #French #dessert #pastry")

How to Poach Pears
In keeping with tradition, this pear tart uses poached pears for the filling. While it’s tempting to just enjoy them on their own, Royal Riviera pears are fabulous for baking, as they have a very buttery texture and maintain their shape extremely well.
For this tart recipe, we’ll be poaching whole cored pears in a simple syrup infused with cinnamon sticks, star anise pods, and vanilla bean.
One important thing to keep in mind when poaching is to always use firm, just barely ripe pears. You do not want to allow the pears to fully ripen or they will break down during the poaching process.
. This tart is delicious and is wonderful served on Thanksgiving or over the holiday season! Top with powdered sugar or apricot glaze. #tart #recipe #abeautifulplate #pear #frangipane #poached #French #dessert #pastry")
What is Frangipane?
Pronounced fran-juh-pan, frangipane is a dessert filling made from ground almonds, butter, eggs, sugar, and small amount of unbleached all-purpose flour. It is sometimes referred to as almond cream.
I fully came to appreciate frangipane in culinary school. We used it constantly for various applications and its ability to transform desserts never ceased to amaze me. It rises as it bakes, and has a wonderful texture and almond flavor that beautifully compliments pears.
Frangipane is made from finely ground almonds, aka. almond flour. While you can flavor frangipane any number of ways, the frangipane filling for this tart is kept fairly traditional.
I like to add fresh lemon zest, a touch of dark rum (optional), and pure vanilla extract.
Blind-Baking the Tart Crust
As is the case with many tart recipes, this pear frangipane tart requires you to blind-bake the tart dough prior to adding the filling.
Blind baking adds another step to this recipe, but is very important for the final result.
It ensures that the tart dough is cooked through completely, gains a deep golden color (aka. flavor!), and ensures a crisp, buttery texture that balances the softer pear frangipane filling.
How to Make It Ahead:
While this dessert does involve several components and steps, there are ways to prep it in advance and make the process more time-friendly.
- Sweet Tart Dough – prepare and refrigerate the tart dough several days in advance (or freeze up to a month ahead and allow to thaw in the refrigerator before rolling out)
- Poached Pears – pears can be poached several days in advance and kept in an airtight container in the fridge.
- Frangipane Filling – frangipane comes together quickly and stores extremely well. Make it several days in advance and store it in the refrigerator until you’re ready to use it. It also freezes well, just be sure to transfer it to the refrigerator in advance and allow it to thaw completely before using.
. This tart is delicious and is wonderful served on Thanksgiving or over the holiday season! Top with powdered sugar or apricot glaze. #tart #recipe #abeautifulplate #pear #frangipane #poached #French #dessert #pastry")
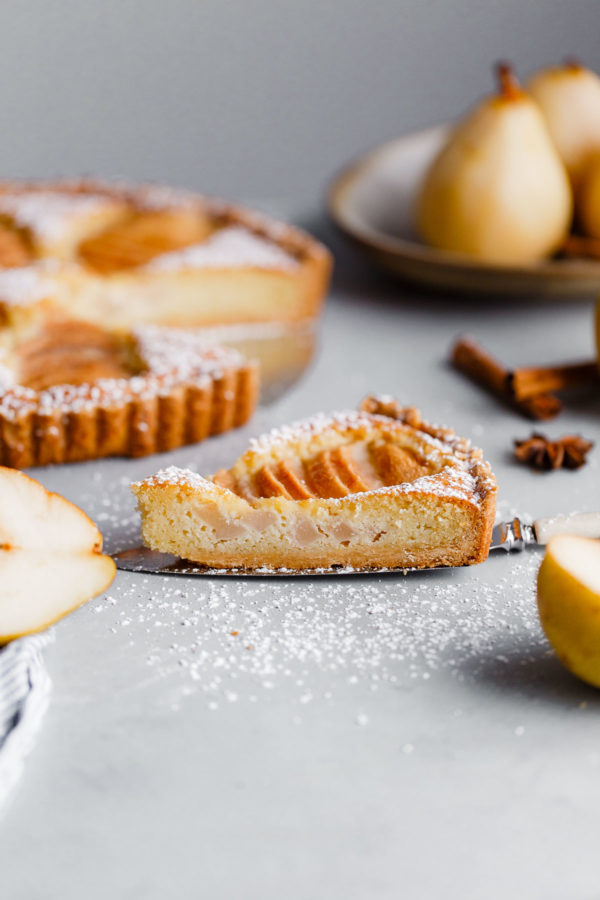
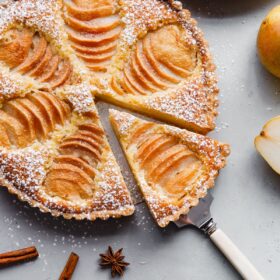
How to Serve Pear Frangipane Tart:
Once baked, you’ll want to allow the tart to cool almost completely before serving. I like to garnish it with a simple dusting of sugar. You can also brush the top with a simple apricot glaze for shine if you desire.
The tart is best served on it’s own or with a simple dollop of whipped cream. This would make an excellent dessert for Thanksgiving or enjoyed over the rest of the holiday season.
. This tart is delicious and is wonderful served on Thanksgiving or over the holiday season! Top with powdered sugar or apricot glaze. #tart #recipe #abeautifulplate #pear #frangipane #poached #French #dessert #pastry")
Pear Frangipane Tart
Ingredients
Tart Dough:
- 2 cups (240 g) unbleached all-purpose flour fluffed, spooned, and leveled
- ⅓ cup (70 g) granulated sugar
- ¼ teaspoon kosher salt
- 1 teaspoon lemon zest
- 11 tablespoons (155 g; 1 stick plus 3 tablespoons) cold unsalted butter cubed
- 1 large egg yolk
- 1 teaspoon pure vanilla extract
Poached Pears:
- 6 cups (1.4 L) cold water
- 2 cups (400 g) granulated sugar
- 2 cinnamon sticks
- 1 star anise pod
- 1 tablespoon vanilla bean paste or 1 tablespoon vanilla extract or 1 vanilla bean, scraped
- 2 strips lemon peel without the pith, plus half a lemon
- 3 Harry & David Royal Riviera Pears firm yet slightly ripe
Frangipane Filling:
- 8 tablespoons (4 oz; 115 grams) unsalted butter softened
- ½ cup + 1 tablespoon (115 g) granulated sugar
- 1 cup (115 g) almond flour
- 3 large whole eggs room temperature
- 1 tablespoon (15 g) unbleached all-purpose flour
- 1 teaspoon pure vanilla extract
- ½ teaspoon lemon zest
- 1 tablespoon dark rum optional
For Serving
- powdered sugar for dusting (optional)
- lightly sweetened whipped cream optional
Instructions
- Prepare the Tart Dough: Lightly grease a 10-inch tart pan with a removable bottom and set aside. In the bowl of a food processor, combine the flour, sugar, salt, and lemon zest. Pulse until well mixed. Add the cold cubed butter and pulse repeatedly until the butter is well distributed into the flour. You shouldn't be able to see any distinguishable pieces. Add the egg yolk and vanilla extract and pulse continuously until the dough just starts to clump together. Note: It might appear very dry at first, but if you continue to pulse and process, it will come together. Be patient.
- Transfer the dough and any smaller pieces to a clean countertop, and knead - pressing the dough down with the heel of your hand - until it is completely smooth. It will resemble a sugar cookie dough in texture. Press the dough into the greased tart pan (with a removable bottom) - it should be just under ¼-inch thick, you should have some dough leftover - and chill in the fridge for a minimum of one hour, or freeze for at least 30 minutes. If you are preparing the dough ahead of time: press it into a disc, wrap tightly in plastic wrap, and refrigerate for a minimum of 1 hour or up to 2 days. If following this method, take the dough out of the fridge at least 15 to 20 minutes before rolling, as it will be too hard to roll right from the fridge. Roll the dough out (between pieces of parchment or wax paper to prevent sticking), carefully pick up and transfer the dough to the tart pan, using fingers to push in dough and gently shape the tart. If it cracks, just simply patch or press the pieces back together. This is a forgiving tart dough. Make sure to press dough tightly inside corners and sides. The dough can be made up to 2 days in advance or frozen up to a month ahead.
- Poach the Pears: As the tart dough is chilling, poach the pears. Combine the cold water and granulated sugar in a medium pot (roughly 3-quart capacity). Place over medium heat and bring to a simmer, stirring occasionally, until the sugar has completely dissolved. Add the cinnamon sticks, star anise pod, vanilla bean paste, and lemon peel.
- Peel the pears, leaving the stem on, and gently rub each pear with the lemon half to prevent the pears from oxidizing. Using melon baller or small paring knife, core the pears from the bottom end. Using a large spoon, gently lower the cored, whole pears into the poaching liquid. The poaching liquid should almost completely cover the pears.
- Return the poaching liquid to a low simmer, cover the surface of the pot with a parchment round, and simmer the pears, occasionally flipping them during the cooking process, for about 12 to 15 minutes or until tender. Remember that you will be cooling the pears in the liquid, so do not overcook. You can test whether the pears are done by piercing the pear (through the bottom end) with a paring knife. The pears should be tender, yet not at all mushy.
- Cool the pears to room temperature in the poaching liquid. Serve or transfer the pears to a large container and refrigerate for up to one week. The poaching liquid can be kept, discarded, or used to store the poached pears. Try reusing the liquid for poaching other pears or as a simple syrup in cocktails, etc.
- Blind Bake the Tart Shell: Meanwhile, preheat the oven to 375°F (190°C) with a rack in the center position. Lightly grease the shiny side of a piece of aluminum foil and fit it, buttered side down, against the chilled tart dough. Fill the foil with baking weights, dried beans, or granulated sugar (all options work well). Place the tart pan on a baking sheet and bake for 20 minutes. Remove the foil and weights, and bake uncovered for an additional 10 to 15 minutes, or until the shell is lightly golden and cooked through. Set tart pan on a wire rack to cool completely before adding the frangipane and poached pears.
- Make the Frangipane Filling: Combine the butter and sugar in the bowl of a stand mixer fitted with a paddle attachment (or use a hand-held mixer). Beat over medium speed until creamy. Over low speed, add the almond flour, alternating with egg until the ingredients are incorporated evenly. Add the flour and mix to combine. Add the vanilla extract, lemon zest, and rum (if using) and mix until just combined. Use right away if the other tart components are ready, or transfer to a container and refrigerate until ready to use.
- Assemble the Tart: Place the tart pan on a baking sheet. Fill the pre-baked tart shell with the frangipane filling and spread into an even layer with an offset spatula. Place the poached pears on a few paper towels to help soak up any excess poaching liquid (this will help prevent it from seeping into the frangipane). Cut the poached pears in half, removing the stem and any core that might remain. Slice the pear halves crosswise into thin slices. Using a spatula, carefully lift each sliced pear half and place on the frangipane, with the narrow end of the pear facing the center of the tart, fanning the slices apart slightly as you work. Repeat with the remaining pear halves, spacing them evenly around the tart.
- Bake at 375°F (190°C) for 40 to 55 minutes, or until the frangipane has risen substantially around the pears and is deep golden brown in color. Note: *If your oven runs hot, you may wish to reduce the temperature by 25 degrees. If the edges of the tart are gaining color too quickly, you can lightly cover them with a ring of foil - be sure to cook the filling through completely. Transfer the tart to a rack to cool until lukewarm or room temperature before removing the sides of the tart pan.
- Before serving, dust lightly with powdered sugar. Serve plain or with whipped cream. While you can prepare several components of this tart ahead, it is best served the day of baking. Any leftovers can be kept at room temperature for 1 to 2 days.
Tips for Success
- It is very important to use firm, just barely ripe pears, whenever you are poaching. Otherwise they will become mushy and overcooked.
- You can use uncooked pears for this recipe as well, however they won't have quite as much flavor as the poached pears. If following this method, use slightly riper pears (but make sure they are still fairly firm).
- For added flavor: Infuse the frangipane with 1/2 teaspoon ground cinnamon and 1/4 teaspoon ground cardamom.
168 Comments on “Pear Frangipane Tart”
This is a favorite. It not only looks impressive but tastes fabulous and is luscious. A quick tip: use canned pear halves vs poaching them. Just pat them dry a bit.
I love your pear tart. Wonder why some are backing it in 350f, 325 and you in 375f?
I’m confuse; would you please let me know; also are you using convection oven or regular
oven?
Thank you so much,
Hi! Glad you enjoy it! All of my recipes are designed for regular oven settings – not convection (I would specify in writing if that was the case). I think you could certainly play around with 350F and 375F for this tart, every oven behaves a little differently. It is not a delicate custard-egg filling, so I don’t see the reason for using a super low 325F setting personally.
Extremely beautiful, thank you for explaining in detail, hats off to ur photography 🥰🥰 im sukanya from Bangalore, India.
One of the best tarts I’ve ever made! Poached the pears and followed the recipe as is.
Perfect!
This is a winner! I made mine in a 9 inch removable pan and still worked out, just a deeper tart.
Every year we receive a box of pears and I am always looking for new recipes and this one will be added to my favorites, it was delish!! Thank you for a great recipe.
Made this on the 24th and it came out so well! My whole family loved it!! I didn’t have a tart pan so I used muffin pans to make mini ones. I decorated them with almond pieces after.
Just made this for an early Christmas dinner, and it came out beautifully!
Only issue I had is the pears seemed to loose all the spice flavor after baking. I tried them as I was adding them to the tart and I could taste the spices really strong, but when I ate the tart next day I couldn’t taste it at all. Any suggestions?
Hi! The pears are actually supposed to be fairly delicate in the tart – that’s traditional. I think you’d have to add spices to the frangipane to notice any substantial difference in flavor.
the best dessert I have ever made! I cheated a bit and used some left-over pastry I had in the fridge already but the filling was as per this recipe.
Thank you very much for the excellent instructions
Made the components ahead of time, so no rush and was able to follow directions diligently. Used a 9 inch tart pan. Used under-ripe Bartlett pears which held together nicely while poaching – sliced thinly to place on top. Added the cardamom and cinnamon to the frangipane. Turned out beautifully! Wish I could post a picture here. 🙂
I never leave recipe reviews, but this was so good that I had no another choice. Absolutely delicious.
This is such a compliment, thank you for taking the time to do so!
Can you poach the pears in red wine or something else to give them a pop of color?
Yep! You could definitely do this, it’s just not as traditional for this particular variation of tart!
Hi Laura,
Can I bake this in a 9” tart pan? I have so many baking pans!
Excited to make this!
Definitely! You’ll just have a little bit extra of everything – so just note that to yourself before starting. Also, keep an eye on bake time because it will most likely need to be reduced. Hope this helps!
Thanks Laura!
How full would you say the tart pan & shell should be with the filling?
3/4?
Yep! A generous 2/3 to 3/4 full. Hope this helps!
I made this for Thanksgiving, and it has easily become something I’d like to make every year! It was so, so good, definitely worth all of the steps.
It took 35 minutes in the oven with the 9” pan 👍
This was a fantastic recipe!!! I loved the simple subtle flavors with the poached pear that made it delicious.
Could you poach the pears in wine?
Also, could you make the three parts early on Thanksgiving day (blind bake crust, mix the Frangipane then refrig and poach and slice the pears)….THEN put the filling and pears in the crust bake while everyone is eating dinner?
I personally would prep the dough ahead (instructions are in the recipe!), frangipane and pears (don’t slice ahead of assembly though) the day BEFORE Thanksgiving – store as separate components of course – and assemble/bake the tart in the morning. I think anything else could be stressful with timing and the attention this recipe requires. Feel free to ask more questions and I’d be happy to elaborate or answer more questions!
Thanks for the quick response. What about the question of poaching in wine?
Stunning.! Worth the work! Don’t look at the nutrition info at the bottom of the recipe.
My nutrition information is just estimates based on calculations and unfortunately takes into account all the poaching liquid (I can’t specify that out), which isn’t used! ?
Can you tell by this if I would have to double the recipe to do 6, mini/individual tarts?
Hello! A friend just dropped off an insane amount of pears and I came across this recipe looking for something to do with them all! I am wondering if you have ever tried freezing this recipe. If you have, what are some tips/advice you might offer in regard to that. Thanks!
I personally wouldn’t freeze the cooked tart, because it might impact the texture and flavor. But a lot of the components can be frozen, but that isn’t very helpful for your situation! You could certainly poach a few pears and leave them in the fridge (in the poaching liquid – just be sure not to let them overcook) for a few days or up to a week.
Maybe try this pear cake recipe? This would freeze better: https://www.abeautifulplate.com/spiced-almond-pear-cake/ or alternatively, you could make a pear crisp and freeze that to reheat later.
If you really have an abundance of pears (I did too, as a I have a bartlett pear tree!), you might want to look into making homemade pear butter/jam (it can be a freezer or fridge jam, so no canning is needed if you’re not comfortable) or dehydrating some (if that is an option), even freezing some ripe chopped pear for smoothies is another great way to use them up.
I made this tart for the family last night and it was very nice however I did have issues with my crust. It wasn’t crumbly at all but over cooked. I blind baked it for the amount of time that you suggested and when I checked it, it was starting to rise up. I then realised that there were no instructions to prick the pastry first with a fork so I then did this which elevated the problem. Unfortunately the crust ended up very overcooked. It was edible but hard to cut with a spoon. I’m not sure if my thermostat is out in my oven ( I do need to check this ) but I do feel that the blind baking time is a bit long when compared to other recipes. I love anything cooked with almond meal and the pears were so delicious. The syrup is just perfect and not to sweet as I thought it would be. I will defiantly make this again as I’m determined to master the crust.
Hi! The crust is not pricked for this recipe – it should not rise much at all during baking. Every oven is different, but since the dough is covered for the majority of the blind baking process, it shouldn’t gain basically any color at all until you remove the foil and bake it a bit longer. You really want the tart crust to be nearly completely cooked through before adding the frangipane.
If the crust does start to gain too much color during the remainder of the baking (once the filling and pears have been added), the best way to protect the edges is with a foil ring! Again, every oven varies by temperature and some ovens have bad hot spots, so these are all factors to look out for and keep an eye on! Glad you enjoyed the taste though!
This ís my second time making this because my husband requested it for for this weekend.
The first time was a success ( and it was my first attempt baking a pie and proud of myself 😀 ).
I didn’t change anything in your recipe and followed the method exactly. While it’s baking in the oven, and the house smells divine!
And for anyone who’s afraid that they might burn the edge of the crust after the blind baking, get a foil and wrap it around ( this is not very environmental friendly but you can re-use it the next time you make another one :))
Thank you, Laura for sharing your recipe.
How do you get your pears so dark? Mine came out quite pale. Thanks
It might just depend on the specific pears you used, your oven calibration, etc. Don’t worry about that too much, as it’s not an integral part of the result that you’re looking for! Hope that helps.