How to Make Clarified Butter, Ghee, and Brown Butter
A comprehensive post on how to make clarified butter, ghee, and brown butter — and the difference between all three!

Hi, let’s talk butter. Ghee vs. clarified butter. Brown butter vs. clarified butter. All types of butter! I don’t discriminate.
Clarified butter, ghee, and brown butter. I’m going to talk about it all. And trust me, it is all good (warning: this is totally where I get nerdy when it comes to food). [Also, I apologize in advance to the person who requested, very politely, in the survey for me to share more recipes using less butter! I swear, this post was already planned!]
Clarified Butter
Are you familiar with clarified butter? I’m sure you are! A lot of people have a tendency to associate it with crab and lobster meat dunking or, sometimes, hollandaise sauce, but that doesn’t even begin to cover this stuff’s potential.
It is basically liquid gold.

Or, more importantly, liquid gold in the cooking world. It’s possibilities and uses are endless.
To sum it up, butter consists of three things: butterfat, milk solids, and water. Most generic store-bought butter is generally 80% butterfat, 16-18% water (yes, really!), and about 1-2% butter solids. In fact, butter is required to be around 80% butterfat in the states.
Most European butters (or European-style butter, such as Plugra, which you can find in most grocery stores now) contain at minimum 82% butterfat. Homemade butter can be as high as 86% butterfat.
It doesn’t sound like a lot, but that small percentage of extra butterfat can make a huge difference in the baking world! The more butterfat, the greater the flavor, the less gluten will develop (tender, flaky pastries!), yada, yada, yada.
But that is an entirely different subject matter. I’m supposed to be talking about clarified butter, right? Well, clarified butter is essentially pure butterfat. No milk solids, no water, just pure butterfat.
Why Use Clarified Butter for Cooking?
Well, there are lots of recipes and dishes that call for cooking with butter. But, as I’m sure many of you have experienced, unless you are cooking it over relatively low heat, it has a tendency to burn and smoke extremely quickly. Not good. That is the result of those pesky (but delicious) milk solids.
Once you make clarified butter and remove those milk solids, butterfat has a very high smoke point. Smoke point is a fancy way of describing the temperature that a fat can be heated to before it starts to smoke (and inevitably, burn).
Normal straight-from-the-fridge butter has a smoke point of 350ºF (176ºC). Sounds high, but that is actually one of the lowest smoke points of any cooking fat.
When you are cooking over high heat (sauteing, searing, stir frying, etc.), you are generally reaching temperatures in excess of 400ºF.
So, what is clarified butter’s smoke point compared to other common cooking fats (such as extra virgin olive, canola, safflower, grape seed oil, etc.)? 450ºF! You basically get an extra 100 degrees of cooking wiggle room.
Clarified butter has a higher smoke point than coconut, grapeseed, lard or duck fat, sesame, canola, and even sunflower oil! Yes, all of those! Butter also has amazing flavor.
Only three other oils can boast higher smoke points than clarified butter: safflower (the highest!), rice bran (second highest), and refined olive oil (note: not extra virgin).
Pretty amazing, right? Hence the liquid gold reference.
Clarified butter became my life during culinary school. I can’t tell you how many pounds and pounds of it I made (or burned, oops) within that six-month period. I don’t want to know how many pounds and pounds of it I consumed.
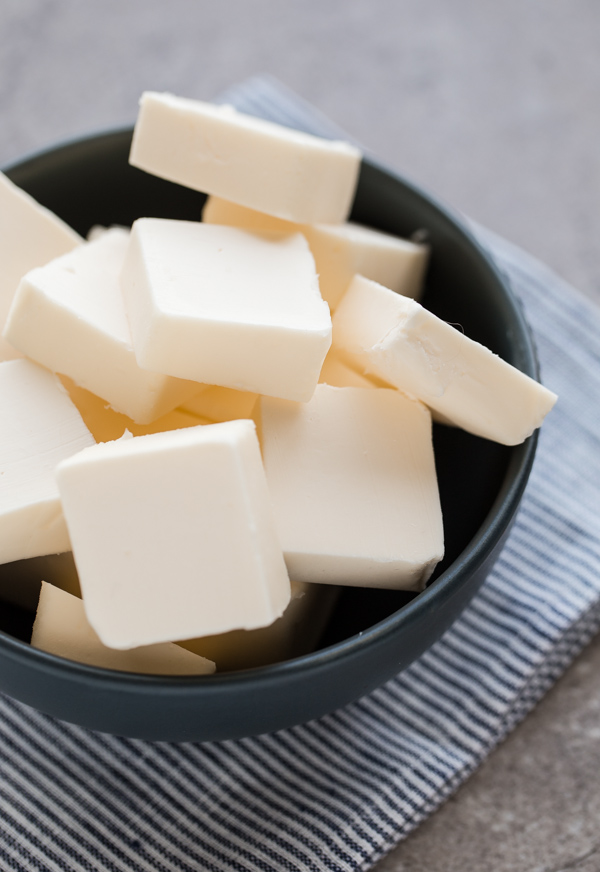
Making clarified butter is not nearly as intimidating as it sounds, but it does require low heat, patience and a watchful eye. Since clarified butter will last in the fridge for at least a month (usually, longer), I prefer to make a large batch of it at a time (i.e. minimum of 2 sticks – 1/2 lb of butter).
Generally, you can expect to lose about 25% in volume once butter is clarified (1 cup of butter will yield roughly 3/4 cup clarified butter).
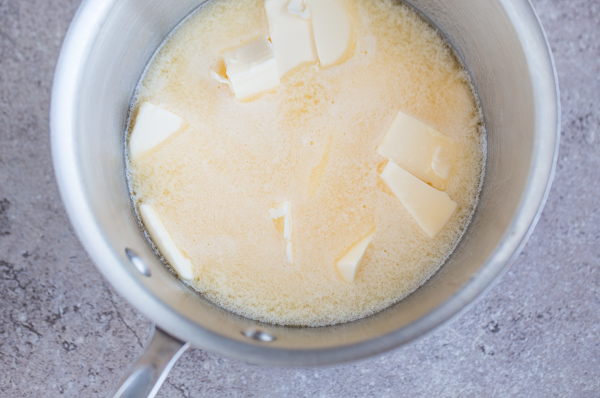
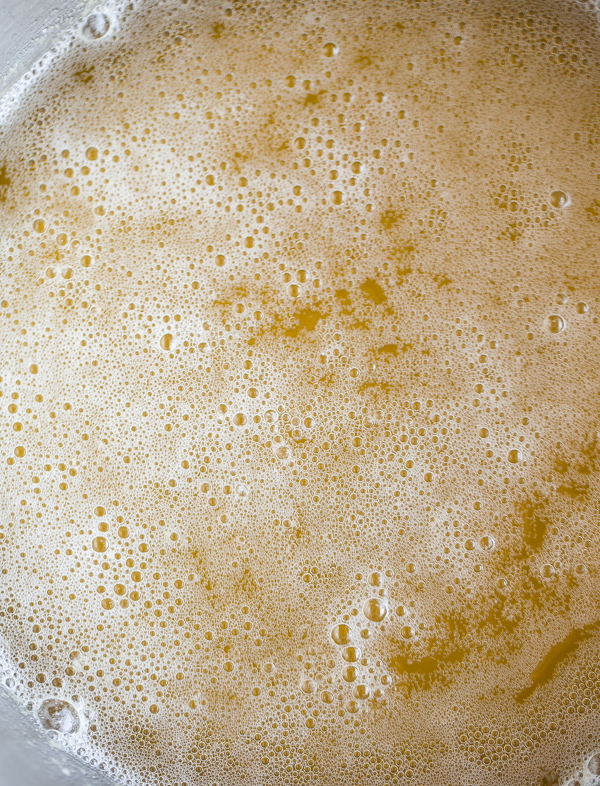
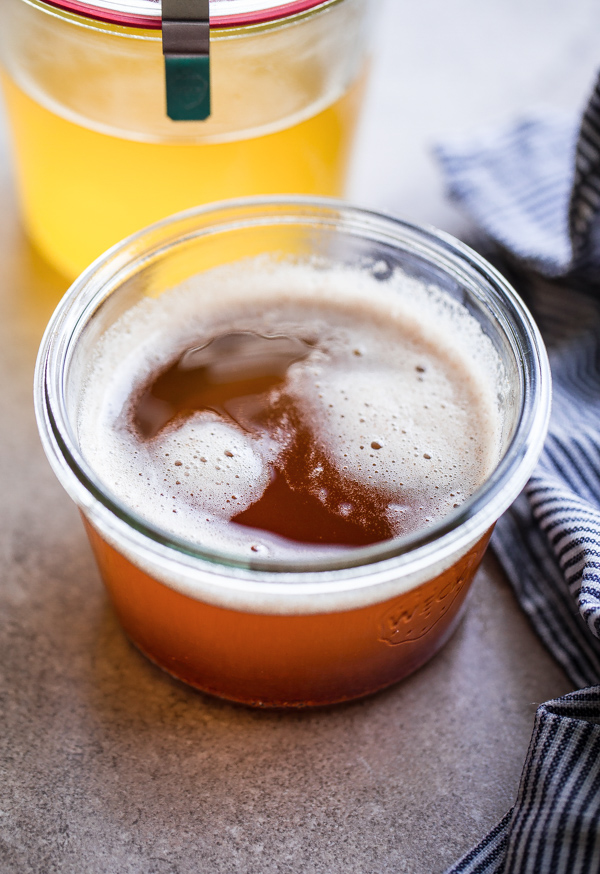
So how do you make it? As I mentioned earlier, clarified butter is pure butterfat. The goal is to remove the milk solids and allow the water content to evaporate during the heating process. Once the butter melts and begins to heat, the butter will begin to foam (I carefully skim and remove the whey that rises to the top the entire time–don’t discard it!).
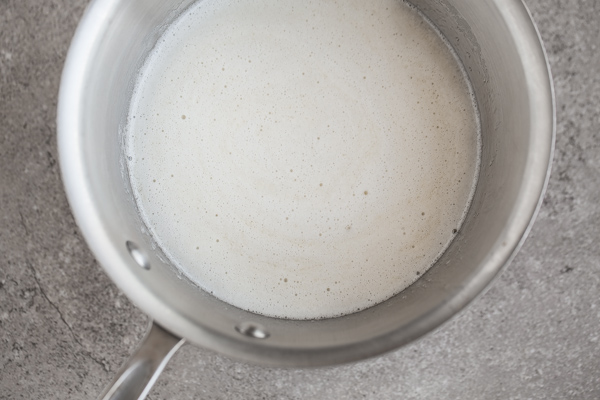
It will also splutter (that is the water evaporating).
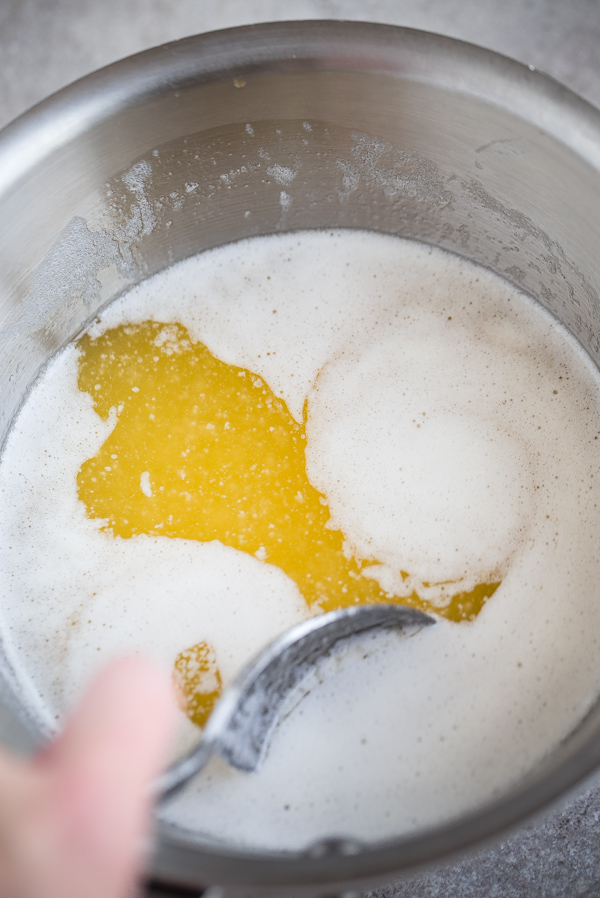
The milk solids will slowly begin to sink to the bottom of the pan.
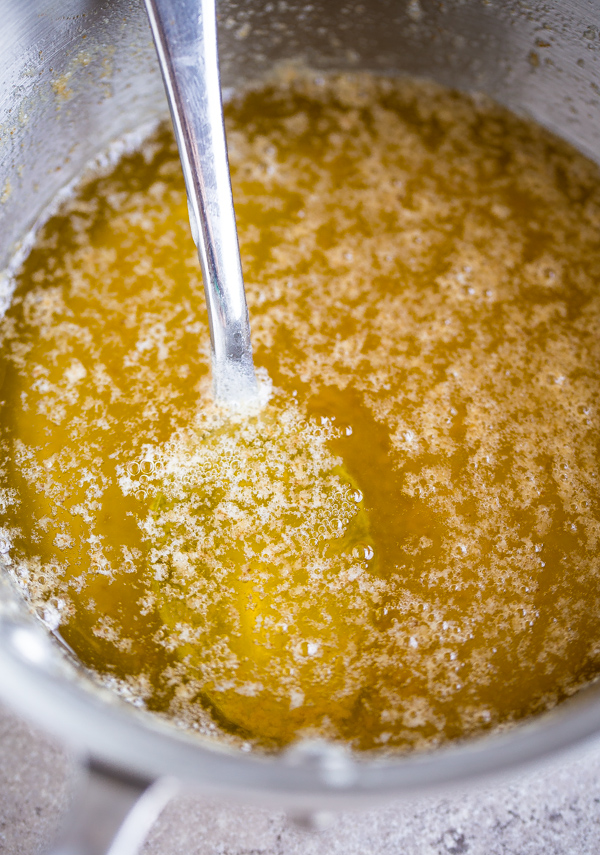
You can tell when the clarified butter is nearly done when it stops spluttering (sign that the water has evaporated), and the bubbles become very, very small and you literally can’t hear much of anything happening anymore (see below).
This is the stage where you need to be extra careful, as at this stage, the milk solids have sunk to the bottom of the pan and can easily begin to brown. For clarified butter, you do not want the butter solids to brown at all. This is the crucial difference between clarified butter and ghee.
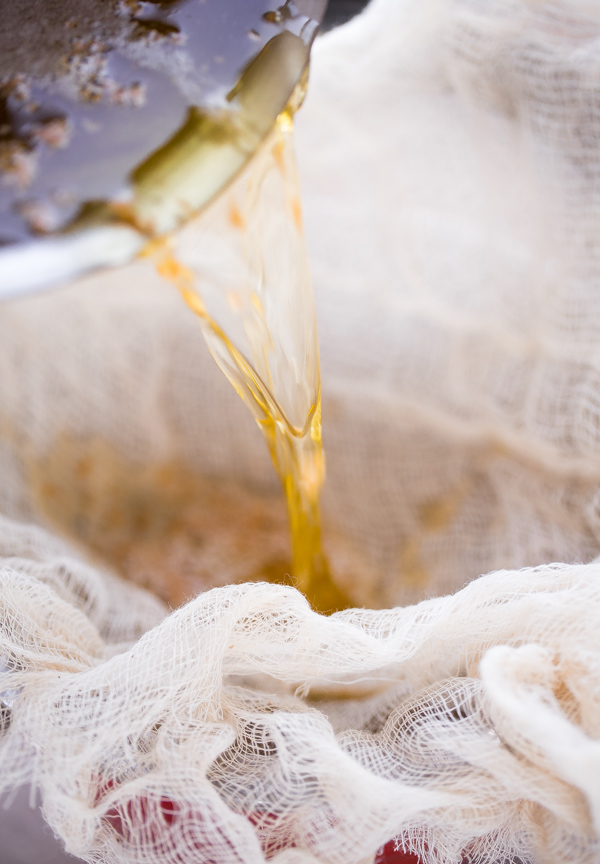
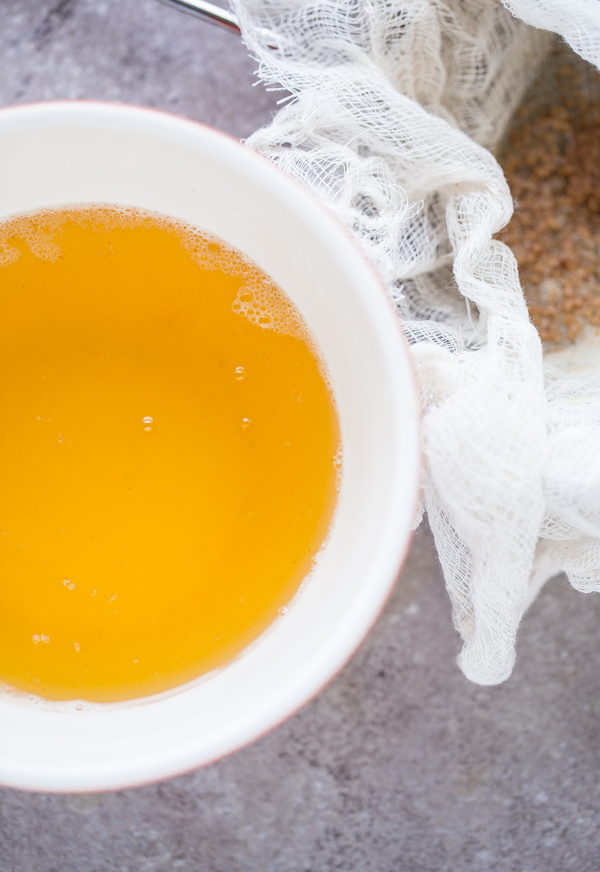
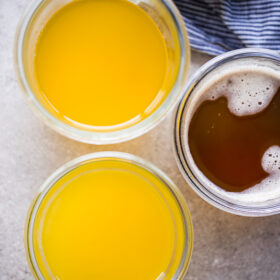
Remove the butter from the heat, allow it to sit for a few minutes, and then pour the clarified butter through a cheesecloth lined fine-meshed sieve, and into a heatproof jar to store! It should be clear and light yellow in color.
Celebrate by making these smoked salmon potato tartines, these crepes with whipped meyer lemon ricotta, these swiss chard and feta phyllo purses, this 30-minute beef bourguignon, or practically anything your heart desires!

Ghee
Have you heard of ghee? Are you wondering what ghee vs clarified butter is?
Ghee is Indian clarified butter. It is used in practically every traditional Indian (as well as other cultures) dish, and while it is the most unfamiliar of cooking butters, ghee has definitely become a cooking buzzword over the last few years.
Traditional clarified butter and ghee are very similar (and can be used interchangeably for the most part)–check back tomorrow for a recipe using it!), but there is one crucial difference between the two.
Unlike clarified butter, which is cooked just to the point where the water evaporates and the milk solids separate (and sink), ghee is cooked until the milk solids begin to caramelize.
If you’ve ever made true brown butter (I’ll get to that in a bit), you know that when milk solids brown, butter becomes very fragrant and nutty. Ghee has a little bit of that.
Since the butter is cooked longer, ghee is also more golden in color. But like clarified butter, ghee does not contain milk solids and is pure butterfat.
Once the milk solids caramelize lightly, the next step is the strain it, as you did with the clarified butter.
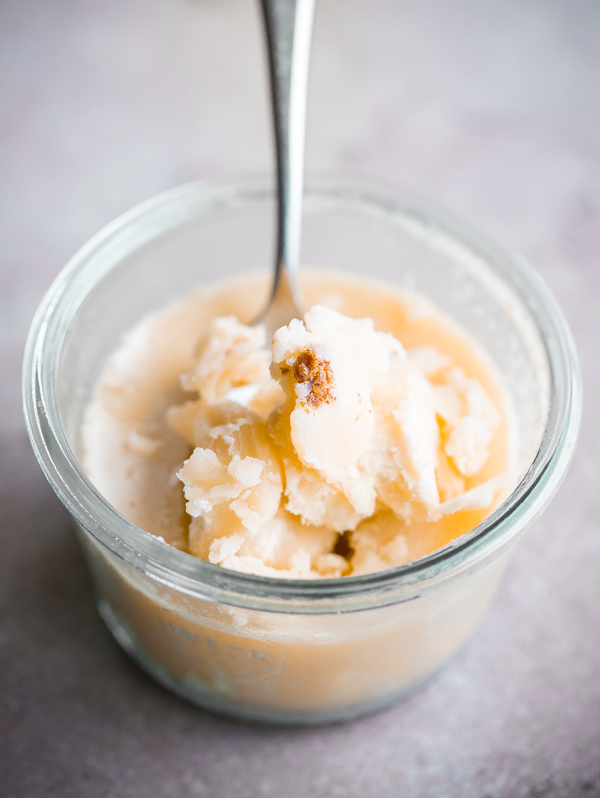
Brown Butter
Ahh, yes, brown butter. Brown butter is that magical thing that happens when you allow the milk solids in butter to caramelize…but you take it one step further. Maybe two to three steps, actually, if we’re getting technical.
You’ve probably accidentally made it on the stove many times, experienced that split second where you go, “Woh, what is that amazing thing that smells so good, like caramel, toasted nuts, and all good things in life?!!”, and then within five seconds of that, cursed an expletive because you got distracted and it turns from perfectly golden brown to….black (and burned).
Seriously, brown butter happens just before regular butter begins to burn (i.e. not good), so you have to be extra careful when making this stuff!
The critical difference between clarified butter and ghee, and its somewhat related cousin, brown butter, is that brown butter contains the milk solids!
Yes, you get to keep and use all those delicious golden brown milk solids.

Brown butter is also cooked much longer than ghee, to the point where the butterfat turns a deep amber brown. The more golden, the better! It has ridiculous flavor!
You can certainly cook with brown butter, but since it does contain the milk solids and has already been cooked, it is better added to a dish at the last minute or cooked over very low heat (for a very short amount of time).
The absolute best thing to make with brown butter, in my opinion, is baked goods! All the baked goods!
After you make the brown butter, put it in a container, allow it to solidify in the fridge, and use it in place of regular butter in practically any recipe.
Melt it again and add it to a brown butter glaze! Make frosting! Bake some brown butter banana bread! Heck, churn it into ice cream!
How to Make Clarified Butter, Ghee, and Brown Butter
Ingredients
- 2 sticks (8 oz; 230 g) high-quality unsalted butter preferably more
Instructions
How to Make Clarified Butter:
- Line a fine-meshed sieve with a few layers of cheesecloth and set over a large heatproof measuring cup. Set aside.
- Cut the butter into ½-inch slices and place in a medium saucepan. Heat the butter over low heat until completely melted.
- Allow the butter to simmer over low heat, as the butter bubbles and splutters, foam–or whey proteins–will begin to rise to the surface. I use a metal spoon and carefully skim the surface (do not stir the butter) to remove the foam during the entire cooking process (I have a small bowl set aside for it). This allows you to see the butter and watch it more carefully. Don’t throw out the foam, it can be stirred into sauce, tossed with pasta, etc. Adjust the heat as necessary.
- Once the foam dissipates (time will vary depending on quality and quantity of butter) and the butter starts spluttering, very small, clear bubbles should form on the surface of the butter. This is a sign that it is almost finished cooking, watch carefully.
- Remove the butter from the heat immediately, allow it to sit for a few minutes, skim any remaining foam that rises to the surface, and carefully pour the butter through the cheesecloth lined sieve, leaving the solids on the bottom of the pan. Allow the butter to cool before transferring to a heatproof jar or container. Use or store in the refrigerator (it should keep for at minimum a month, if not significantly longer).
How to Make Ghee:
- Repeat Steps 1 through 4 above.
- Once the foam dissipates and the butter stops spluttering, continue to cook the butter just until the milk solids begin to caramelize and turn golden brown on the bottom of the pan. It will be slightly more golden in color than clarified butter, and just begin to have a light nutty fragrance.
- Remove the butter from the heat immediately, allow it to sit for a few minutes, skim any remaining foam that rises to the surface, and carefully pour the butter through the cheesecloth lined sieve, so that the cheesecloth catches the milk solids. Allow the butter to cool before transferring to a heatproof jar or container. Use or store in the refrigerator (it should keep for at minimum a month, if not significantly longer).
How to Make Brown Butter:
- Cut the butter into ½-inch slices and place in a medium saucepan. Heat the butter over low heat until completely melted.
- Allow the butter to simmer, at this point you can increase the heat to medium to speed up the process (however, watch it carefully the whole time).
- Continue to cook the butter as it splutters and bubbles, stirring continuously with a rubber spatula and scraping the bottom of the pan continuously (this will help the milk solids caramelize more evenly). The foam will eventually subside, small bubbles will form, and the milk solids will begin to caramelize lightly. Reduce the heat to low and swirl the pan until the butter becomes fragrant (nutty) and a light amber in color.
- Turn off the heat immediately (the butter will continue to cook) and transfer the butter to a heatproof bowl, be sure to scrape any remaining brown bits that stick to the bottom of the saucepan into the bowl–this is the best and most flavorful part of brown butter! Cool the butter, and then store in a glass jar or container. Use or store in the refrigerator (brown butter will keep for at minimum a week, if not longer).
112 Comments on “How to Make Clarified Butter, Ghee, and Brown Butter”
So what is it called if you strain the brown butter? Clarified brown butter? Brown ghee? Could you use that the same as ghee and clarified butter since it has no milk solids and would it also last as just long as ghee since it is has no milk solids? But be extra flavorful?
Hi – that would be closer to ghee, but it would be much darker in color and more toasted than traditional ghee. Not quite as idea for high temperature cooking (because it’s already been taken a bit further), but delicious! As long as it was strained very well and stored in the fridge, it should last for quite some time!
Can clarified butter or ghee be caramelized if there are no milk solids? If so then what is occurring with the fat to caramelize?
Ghee is basically clarified butter that has been browned further. Yes, but you’re essentially slowly moving towards completely burnt fat (black).
Thanks for the lesson
Hey it’s a most beautiful article I have ever came across I would love to have clarity further more on somefhung how come clarified butter and brown butter has .I’ll solids and ghee don’t when process is same it’s just caramelization if milk solids take place in ghee and all 3 are sieved .you have mentioned two times that both clarified butter and clarified brown butter has milk solids.
Excellent explanation and instructions! I cook from scratch A LOT and this is a huge help!
Love this post for its clear directions and simple, well thought out discussion of the differences in these lovely oils. I currently use an oven method for making ghee that I find easy and effective. I place a pound of unsalted butter into an oven-safe pan, uncovered and then put it in a cold oven. Set the temperature to 250 degrees F and leave it for at least 1 hour and 15 minutes. When it’s done, I follow normal straining procedures. I keep the browned bits for mixing on top of popcorn or spreading on a piece of toast with truffle salt.
This is so smart, I’m definitely going to try this out and maybe update this post for an easy open! Thank you for sharing!
Good info
THANK YOU, Laura! As a fellow culinary graduate, it drives me bonkers to see so many bloggers stating that ghee and clarified butter are the same thing. They are CLOSE but they are NOT the same. Oh, and halleluiah for the golden goodness of ghee. P.S., brown butter on all of the things, please! 🙂
Thank you, this was very informative without being too technical. I just discovered using browned butter in my cookies, and it has changed my life! I didn’t know I could keep it in the fridge.
I also want to try making ghee – I haven’t been all that impressed with store-bought, but people keep going on about it, so I’ll try again (though usually I run the opposite direction of anything trendy)
I make Rice Crispy Treats with brown butter and marshmallow creme (it has more vanilla flavor and gooeyness). I often make a small portion for myself to eat warm. I use a 4 cup Pyrex measuring cup and brown about 2 tablespoons of butter in the microwave (now I want to make a big batch to keep in the fridge). I like the little pieces of brown milk solids from just microwaving the butter. I then add about a cup of Marshmallow Fluff and microwave for almost a minute until it’s light and fluffy. I stir the butter and marshmallow creme together for sometimes add a little vanilla extract. Then I slowly pour in rice crispies until the marshmallow mixture is no longer sticky. Then eat warm.
Sometimes I toast my rice crispies in a wok. I’ll do a whole box full and pour them back in the cereal box after they’re cool. Slightly toasting the cereal adds a lot of flavor. If you really want to get fancy, you could make homemade marshmallows or marshmallow fluff. Brown butter rice crispy treats with homemade marshmallow fluff would be absolutely amazing, and you can really taste the brown butter.