Candy Cane Crunch Cake
Moist peppermint chocolate cake filled with candy cane Swiss meringue buttercream and topped with dark chocolate peppermint glaze. This whimsical Candy Cane Crunch Cake is perfect for the holidays!

This recipe was created in partnership with Bob’s Red Mill.
The holiday season has always been magical to me. Despite the chaotic nature and occasional stress-inducing moments (have you met my family?), I look forward to this brief window of time each year.
Even though we are now scattered across the country, my sisters, brothers-in-law, nephew, and I always travel home to DC to celebrate the holidays with my parents. The house is full and there is never a dull moment. It’s a time to unplug, soak it all up, and celebrate traditions. Many old, some new, and a few slightly silly.
As one might guess in a food-obsessed family, most of these traditions take place around the table. The kitchen is constantly abuzz with the sounds of whirling stand mixers, simmering pots, beeping kitchen timers, humming dishwashers, and bossy cooks (raises hand sheepishly).
Today’s Candy Cane Crunch Cake is my latest addition to our ever-evolving holiday menu, and I’m certain you will love it as much as I do! It is festive, downright delicious, and just as much fun to make as it is to devour. It looks intimidating, but I’m going to walk you through the whole process.

The inspiration for this Candy Cane Crunch Cake came from those candy cane sandwich cookies that have made their way into my grocery shopping cart on more than one occasion this season. So simple, yet so addictive! I was able to pry my hands off of the latest box just long enough to brainstorm this cake and since nothing screams ‘happy holidays’ like candy canes, peppermint, and chocolate, it is no surprise that this cake incorporates all three!
Like all good desserts, this candy cane cake starts with a few simple ingredients: flour, cocoa powder, sugar, milk, and eggs. Small deviations make all the difference in flavor and consistency, so try to get your hands on the best that you can find. Leading up to the holidays, I always stock up on baking essentials, including several bags of all-purpose flour and other basics. There are so many distractions during the holiday season and there is nothing worse than running out of flour or having to go on last-minute grocery store runs!
My go-to is Bob’s Red Mill unbleached all purpose flour. It is versatile, reliable, and unlike other all-purpose flours, contains a touch of malted barley flour (which improves rise and browning of yeast breads!). My family uses it for everything from traditional sugar cookies to pumpkin muffins (these are requested each year), fruitcake (don’t knock it ’til you try it), buche de noel, and everything in between.

The cake itself is made up of three 8-inch layers of peppermint chocolate cake. Based on this fabulous London Fog cake, the chocolate cake batter calls for both oil and strongly-brewed coffee (if you’re not a coffee lover, don’t fret – you won’t taste it!), which produces an extra moist chocolate cake that holds up extremely well in the fridge.
It is filled with layers of candy cane Swiss meringue buttercream, aka. Swiss meringue buttercream infused with crushed candy canes and a touch of peppermint extract. It is as dreamy as it sounds, and has a lovely crunch that adds great texture to every bite. If you’ve never made Swiss meringue buttercream before, you’re in for a treat. Unlike traditional frostings, Swiss meringue buttercream is in a league of its own. It is the ultimate frosting for people that don’t normally like frosting.
The basic procedure involves heating egg whites and granulated sugar over a double-broiler until hot, beating the mixture over high speed until it reaches stiff peaks (hence the ‘meringue’ in the name), and slowly adding slightly softened butter until it is shiny, smooth, and airy! Despite taking more effort to throw together, I absolutely adore Swiss meringue buttercream. It’s classy and elegant. It also happens to be less sweet and significantly easier to work with than other frostings.

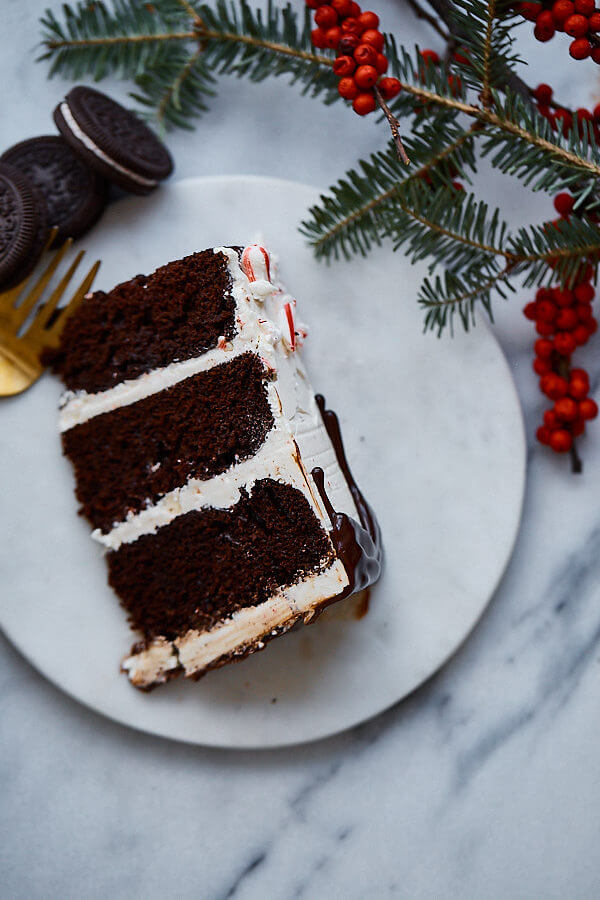
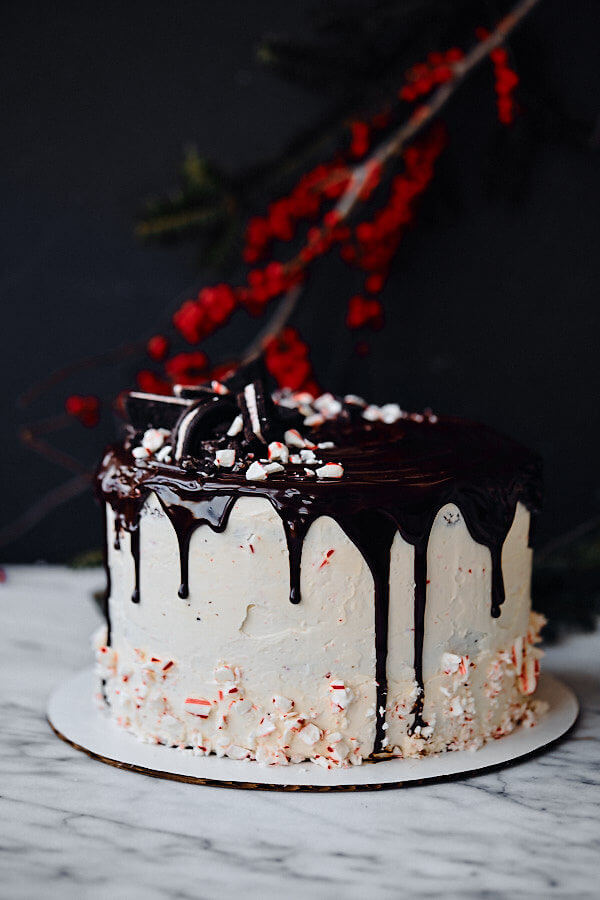
Once the cake has been frosted and chilled, the final touch is the addition of a dark chocolate peppermint glaze (adapted just slightly from my friend and cake inspiration guru Tessa Huff). I love the contrast between the dark chocolate drips and the white candy cane-flecked buttercream, as well as the additional burst of chocolate flavor. It gives the cake that extra wow factor!
The glaze itself is a simple ganache made with bittersweet chocolate, heavy cream, peppermint extract, and touch of corn syrup (to help thin it down for proper drizzling). For best results, allow the ganache to cool at least 5 to 10 minutes before glazing the chilled frosted cake. It should be slightly thick, but still be able to be drizzled from a spoon.
Before serving, top the candy cane crunch cake with halved candy cane sandwich cookies and crushed candy canes, or go wild with your imagination! Add a festive border of crushed candy canes to the bottom of the cake. Small peppermint meringues or store-bought peppermint bark would be great options too.
Winter wonderland in cake form. Let’s do this!


Candy Cane Crunch Cake
Equipment
Ingredients
For the Cake Pans:
- butter or nonstick cooking spray for greasing
- unbleached all-purpose flour for dusting
Chocolate Cake:
- 2½ cups (315 g) Bob’s Red Mill unbleached all-purpose flour
- 1 cup (95 g) unsweetened non-alkalized cocoa powder
- 2½ teaspoon baking powder
- ¾ teaspoon baking soda
- 1 teaspoon kosher salt
- ½ cup + 2 tablespoons (150 mL) canola or vegetable oil
- 2 cups (400 g) granulated sugar
- 2 large eggs room temperature
- 1 large egg yolk room temperature
- 2 teaspoons pure vanilla extract
- 1¼ teaspoon pure peppermint extract
- 1½ cups (360 mL) whole milk room temperature
- 1 cup (240 mL) hot strong-brewed coffee
Candy Cane Swiss Meringue Buttercream:
- 6 standard peppermint candy canes crushed
- ½ cup + 2 tablespoons (150 mL) large egg whites
- 1¼ cups (250 g) granulated sugar
- 2 cups (16 oz; 450 g) unsalted butter room temperature
- 1 teaspoon pure vanilla extract
- ½ teaspoon pure peppermint extract
Dark Chocolate Peppermint Glaze:
- 3 ounces (85 g) bittersweet chocolate finely chopped
- ⅓ cup + 1 tablespoon (135 mL) heavy cream
- 3 tablespoons (45 mL) light corn syrup
- ½ teaspoon pure peppermint extract
- ¼ teaspoon pure vanilla extract
Decorations:
- 2-3 peppermint candy canes crushed
- 4-5 candy canes or peppermint sandwich cookies cut in half (*I used Whole Foods brand!), meringues, or peppermint bark
Instructions
Prepare the Cake:
- Preheat the oven to 350°F (175°C) with a rack in the center position. Grease and flour three 8-inch (20-cm) cake pans and set aside (*see the note section for tips if you do not own three pans).
- In a medium bowl, sift together the flour, cocoa powder, baking powder, baking soda, and salt and set aside.
- In a bowl of a stand mixer fitted with a paddle attachment, beat together the oil and sugar on medium speed for 2 minutes. Over medium speed, add the eggs, egg yolk, vanilla, and peppermint extract. Stop the mixer and scrape down the bowl.
- Turn the mixer to low and add the flour mixture in three batches, alternating with the milk, beginning and ending with the flour mixture. Stop the mixer and scrape down the bowl. With the mixer on low, slowly pour in the hot coffee. Mix on medium-low for no more than 30 seconds, or until combined. Scrape down the bowl to ensure it is incorporated evenly.
- Evenly divide the batter (*see the note section on how to do this!) among the prepared cake pans. Bake for 23 to 25 minutes, or until a toothpick inserted into the center of the cake comes out clean. Let them cool on a wire rack for 10 to 15 minutes before removing the cakes from their pans. Allow the cake layers to cool completely before decorating. *If you are preparing this cake in advance, double-wrap the cooled cake layers in plastic wrap before refrigerating or freezing.
Prepare the Swiss Meringue Buttercream:
- Place the candy canes in a large resealable freezer bag and squeeze out any excess air. Using a rolling pin, crush the candy canes into very small pieces (*you don’t want any of the pieces to be too large or they will be chewy, rather than crunchy). Set aside.
- Place the egg whites and sugar in the bowl of a stand mixer. Whisk them by hand to combine. Fill a medium saucepan with a few inches of water and place it over medium heat until lightly simmering. Place the bowl on top of the saucepan to create a double-broiler, making sure the bottom of the bowl doesn’t touch the water. Whisking intermittently, heat the egg mixture until it reaches 160°F (70°C) on a candy thermometer or is hot to the touch.
- Using the stand mixer, beat the hot egg white mixture over high speed for 8 to 10 minutes or until it reaches stiff peaks. Over low speed, slowly add the chunks of butter (a tablespoon or two at a time). Once incorporated, turn the mixer to medium high and beat until the buttercream is silky smooth, 3 to 5 minutes. Add the vanilla and peppermint extract and beat for an additional 30 seconds. Using a spatula, fold in the crushed candy canes.
Cake Assembly:
- Level the cooled cake layers with a long serrated knife and choose which layer will be the bottom (tip: pick the sturdiest layer). Place it on a cake plate, turning table, or serving dish. Spread on roughly ¾ cup (180 ml) of the buttercream with an offset spatula. Top with the next layer of cake and repeat, ending with the third layer (tip: pick the most level, attractive layer for the top).
- Frost the sides and top of the cake with the remaining buttercream (*if time permits, frost a thin crumb coat, refrigerate for 15 to 20 minutes, and finish with the remaining buttercream). A straight-sided frosting spatula and bench scraper are great for producing smooth sides. Refrigerate the cake, uncovered, for 20 to 25 minute before glazing.
For the Glaze:
- In a small saucepan, combine the chopped bittersweet chocolate, cream, and corn syrup. Place over medium-low heat and stir continuously until the chocolate has melted. Remove from the heat and whisk gently until smooth and shiny. Stir in the peppermint and vanilla extract. Allow the glaze to cool until it is thick, yet can still drizzle from a spoon - about 10 minutes. (*If the glaze is too hot, it will drip too quickly and potentially melt the frosting. If the glaze is too cool, it will set too thickly and won’t drip over the sides).
- Gently spoon the chocolate glaze over the edges of the cake, letting it drip over the edges. Spoon the remainder of the glaze in the center of the top of the cake, spreading and smoothing it into a thin even layer with a small offset spatula. Allow the glaze to set at room temperature before topping with garnishes.
For the Decoration:
- Using your hands, decorate the cake by gently pressing crushed candy canes into the buttercream on the bottom of the cake. Top the cake with peppermint sandwich cookie halves and additional candy cane pieces. *Important Storage Note: The exposed candy cane pieces and cookies will gain moisture and become chewier (and less crunchy), so it is best to do this just before serving if possible.
- Serve the cake slightly chilled or at room temperature. For clean slicing, run a long thin knife under very hot water for several seconds, dry the knife well, and proceed to slice the cake into wedges. Repeat for each slice.
Equipment Note:
- If you do not own three cake pan (I only own two), you can bake two layers at a time – and finish with one final layer. The batter will hold. Wash and cool the cake pan before using again with the remaining batter. The cake will keep in the fridge, covered with plastic wrap, for up to 4 days; it may also be frozen.
Tips for Success:
- To make very even, flat cake layers, I like to use these cake strips, which prevent most doming.
- To Ensure Even Cake Layers: I recommend weighing your empty stand mixer bowl in grams before you start baking this cake. Note the weight on a piece of paper. Weigh the final, prepared cake batter (in the bowl) and subtract the weight of the empty stand mixer bowl. This is the total batter weight. Divide this number by three. This final number is the weight of batter you want in each cake pan before it goes into the oven.
60 Comments on “Candy Cane Crunch Cake”
I want to make this for a family event this weekend where there will be kids! Is there anything I can substitute instead of the coffee – that doesn’t seem a great idea for little kids?! Thank you!
Hi Fee! The coffee flavor isn’t prominent but yes, I suppose there could be some lingering caffeine (though chocolate also contains caffeine haha!), so you might be overthinking the effect. It does add flavor, but you could substitute decaf brewed coffee (my first choice) or hot water (less ideal).
This cake was absolutely delicious. I’m a novice cake baker and ended up using two 9-inch cake pans instead of three 8-inch cake pans. The cake mix was definitely too much in the pans and didn’t rise evenly in a flat way. Any suggestions? I want to make this recipe again because it was so good, maybe even in cupcake format?
Hi! So glad you enjoyed the cake. It is definitely not tested to be a 2 layer cake – as you said, it’s too much batter for two (even 9-inch pans). I really recommend making it as directed, otherwise you’ll have to do some conversions based on the grams to scale it down.
I use the cake strips to help create more even tops – again, I think you experienced more issues due to adjusting the equipment significantly. Otherwise you will need to level the cakes after they have cooled with a serrated knife. Hope this helps!
Not a baker, but wanting to make this for a friends birthday dinner. Can I make the cake and the glaze the day before and refrigerate? Reading comments, and thinking I should do the buttercream the day of. Any help is welcome. Beautiful cake, crossing my fingers!
The cake can definitely be baked the day before (it might be better to actually do it a few days ahead and freeze it actually for better texture) – I would not make the glaze the day before. It needs to be loose and although it’s possible to reheat ganache, it can sometimes break if you’re not careful, so I think it’s best to do that the day of too.
Hi! I am halfway through baking and realized my cocoa powder is alkalized. I guess I will find out shortly if it turns out OK, but wanted to see if you experimented with this and whether the result was fine? Hoping I won’t have to bake another! Thanks so much!
They’re very different for baking (one is neutralized and other is acidic – and therefore this relates to the leaveners used) – it might result in flatter cakes or potentially impact the flavor significantly. You may want to somehow try a tiny piece of baked cake before you go to the trouble of decorating!
I can’t say for sure how much of an impact because I didn’t test the recipe that way! Wish I could be more specific!
Hi there! I work at a bakery and plan to use this recipe (plus a little alteration). I am wondering if I make extra frosting, can I store it to use on a future cake? Or will it not keep since it’s Swiss meringue buttercream? Thanks in advance!
It is Swiss meringue buttercream, so not ideal unless you were familiar with making that in advance/storage. I also would DEFINITELY leave the candy canes out because they could bleed or the texture may change if the cake isn’t served soon after making.
HI Laura, I want to make this cake for Christmas, how would I modify the recipe for 4 7inch cake tins.?
Hi Erin,
Unfortunately I haven’t tested this recipe to know the direct conversion and you’d have to do some math to figure it out. The best advice I could offer is to look at approx. volume of a 8-inch cake pan (roughly 8 cups) and determine the volume of your cake tins (not sure of the height of those) and see how it compares to one another and factor in the additional layer.
My *guess* (please take this with a grain of salt!) is that you might just be able to split this batter into 4-inch tins with no adaptation. The layers might be a touch thinner, and you’ll probably need to watch and reduce the baking time – again, I can’t give an exact modification to follow, but hope this helps!
Hello! This cake is absolutely gorgeous and i’m thinking of making this cake for the holidays, however i cant find corn syrup anywhere! Is there any alternative to con syrup or can i just not use anything?? Please respond and thank you x
It’s the same thing as Karo! It should be in the baking aisle of a basic grocery store. It’s not absolutely crucial, just adds some shininess and helps prevent any potential seizing. An alternative would be a touch of honey!
Thank you so much xx can’t wait to bake this
This cake is BEAUTIFUL and I absolutely love the swiss meringue buttercream. I’ve never worked with it before and it came out wonderfully. The flavors were on point (I was worried about how fast I was burning through that little bottle of peppermint extract). My biggest issue was that the cake was dry – it seemed to go from not done to done and dry in seconds. I’m not sure if its meant to be a drier cake?? Or if I did something wrong – but that actually turned me off. I also love that you listed the weight of the ingredients because I actually don’t measure, only weigh. I’m still giving this recipe 5 stars until I make the cake portion again – I’ll update once I try it again! Oh, I can’t understand that comment about not having enough frosting. I actually went a little skimpy on the inner layers but I had PLENTY and my husband and kids are total frosting piggies!
Hi Lisa!! Thanks for sharing your experience! I’ve never experienced any sort of issue with dryness with this cake batter – as it has a high level of moisture (with coffee, milk, etc.) and is also oil-based. Never heard this from anyone else either. Any chance that your oven might run hot? Or did you make any substitutions? It is not meant to be a dry cake, so I’m wondering if something was omitted or changed. Glad you enjoyed the flavors though and hope that when you make it again, any dryness was a fluke accident.
This cake is DELICIOUS! The sponge is perfect and I LOVE the icing! The only change I made was to make a thicker ganache as a filling. So yummy! Thanks for the wonderful recipe!
So happy that you enjoyed it! Thanks Kerianna!
Should this cake be refrigerated??
Yes. I’ll add a note, but any leftovers (or if you are making the cake ahead) should be stored in the refrigerator. This is true for any cake that has buttercream. It’s ok if it sits out for a bit after making, if you’re planning on serving it that day.
This was fabulous! I made it in 2 cake pans and it came out fine. Used Starlite mints instead of candy canes with no issues. The cake tasted fantastic and looked beautiful. Thanks for the recipe!
Made this for my family Christmas last weekend. Looked beautiful and tested pretty good. Here is my 2 cents: the directions do not tell when to add the extracts to the glaze. The corn syrup made the glaze too runny and I had to refrigerate it overnight to get it to be the right consistency. The Swiss buttercream tasted like butter… Maybe I didn’t beat it enough… That was the only disappointing thing… But many loved it anyway.
Hi Abby, Thanks for your notes. I just updated the glaze instructions to fix that typo – thank you for bringing it to my attention. As far as the glaze – hmm.. I’m wondering if another ingredient might have been left out? I’m not sure how the corn syrup would make it too runny based on the other measurements. It’s also strange to me that it would be a suitable texture after refrigerating for that long – any chance you added too much cream or something else? Buttercream (especially Swiss) is very butter heavy, so the butter flavor is definitely present, but it should have been smooth and fluffy if it was beaten enough and/or made correctly. If the cake was too cold for serving, the buttercream won’t have as enjoyable a texture too. Hope this helps!
You are right about the corn syrup…it would not make it more runny….I should have thought more before I posted 🙂 I have never had ganache still be spreadable after in the fridge but it was 🙂 and everyone is still eating the leftovers so I won’t worry about it being too buttery. Thanks for your quick response!
Help! I’m endeavoring to make this for my daughter’s 17th bday 12/14- we both love the British Baking show and she’ll totally get that this is a gift of love from me! Throw in some meringue decorations and it’s like an entire episode in one cake! BUT one of her friends highly allergic and gluten intolerant! Can I make this a gluten free cake somehow? If not, can you recommend a mini-cake recipe I can make and just throw on the rest (buttercream, ganache, etc?)… This cake is beautiful! Thank you!!!
Hi Michelle! So honored that you are thinking of making this for your daughter’s birthday. I think you should be able to substitute a 1:1 gluten free flour blend (Bob’s Red Mill makes some – which I would recommend – Cup4Cup is another good alternative) for the regular all purpose in this recipe without any issues. Would that work? If so, I would try that!