Classic French Boule
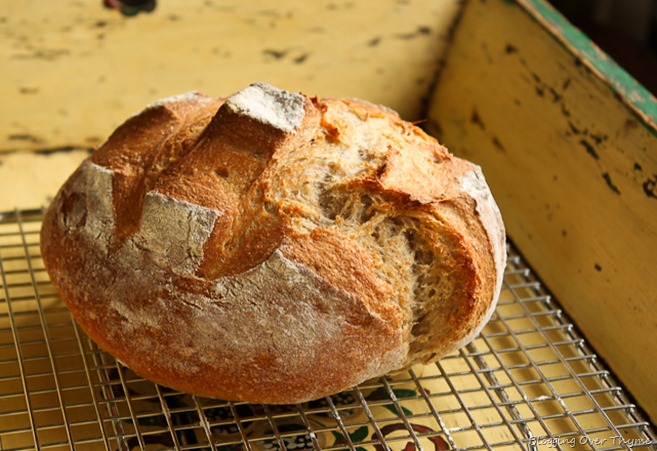
This classic French boule is incredibly easy to make and produces a delicious, crusty artisan style loaf of bread without any of the fuss.

Over the past year, yeast, an ingredient that once intimidated me, has quickly become one of my favorite ingredients to use in the kitchen.
I’ve experimented with multigrain loaves, no knead focaccia, and dinner rolls, but this French Boule is one of my all-time favorite easy bread recipes.
The dough is incredibly easy to make and the resulting artisan-style bread has a lovely hearty crusty and crumb. This bread pairs wonderfully with homemade soup. It can also be used for sandwiches or sliced and served plain with salted butter. In my opinion, great bread doesn’t need a lot of frills or toppings.
If you love this bread and are looking to take your bread baking skills up a notch, I highly recommend trying your hand at homemade sourdough next.
This French Boule dough, which yields two 2-pound loaves, can be stored in the refrigerator for up to two weeks, allowing you to make homemade bread any day of the week. I promise, after tasting this bread, you’ll be making it all the time.
The recipe is adapted slightly from one of my favorite cookbooks, Artisan Bread in 5 Minutes A Day, by Jeff Hertzberg and Zoë Francois.
The original recipe calls for 100% unbleached white flour. This version contains a mixture of whole wheat flour and the end result is even more delicious, while still retaining a crusty exterior and not being overly dense. Happy bread baking!

Classic French Boule
Ingredients
- 3 cups (680g) warm water (95°F/35°C)
- 1 tablespoon + 1½ teaspoons active dry yeast
- 1 tablespoon + 1½ teaspoons (18g) kosher salt
- 4 cups (560g) unbleached all-purpose flour
- 2½ cups (350g) whole wheat flour
- semolina or cornmeal for dusting
Instructions
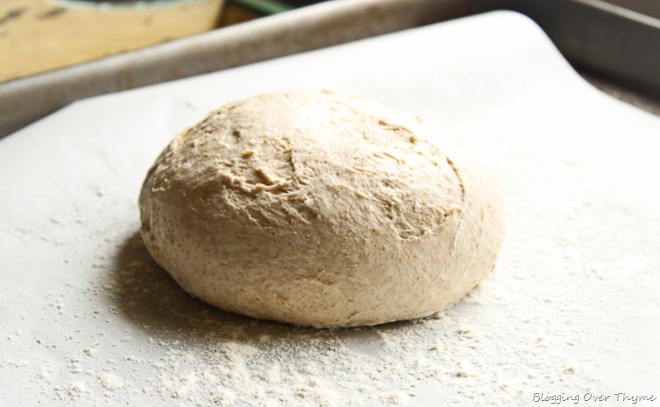
- The Day Before Baking: In a large container(with non-airtight lid), whisk together warm water, yeast, and salt. Slowly add in all-purpose and whole wheat flour, mixing with wooden spoon. When dough becomes too difficult and thick to stir, start mixing with your hands until all the flour is incorporated and the dough is uniform in texture. It should be very wet and sticky, do not knead the dough. Cover the dough lightly (do not seal container) and allow to rise at room temperature for at least 2 hours. Transfer dough container to the refrigerator. Dough can be used the following day or stored for up to 2 weeks.
- Important Baking Note: Steam enables the bread to develop a crusty, crisp exterior. One way to incorporate steam into your oven at home is to place a broiler tray on an oven rack and fill it with very hot water immediately after placing the loaf in the oven. Close the oven door immediately. If you do not own a baking stone or steel, you can also bake this loaf in a Dutch oven using the method outlined in my artisan sourdough bread recipe. It will yield even better results.
- Before Baking: Preheat a pizza stone or steel to 450°F (230°C) for at least 45 minutes. Dust a pizza peel lightly with semolina or cornmeal, remove half of the dough from the refrigerator and quickly “cloak” and shape the dough into a tight round. This shaping process should only take about 30 to 60 seconds total. To do so, stretch the surface around to the bottom of the loaf, creating surface tension on the top of the loaf so that the surface is relatively smooth. Allow the shaped boule to rest uncovered at room temperature for 45 minutes. Equipment Note: If you do own have a pizza peel, place dough on a half sheet pan lined with parchment paper.
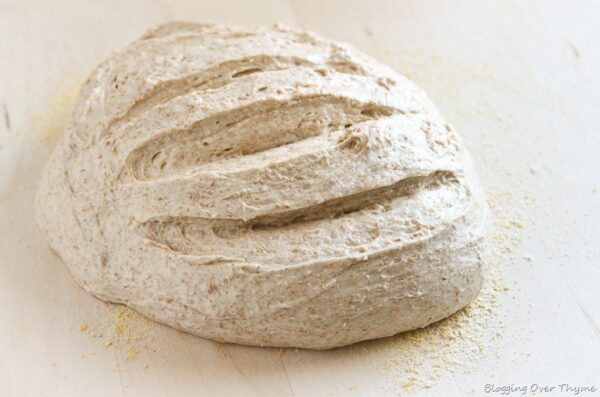
- Once the oven has preheated, lightly dust the top of the loaf with all purpose flour and using a serrated knife, score the top of the loaf with a scallop pattern (see photo) or # pattern. The individual scores should be no more than ½-inch deep.
- Transfer the dough onto the pizza stone (or place the baking sheet in the bottom third of your oven) and bake for 35 to 50 minutes, or until the internal temperature reads between 190°F-200°F (88°C-93°C). Allow loaf to cool on a rack for 1-2 hours before slicing. You can slice into the bread earlier, but allowing it to cool completely yields a better crumb texture and helps prevent the bread from losing moisture and staling faster.
77 Comments on “Classic French Boule”
Wow! Thanks for the quick response! I made the dough last night and just took it out of the fridge. Boy, did it expand a lot. It’s on the baking sheet ready to go in the oven. It looks a lot flatter than the one in the beautiful picture. Did I do something wrong? By the way, I’m in South Florida. Is humidity a factor? I’m going to use the bread to make homemade dressing for tomorrow.
Of course! Did you shape the dough with your hands before putting it in the oven? If you live somewhere where its hot (or your kitchen is very hot), it will definitely be a little flatter (if thats the case, and you prefer a taller loaf, try just allowing it to rest at room temperature for 15 minutes, as opposed to 45), but it should rise quite a bit during baking. It will still be delicious regardless though! And if you’re using it for dressing, the looks don’t matter quite as much 😉 Please let me know how it turns out!
Do you punch the dough down at all?
Can you bake it after the rest period or does it have to be refrigerated first?
Hi Tom! Thanks for your question–you don’t need to punch down the dough. Although you can use the dough immediately after allowing it to rest for two hours–I recommend refrigerating it for at least an hour or two (or overnight, if you have the time), so that it is a little bit more firm and easy to work with. It will result in a higher loaf, because it won’t be quite as loose going into the oven. But you CAN bake it after the rest period. Please let me know if you have any more questions! Thanks!
Whitney — Thank you for asking this question! This bread dough is definitely wet–it is actually a good thing, but it makes it difficult to work with when at room temperature. You might already be doing this, but definitely do the resting in the fridge after initially making the dough, as that will help a lot.
As for the spread during resting to come to room temperature, I suggest experimenting (although I can't say I have personally done this) and maybe decreasing the rest time by half and then trying to bake. Hopefully that will eliminate some of the spreading with time! See if this works, and definitely get back to me and let me know the results. Thanks for visiting!
Laura:
I live in the ever-humid area of New Orleans and have been having a problem with the dough. It is exceedingly wet, and spreads over a massive area when I let it rest for 45 minutes. What would you suggest I adjust to remedy this problem? I have been adding more flour, but it results in a very dense and dry bread.
Thanks!!
Tom LIm — I'm glad you asked this, because its actually something I was curious about ever since you brought it up. I looked to the original recipe inspiration source and they say that instant yeast (and actually any type of yeast) should work just as well with this recipe.
However, the storage time of the dough in the fridge really enables this to be possible without any major changes, so don't skip that part! Hope this helps!
Can I substitute Active Dry Yeast with Instant Yeast for this recipe? What would therefore change? Eg. rise time, amount of yeast, amount of water, flour, etc. Thanks in advance.
Zenedidyk — I learned from somewhere that the best way to store bread is leave it cut side down on a cutting board. Occasionally, if it has been more than a day or two, the crust starts to get too hard this way, but I feel like it eliminates the moisture problem from putting it in ziploc bags. Another option is to stick it in a hot oven for 10-15 minutes to get the crust crispy again! That always makes a big difference. Hope this helps!
Sheebee — Hmmm…I haven't done this with this recipe. I'm not sure if it would work as well–and it might lead to a drier bread. I would say just do the same technique and see how it works out. Can't promise anything though! But be sure to let me know how it goes if you do 🙂
I want to make rolls instead, Do you think the recipe would adapt well to that? Any suggestions? Thanks!
Hello, beautiful photos! I recently learned to make this kind of bread and I'm loving it. Do you have any suggestions for how to store the bread once it's baked (like to eat the next day after baking)?
No seriously–you can store the dough for up to to TWO weeks! Pretty incredible, huh?
It actually develops a slight sourdough taste as well. Enjoy! 🙂
My heart just dropped. “Place in refrigerator and cover lightly for up to two weeks.” ??? Say it ain’t so. Hahaaa, I’m sure it’s a typo coz I mean, that would just be abuse.
that looks straight out of a bakery! amazing. will definitely have to try this but i can absolutely guarantee it will not compare to yours 🙂
It really isn’t! I don’t know why it took me so long to get around to using it more frequently. I always used to worry about proofing it or mixing it with the right temp water—but this bread recipe is not picky about any of that stuff. And it turns out better than most complicated bread recipes!
Thanks so much Joanne! Love your blog, by the way.
Thanks so much Nuria! I love making bread, something about it is so comforting. And nothing beats the fresh stuff! 🙂
Definitely let me know if you try it, you won’t be disappointed!
Laura
I used to be deathly afraid of working with yeast but once you do it a few times, you realize it’s not such a big deal! Though the bread you get out of it IS kind of a big deal….and a delicious deal. This looks amazing. Straight out of a bakery window.
You’ve got a beautiful blog, Laura! I have tried to make my own bread too and I know it’s a wonderful experience! Would love to try your classic French Boule 😀
Thanks so much Lindsay! That means a lot 🙂
Do I have to let the yeast sit for a couple minutes before mixing everything together, or do I just mix all the ingredients immediately after putting the yeast in the warm water?
You can just mix the ingredients in! Thanks for the great question.
Yes! It’s the exact same one.
Is this the recipe that you made for us?!?! Thanks for posting the recipe!
Wow – I’m totally distracted by your pictures! Love them!
Hi,
I am trying to make this bread , while kneading my dough was not sticky and was on the dry side.i followed the recipe exactly, should i have added more water(more than 3 cups).
Hmm…the dough definitely shouldn’t be dry–it should be very wet, actually. Are you sure you incorporated all of the water or used the right flour measurements???
HI Laura,
Actually my dough after keeping for few hours was in good shape.Although it was very hard to mix it, but the end result is great.I had a perfect bread