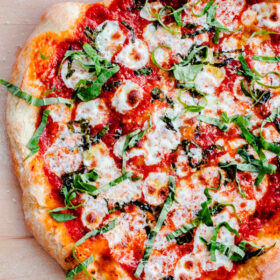
BEST Homemade Margherita Pizza
My search for the best homemade margherita pizza (made in a standard oven with everyday ingredients) is over! You’ll want to make this homemade pizza recipe over and over again. For step-by-step dough instructions, check out the margherita pizza video below!

The time has come! I’ve been teasing you on Instagram for weeks, and I sincerely apologize. I was busy eating this margherita pizza.
Ok, so let me be honest. I rarely ever, EVER tell you that a recipe is the best of anything. Let alone, put it in caps! Sure, I’ll say that something is delicious, but declaring such bold statements generally makes me extremely uncomfortable. I’m terrified that you will go home and make said best-ever-recipe and be disappointed. I would hate that.
But I’m feeling very good about this best margherita pizza recipe and I’m confident that you will love it.

I’m not an authority on homemade pizza by any means, but I’ve definitely eaten my share of pizza, both excellent and not so great.
The best margherita pizza that I’ve ever eaten in my entire life was in Naples, Italy a few years ago during our trip to the Amalfi Coast. We stood in line in a cobblestone street just off of Via Tribunali in the historic neighborhood (known for having the best pizza places in the entire world), and snagged a table at the famous Gino Sorbillo.
It’s always a good sign when you’re in Italy and a million other Italians are standing in line for the exact same pizza. No tourists, just Italians. It wasn’t fancy in the slightest. There was a disco light hanging from the ceiling and the cups were of the flimsy plastic variety.
Oh, but it was glorious. The pizzas cost only three euros and arrived flopping off of the plates. Literally, flopping. They were huge. I ate every last bite of that pizza and came back for another one the very next day.

So, when I say that today’s recipe is the best homemade margherita pizza, I’m taking all of these pizza-eating experiences into account. I’m not going to claim that this pizza tastes identical to a true Neapolitan pizza or that you’ll never taste a better pizza outside of your kitchen again. That would be ludicrous (and slightly obnoxious) and just not true.
But I do believe that this is the best margherita pizza that you’ll be able to make in your own kitchen, with a standard oven, with normal everyday ingredients (no fancy flours required), and without preparing an incredibly time-intensive pizza dough days in advance.
Homemade Pizza Equipment Recommendations:
First things first. Let’s talk equipment. A baking stone or steel is a must for great pizza at home. A few years ago, I replaced my traditional baking stone with a baking steel. It is a game-changer.
Baking steels are expensive, but I genuinely believe they are 100% worth the investment if you are interested in making pizza or bread at home. Baking steels absorb the heat from your oven and allow you to mimic brick-ovens, which generally reach temperatures in excess of 800 degrees Fahrenheit. They help you achieve crispy crusts by pulling moisture from whatever dough you are baking, including pizza crusts.
I also recommend a pizza peel, because it will make pizza-making so much easier. Wooden or metal, it will allow you to slide the pizza quickly onto the baking stone and make it much easier to remove the pizza from the oven once it is done.
If you don’t own a pizza peel (or don’t want to own a pizza peel), you can use the back of a large baking sheet or flat cookie sheet to transfer the pizza onto the stone – but it is tricky!

Tips for Margherita Pizza Success:
For the best margherita pizza, you will want to preheat your oven to the highest temperature possible. For my oven, that is 550 degrees Fahrenheit. I allow my baking steel to preheat for at least 30 minutes (regardless of whether my oven is ready as it takes time for your baking stone to come to temperature). The higher the temperature the better.
This recipe makes two 10-inch pizzas, and they should be able to properly cook in 7 to 8 minutes at that temperature.
Best Homemade Margherita Pizza
Ingredients
Homemade Pizza Dough:
- 2½ cups (300 g) unbleached all-purpose flour
- 1 teaspoon granulated sugar
- ½ teaspoon active dry yeast or SAF instant yeast
- ¾ teaspoon kosher salt
- 7 ounces (105°F to 115°F) warm water
- 1 tablespoon extra virgin olive oil
- semolina and all-purpose flour for dusting the pizza peel
Pizza Sauce:
- 1 cup pureed or crushed canned San Marzano tomatoes (or canned Italian plum tomatoes)
- 2-3 fresh garlic cloves grated with a microplane or pressed
- 1 teaspoon extra virgin olive oil plus more for drizzling
- 2-3 large pinches of kosher salt to taste
- ¼ teaspoon freshly ground black pepper
Toppings:
- 2-3 tablespoons finely grated parmigiano-reggiano cheese plus more for serving
- 7 ounces fresh mozzarella cheese (not packed in water) cut into ½-inch cubes
- 5-6 large fresh basil leaves plus more for garnishing
- dried red pepper flakes optional
Instructions
- Prepare Pizza Dough: In a medium bowl, whisk together the all-purpose flour, sugar, yeast and salt. Add the warm water and olive oil, and stir the mixture with a wooden spoon until the dough just begins to come together. It will seem shaggy and dry, but don’t worry.
- Scrape the dough onto a well-floured counter top and knead the dough for three minutes. It should quickly come together and begin to get sticky. Dust the dough with flour as needed (sometimes I will have to do this 2 to 3 times, depending on humidity levels) – it should be slightly tacky, but should not be sticking to your counter top. After about 3 minutes, the dough should be smooth, slightly elastic, and tacky. Lightly grease a large mixing bowl with olive oil, and place the dough into the bowl.
- Cover the bowl with a kitchen towel (or plastic wrap) and allow the dough to rise in a warm, dry area of your kitchen for 2 hours or until the dough has doubled in size. Proofing Tip: If your kitchen is very cold, heat a large heatproof measuring cup of water in the microwave for 2 to 3 minutes. This creates a nice warm environment. Remove the cup and place the bowl with the dough in the microwave until it has risen. [If you are preparing the dough in advance, see the note section for freezing instructions.]
- Preheat Oven and Pizza Steel or Stone: Place the pizza steel (or stone) on the second to top rack of your oven (roughly 8 inches from the broiler element), and preheat the oven and steel (or stone) to 550°F (285°C) for a minumum of 1 hour. If your oven does not go up to 550°F (285°C) or you are using a delicate pizza stone, I recommend heating it to a maximum of 500°F (260°C)
- As the oven is preheating, assemble the ingredients. In a small bowl, stir together the pureed tomatoes, minced garlic, extra virgin olive oil, pepper, and salt. Set aside another small bowl with the cubed mozzarella cheese (pat the cheese with a paper towel to remove any excess moisture). Set aside the basil leaves and grated parmigiano-reggiano cheese for easy grabbing.
- Separate the dough into two equal-sized portions. It will deflate slightly, but that is OK. Place the dough on a large plate or floured counter top, cover gently with plastic wrap, and allow the dough to rest for 5 to 10 minutes.
- Assemble the Pizza: Sprinkle the pizza peel (if you do not own a pizza peel, you can try using the back of a half sheet pan - but it is tricky!) with a tablespoon of semolina and dusting of all-purpose flour. Gently use both hands to stretch one ball of pizza dough into roughly a 10-inch circle (don’t worry if its not perfectly uniform). If the dough springs back or is too elastic, allow it to rest for an additional five minutes. The edges of the dough can be slightly thicker, but make sure the center of the dough is thin (you should be able to see some light through it if you held it up). Gently transfer the dough onto the semolina and flour dusted pizza peel or baking sheet.
- Drizzle or brush the dough lightly (using your fingertips) with olive oil (roughly a teaspoon. Using a large spoon, add roughly ½ cup of the tomato sauce onto the pizza dough, leaving a ½-inch or ¾-inch border on all sides. Use the back of the spoon to spread it evenly and thinly. Sprinkle a tablespoon of parmigiano-reggiano cheese onto the pizza sauce. Add half of the cubed mozzarella, distributing it evenly over the entire pizza. Using your hands, tear a few large basil leaves, and sprinkle the basil over the pizza. At this point, I’ll occasionally stretch the sides of the dough out a bit to make it even thinner. Gently slide the pizza from the peel onto the heated baking stone. Bake for 7 to 8 minutes, or until the crust is golden and the cheese is bubbling and caramelized and the edges of the pizza are golden brown. Note: If you're looking for more color, finish the pizza under the low or medium broil setting, but watch it carefully! Remove the pizza carefully from the oven with the pizza peel, transfer to a wooden cutting board or foil, drizzle the top with olive oil, some grated parmigiano-reggiano cheese, and chiffonade of fresh basil. Slice and serve immediately and/or prepare the second pizza.
- Serving Tip: If you’re serving two pizzas at once, I recommend placing the cooked pizza on a separate baking sheet while you prepare the other pizza. In the last few minutes of cooking, place the prepared pizza into the oven (on a rack below the pizza stone) so that it is extra hot for serving. Otherwise, I recommend serving one pizza fresh out of the oven, keeping the oven hot, and preparing the second pizza after people have gone through the first one! The pizza will taste great either way, but it is at its prime within minutes out of the oven!.
Video
Tips for Success:
- Semolina flour has a higher burn point than regular flour, and ensures that the dough will not stick to the peel when transferring the pizza to the oven.
- There is no need to dissolve the yeast in warm water before using (as commonly believed). Active dry yeast has been reformulated in recent years to contain significantly smaller granules and will not have trouble dissolving into the dough. However, it is important to ensure that your active dry yeast is indeed alive and well. Double check your expiration date and when in a doubt, proof it.
- If preparing the dough in advance: once the dough has rested for two hours, separate into two portions, wrap each piece of dough well in plastic wrap, and place them in a freezer-safe bag. The dough can be chilled in the refrigerator for up to 24 hours or frozen for 3 months. Thaw the dough in the refrigerator, and allow it to stand at room temperature (in a greased bowl, covered with a kitchen towel) for at least 30 minutes before using.

203 Comments on “BEST Homemade Margherita Pizza”
That’s a beautiful pizza margherita!
Live alone. How do I freeze extra crust? What is procedure when thawing and using later? Thanks
Thanks for this. My crust came out super doughy / undercooked. Any advice?
And a few nights later, the extra dough I stored in the fridge (I set it out for about 2 hours first) held its shape much better and turned out too crackery.
How did you cook the pizza? Did you change the temperature at all? Or cook it on another surface? This recipe will produce the best results at a super high temperature using a preheated baking stone – as described in the recipe and post itself. It sounds like you might have cooked it a different way or didn’t stretch the dough to be thin enough. The dough should be very thin going into the oven, as I mention in the instructions, otherwise it would absolutely be doughy.
Per your refrigerating comment, did the dough sit in your refrigerator for days? If so, that would totally change the texture, but it’s hard to say the exact culprit without more details. I don’t recommend storing the dough in the fridge for days.
If I make the dough the night before do I have to freeze it or is it okay to refrigorate it?
You could definitely refrigerate the dough and it should still come out well (I’ll test this and come back with notes for others, thanks for pointing this out!). I would just make sure to allow it to come to room temperature for at least an hour or longer so that it is not so cold for shaping. Hope this helps and please report back if you try it!
Can you detail how to make the tomato sauce? Do I need to peel them, etc? Thanks! Can’t wait to try it!
Hi Tara! The tomato sauce instructions are in the recipe. This uses canned peeled tomatoes (crushed or pureed in a food processor), so there is no need to peel anything.
Made this last night. Turned out pretty and tasted delicious!
So happy to hear that! Thanks Tara!
On my second go with this recipe as it looks so divine but why oh why is the water in ounces when everything else is metric? ?
Pingback: Pizza Night Recipes that the family will love
Have you ever tried making this with whole wheat flour? Any luck?
I haven’t personally made this exact recipe with whole wheat flour, but it is on my list of things to try/adapt and post! Whole wheat flour absorbs more liquid than all-purpose (and responds differently to yeast), so I have a feeling the quantities would need to be adjusted in order for it to be as good. Stay tuned!
I have just made a pizza using a combination of your ideas. I made the dough and the pizza sauce ad-literam. I have no stone but I’ve had the oven at the highest temperature possible (550F) and I used a glass dish.
The toppings were grilled chicken breast, frozen mushrooms (mixed), asparagus (sliced), red pepper (long and thin slices), kalamata olives, cheese (feta and mild brick mozzarella), and fresh basil. It was delicious! Thank you for the ideas!
I absolutely love this recipe! My husband and I found it on Pinterest a little over a year ago and literally started making it once a week as our go- to recipe. It really is so simple that I can’t believe I waited so long to try it. And, it tastes incredible!
So thrilled to hear that! My husband and I love making homemade pizza too, and this is one of my favorite recipes on the site. Thank you so much for coming back to leave recipe feedback. I really appreciate it, and hope you’ll have a chance to stick around and check out a few of my other recipes!
I am trying this tonight and I can’t wait!
One thought is since I am paleo, I am using this dough… any thoughts or changes to it?
http://eatsomethingdelicious.com/multi-purpose-dough/
This looks delicious! Any ideas on how many tomatoes or oz of tomatoes it takes to equal the amount from a can? I’m growing some and while i’ve only been able to harvest three so far, i’d love this to be the first recipe i use them on! thanks!
Unfortunately, I can’t offer too much specificity with regards to your question, because fresh tomatoes vary by size and density and canned tomatoes are just very different! I can’t imagine needing more than 1-2 small tomatoes (1/3 cup sauce-roughly) per pizza, if that helps, but you would most likely need to eyeball it and figure it out as you go. Sorry I can’t be more helpful!
I just made this pizza on a pizza stone on my barbecue. I could NOT believe how fabulous this was. Best pizza my husband and I have ever had anywhere.
Only one comment, as we are new to this, is despite putting cornmeal between the pizza and the peel, we still had trouble sliding it off onto the stone. Next time more cornmeal. A long handled metal barbecue flipper helped too.
This looks absolutely fabulous. I cannot wait to try it with my husband. I still haven’t found a pizza crust recipe that we really love, so hopefully this is it. If I enjoy it, I may give it a review on my blog! Happy pizza-making!
Can’t wait to hear what you think!!
Hi… i just finished following you on FB and twitter. i am too proud to do that. I agree with you completely about your experience in Naples Italy about Margherita Pizza. for me it was in 1966 during a visit to Napoli coming from Milan where I was studying for diploma of Merit.
from now on i will be happy to post your recipes on my social media accounts :FB.. Pinterest.. Twitter ..Yummly and Tumblr.. wish you nice day
thank you for the recipe i really love it. just one question, my crust is always a bit chewy and hard.. do you have a tip for me?
Laura, I noticed that the recipe has no instruction to punch down the dough at any point. My first attempt at making a pizza resulted in a crust with several large holes. Do you think that these blisters could have been punched out before baking?
I don’t personally punch down dough, because I enjoy varied air pockets/blisters on my pizzas and want to retain as much of that air as possible. It contributes to texture and flavor. Punching down will produce more even air pockets, but will inevitably lead to a more dense crust. It’s really a personal choice! Hope this helps.
Laura I haven’t done your pizza but regularly make my own and use a pizza stone. I have found out that if I put the cheese immediately the cheese burns because it takes longer for the pizza to cook then the cheese to melt. Normally I heat up my oven 525 with the stone inside place the pizza in the stone and when almost cooked I take it out, add the cheese and put the pizza back in.
Do you by chance know the calorie intake for this pizza?
Thank you!
Unfortunately, I don’t. I don’t calculate the calories on any of my recipes, because I’m not a nutritionist and most online calculators can be very inaccurate. Hope you understand!
I hate the taste of “cooked” sauces. Blending the tomatoes with garlic gave just the right flavor that was fresh and tasty on my homemade pizza. Thanks for the recipe 🙂