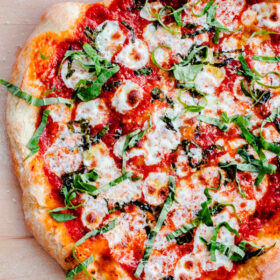
BEST Homemade Margherita Pizza
My search for the best homemade margherita pizza (made in a standard oven with everyday ingredients) is over! You’ll want to make this homemade pizza recipe over and over again. For step-by-step dough instructions, check out the margherita pizza video below!

The time has come! I’ve been teasing you on Instagram for weeks, and I sincerely apologize. I was busy eating this margherita pizza.
Ok, so let me be honest. I rarely ever, EVER tell you that a recipe is the best of anything. Let alone, put it in caps! Sure, I’ll say that something is delicious, but declaring such bold statements generally makes me extremely uncomfortable. I’m terrified that you will go home and make said best-ever-recipe and be disappointed. I would hate that.
But I’m feeling very good about this best margherita pizza recipe and I’m confident that you will love it.

I’m not an authority on homemade pizza by any means, but I’ve definitely eaten my share of pizza, both excellent and not so great.
The best margherita pizza that I’ve ever eaten in my entire life was in Naples, Italy a few years ago during our trip to the Amalfi Coast. We stood in line in a cobblestone street just off of Via Tribunali in the historic neighborhood (known for having the best pizza places in the entire world), and snagged a table at the famous Gino Sorbillo.
It’s always a good sign when you’re in Italy and a million other Italians are standing in line for the exact same pizza. No tourists, just Italians. It wasn’t fancy in the slightest. There was a disco light hanging from the ceiling and the cups were of the flimsy plastic variety.
Oh, but it was glorious. The pizzas cost only three euros and arrived flopping off of the plates. Literally, flopping. They were huge. I ate every last bite of that pizza and came back for another one the very next day.

So, when I say that today’s recipe is the best homemade margherita pizza, I’m taking all of these pizza-eating experiences into account. I’m not going to claim that this pizza tastes identical to a true Neapolitan pizza or that you’ll never taste a better pizza outside of your kitchen again. That would be ludicrous (and slightly obnoxious) and just not true.
But I do believe that this is the best margherita pizza that you’ll be able to make in your own kitchen, with a standard oven, with normal everyday ingredients (no fancy flours required), and without preparing an incredibly time-intensive pizza dough days in advance.
Homemade Pizza Equipment Recommendations:
First things first. Let’s talk equipment. A baking stone or steel is a must for great pizza at home. A few years ago, I replaced my traditional baking stone with a baking steel. It is a game-changer.
Baking steels are expensive, but I genuinely believe they are 100% worth the investment if you are interested in making pizza or bread at home. Baking steels absorb the heat from your oven and allow you to mimic brick-ovens, which generally reach temperatures in excess of 800 degrees Fahrenheit. They help you achieve crispy crusts by pulling moisture from whatever dough you are baking, including pizza crusts.
I also recommend a pizza peel, because it will make pizza-making so much easier. Wooden or metal, it will allow you to slide the pizza quickly onto the baking stone and make it much easier to remove the pizza from the oven once it is done.
If you don’t own a pizza peel (or don’t want to own a pizza peel), you can use the back of a large baking sheet or flat cookie sheet to transfer the pizza onto the stone – but it is tricky!

Tips for Margherita Pizza Success:
For the best margherita pizza, you will want to preheat your oven to the highest temperature possible. For my oven, that is 550 degrees Fahrenheit. I allow my baking steel to preheat for at least 30 minutes (regardless of whether my oven is ready as it takes time for your baking stone to come to temperature). The higher the temperature the better.
This recipe makes two 10-inch pizzas, and they should be able to properly cook in 7 to 8 minutes at that temperature.
Best Homemade Margherita Pizza
Ingredients
Homemade Pizza Dough:
- 2½ cups (300 g) unbleached all-purpose flour
- 1 teaspoon granulated sugar
- ½ teaspoon active dry yeast or SAF instant yeast
- ¾ teaspoon kosher salt
- 7 ounces (105°F to 115°F) warm water
- 1 tablespoon extra virgin olive oil
- semolina and all-purpose flour for dusting the pizza peel
Pizza Sauce:
- 1 cup pureed or crushed canned San Marzano tomatoes (or canned Italian plum tomatoes)
- 2-3 fresh garlic cloves grated with a microplane or pressed
- 1 teaspoon extra virgin olive oil plus more for drizzling
- 2-3 large pinches of kosher salt to taste
- ¼ teaspoon freshly ground black pepper
Toppings:
- 2-3 tablespoons finely grated parmigiano-reggiano cheese plus more for serving
- 7 ounces fresh mozzarella cheese (not packed in water) cut into ½-inch cubes
- 5-6 large fresh basil leaves plus more for garnishing
- dried red pepper flakes optional
Instructions
- Prepare Pizza Dough: In a medium bowl, whisk together the all-purpose flour, sugar, yeast and salt. Add the warm water and olive oil, and stir the mixture with a wooden spoon until the dough just begins to come together. It will seem shaggy and dry, but don’t worry.
- Scrape the dough onto a well-floured counter top and knead the dough for three minutes. It should quickly come together and begin to get sticky. Dust the dough with flour as needed (sometimes I will have to do this 2 to 3 times, depending on humidity levels) – it should be slightly tacky, but should not be sticking to your counter top. After about 3 minutes, the dough should be smooth, slightly elastic, and tacky. Lightly grease a large mixing bowl with olive oil, and place the dough into the bowl.
- Cover the bowl with a kitchen towel (or plastic wrap) and allow the dough to rise in a warm, dry area of your kitchen for 2 hours or until the dough has doubled in size. Proofing Tip: If your kitchen is very cold, heat a large heatproof measuring cup of water in the microwave for 2 to 3 minutes. This creates a nice warm environment. Remove the cup and place the bowl with the dough in the microwave until it has risen. [If you are preparing the dough in advance, see the note section for freezing instructions.]
- Preheat Oven and Pizza Steel or Stone: Place the pizza steel (or stone) on the second to top rack of your oven (roughly 8 inches from the broiler element), and preheat the oven and steel (or stone) to 550°F (285°C) for a minumum of 1 hour. If your oven does not go up to 550°F (285°C) or you are using a delicate pizza stone, I recommend heating it to a maximum of 500°F (260°C)
- As the oven is preheating, assemble the ingredients. In a small bowl, stir together the pureed tomatoes, minced garlic, extra virgin olive oil, pepper, and salt. Set aside another small bowl with the cubed mozzarella cheese (pat the cheese with a paper towel to remove any excess moisture). Set aside the basil leaves and grated parmigiano-reggiano cheese for easy grabbing.
- Separate the dough into two equal-sized portions. It will deflate slightly, but that is OK. Place the dough on a large plate or floured counter top, cover gently with plastic wrap, and allow the dough to rest for 5 to 10 minutes.
- Assemble the Pizza: Sprinkle the pizza peel (if you do not own a pizza peel, you can try using the back of a half sheet pan - but it is tricky!) with a tablespoon of semolina and dusting of all-purpose flour. Gently use both hands to stretch one ball of pizza dough into roughly a 10-inch circle (don’t worry if its not perfectly uniform). If the dough springs back or is too elastic, allow it to rest for an additional five minutes. The edges of the dough can be slightly thicker, but make sure the center of the dough is thin (you should be able to see some light through it if you held it up). Gently transfer the dough onto the semolina and flour dusted pizza peel or baking sheet.
- Drizzle or brush the dough lightly (using your fingertips) with olive oil (roughly a teaspoon. Using a large spoon, add roughly ½ cup of the tomato sauce onto the pizza dough, leaving a ½-inch or ¾-inch border on all sides. Use the back of the spoon to spread it evenly and thinly. Sprinkle a tablespoon of parmigiano-reggiano cheese onto the pizza sauce. Add half of the cubed mozzarella, distributing it evenly over the entire pizza. Using your hands, tear a few large basil leaves, and sprinkle the basil over the pizza. At this point, I’ll occasionally stretch the sides of the dough out a bit to make it even thinner. Gently slide the pizza from the peel onto the heated baking stone. Bake for 7 to 8 minutes, or until the crust is golden and the cheese is bubbling and caramelized and the edges of the pizza are golden brown. Note: If you're looking for more color, finish the pizza under the low or medium broil setting, but watch it carefully! Remove the pizza carefully from the oven with the pizza peel, transfer to a wooden cutting board or foil, drizzle the top with olive oil, some grated parmigiano-reggiano cheese, and chiffonade of fresh basil. Slice and serve immediately and/or prepare the second pizza.
- Serving Tip: If you’re serving two pizzas at once, I recommend placing the cooked pizza on a separate baking sheet while you prepare the other pizza. In the last few minutes of cooking, place the prepared pizza into the oven (on a rack below the pizza stone) so that it is extra hot for serving. Otherwise, I recommend serving one pizza fresh out of the oven, keeping the oven hot, and preparing the second pizza after people have gone through the first one! The pizza will taste great either way, but it is at its prime within minutes out of the oven!.
Video
Tips for Success:
- Semolina flour has a higher burn point than regular flour, and ensures that the dough will not stick to the peel when transferring the pizza to the oven.
- There is no need to dissolve the yeast in warm water before using (as commonly believed). Active dry yeast has been reformulated in recent years to contain significantly smaller granules and will not have trouble dissolving into the dough. However, it is important to ensure that your active dry yeast is indeed alive and well. Double check your expiration date and when in a doubt, proof it.
- If preparing the dough in advance: once the dough has rested for two hours, separate into two portions, wrap each piece of dough well in plastic wrap, and place them in a freezer-safe bag. The dough can be chilled in the refrigerator for up to 24 hours or frozen for 3 months. Thaw the dough in the refrigerator, and allow it to stand at room temperature (in a greased bowl, covered with a kitchen towel) for at least 30 minutes before using.

202 Comments on “BEST Homemade Margherita Pizza”
Tried this last night and the ingredients were DELICIOUS! (Purchased a stone just for this recipe).
But, Laura, my dough did not rise; I tried your microwave trick, covered with a towel for over 2 hours and I got nothing…I used it anyway but I’m wondering what could have gone wrong? I measured and followed all the steps…any ideas?
Thank you!
Hi! Have you tested your yeast to make sure it’s alive? Or perhaps you have a very cold kitchen? I’d try a new package of yeast and see if that helps! xo
Laura, sorry for the late reply! No, I think I might have tried ‘dead’ yeast. If I follow the ‘sell by date’ am I ok? Thank you for your reply!
Usually you are! You might want to test it. Red Star Platinum yeast (or SAF) is green stuff and should usually be fine! Maybe try a warmer spot in your kitchen too!
Not a bad start and you have some definite “don’t do’s” in there. 1 thing I would recommend is to use Jim Lahey’s dough method. This is good in a pinch but you said the “best you can make at home” and only a 16-20 hour dough will get you to that level. Pizza looks great and the rest of what you said is spot on.
3 cups flour
1.5 cup water
1/8 tsp yeast
1.5 tsp salt
Mix together until not so sticky and cover for 12 hours. Punch down and then again after 2 more hours and then the dough is ready. Takes a while but it is worth every bite!
Hi! Do you do anything to make the sauce/mix the sauce ingredients before putting it on the dough?
Hi! Not sure what you mean by this – yes, the tomato sauce ingredients are mixed together (instructions in the recipe box at the bottom of the post), but aside from that, no.
I made it without a pizza stone or peel and waited too long to eat it so it was cold, but it was one of the best homemade pizzas I’ve made so far! I will say that my family is more of a thick crust family though, so when I make it again, I might make them a little smaller and thicker. This is a great recipe!
Your dough is easy and very good. I made it with 1/2 WW flour and it still was very elastic.
This. Was. So. Good.
Thank you for an excellent recipe and excellent directions.
Excellent recipe! I do only one thing different: I do not cook the basil with the pizza, I cut the leaves into ribbons and spread it on top AFTER the pizza comes out of the oven. MMM, MMM Good!!!
Made this pizza yesterday and it turned out so good! Will definitely be making again.
Delicious, Laura! We loved the sauce and dough was especially delicious. Thanks for sharing!
So glad you enjoyed it! Thanks for taking the time to leave a review, I really appreciate it.
Your dough formula is the best I’ve come across in several years of searching. I did, however, add a little additional flour to reduce the stickiness. The dough, made with Montana Natural White AP flour, was soft enough to stretch thin easily and nicely browned in my oven on a stone in 8 minutes at 500°F. Next time I will up the temperature to 550° and reduce the time to about 7 minutes. I stretched and topped the crust on parchment paper on my wooden peel, making the transfer to the oven easy. The half of the dough I didn’t use immediately stayed in the fridge for a few hours, and also made a great crust. We all enjoyed Marguerita pizzas made with fresh tomato slices over mozzarella over Parmesan. Thank you for sharing this recipe.
So thrilled to hear this! Thank you so much for the great feedback, modification notes, and for taking the time to leave a review and feedback. It helps support my site, and I’m very appreciative. xo!
Finally a pizza and crust that are delicious! My husband thought this pizza would be bland but he loved it! I didn’t have a pizza stone and didn’t have semolina flour so for the first pizza it stuck to my baking sheet (tried cornmeal but that didn’t work) so for the second one I just made it on a pizza pan (unfortunately that was not pre-heated but it still was great! Does the semolina flour make the pizza easily slide off the baking sheet? I will definitely make this again – easy and so good. Also – my dough wasn’t rising as much as it should (even though it was in the oven with the light on) so put a few cups of water in the microwave and heated up the water, then took it out of the microwave and put the dough in the microwave which was warm so the dough rose perfectly!
I LOVE this recipe! I want to make it everyday but I have such anxiety trying to make it bc I can’t manage to get the pizza onto the stone from the peel. Even the cubed mozzarella fly off the pizza. I have tried preparing it different ways (on the counter, on the peel, on parchment … ) but it ALWAYS STICKS. I use semolina, to no avail. I have tried trying to transfer slow (no good), then fast (slightly better). Once the whole pizza was flung into the back of the stove (no pizza that night). I’ve set off the smoke detectors twice (much to my dog’s dismay). Yesterday my pizza turned out kidney bean shaped bc one sticky part wouldn’t let go of the peel. Please help!!!
Are you putting cornmeal under crust, on wooden pizza mover and on stone (needs to be evenly covered on all 3.
Semolina and/or flour goes on the pizza peel, some will automatically transfer with the pizza as you flick it onto the stone. Don’t put it anywhere else.
The food was absolutely delicious. Cooking this now! My house smells amazing! my husband already tweaking it a little. He added a bit of mushroom and we topped up with parmesan cheese. Delicious meal which I would definitely recommend.
Many thanks
Sounds delish! Love your tweaks!
I made this and it was great, thank you!
So happy to hear that!! Thanks for taking the time to leave feedback!
Hi Laura, I made this Pizza yesterday for my Birthday dinner (solo party during those times ?) and it was super delicious! Not the first time I am making it! Thank you for this amazing recipe! Take care of you.
Virtual hugs,
Aline
So happy to hear that Aline! Thank you so much for taking the time to leave a review, I really appreciate it. Stay safe and well during this crazy time!
So easy to make,yet so delicious. I used plain flour instead of bread flour. Yummy .Thanks.
Is it possible to make this into one large pizza instead of two smaller ones?
You definitely could, but it will be a bit harder to transfer in and out of the oven, depending on how you’re cooking it – which is why I prefer to make smaller pizzas.
I made this tonight! My first try at homemade pizza. The dough didn’t really rise ( I will figure it out) and it wasn’t pretty but IT WAS SOOOOOOO GOOD!!! This is what I look for when i order margherita pizza. I will make again! Thank you so much!
Hmm, try sticking the dough in a warmer spot in your kitchen and see if that helps! Is it old yeast? Either way, I’m thrilled you enjoyed it!!
I’m currently making this and just wondering if I can use a pizza stone instead of a baking sheet?
Yes! The recipe is designed for a baking stone or baking steel.
I get to eat Margherita pizza almost everyday living in Boston’s North End and yours looks just as appetizing!
Hi Laura! Ages later but found you through Google–do the proportions change if I half the recipe? I am making it for myself only, and I can guarantee you that I don’t have the restraint to stop if I have extra ?
Sorry for not responding earlier. If you wanted to half the recipe, you’d just half all the ingredients – but I would recommend just making the whole thing and having leftovers 😉
This is so good! I will be making it for the 4th time tonight for pizza night. Absolutely the best. So many pizza dough recipes call for way too much yeast, which makes them too thick. This is perfection, right down to the raw sauce!
So glad you like it!!
Hey There! Haven’t made this yet but I’m trying it for New Year’s Eve tonight. You mention ‘the cornmeal’ during the prep section for use on the peel, but it’s not listed in the ingrediants. In the ingrediants you describe how semolina flour would be used on the peel. Is either OK?
Hi Todd! Thanks for bringing this to my attention. My original recipe used cornmeal because it’s easier to come by, but since that time, I updated the recipe to recommend semolina, which has a lower burn point, and better flavor/texture in my opinion. I must have forgotten to update that part of the instructions. I will update it now. Either will work, but I do prefer semolina!