Simple Spatchcock Chicken Recipe
A simple spatchcock chicken recipe, seasoned with fresh thyme and lemon zest, along with helpful tips on how to roast a chicken. This easy staple dish makes a great addition to your weekly meal prep!

One of my intentions this year is to share more simple, technique-driven recipe posts. I’ve consistently received great feedback and encouragement (thank you!) on my cooking guides and posts in the past, and I always look forward to sharing them with you.
My focus for this year is to continue to build and expand on that content, so that this space can be a comprehensive resource for all of your cooking needs and questions!
So today, we’re getting back to basics. A roast spatchcock chicken recipe that can easily be added to your weekly meal prep (or meal rotation). A few years ago, I published a step-by-step guide for how to spatchcock a chicken. Today, I’m sharing my go-to spatchcock chicken recipe, and diving deeper into this technique.
We’re keeping the flavors for this spatchcock chicken recipe very simple: kosher salt, freshly ground black pepper, grated lemon zest, and fresh thyme. Classic flavors that go with just about everything. Once you get the hang of this method, you can use this recipe as a springboard for your own creations.

What Is Spatchcock Chicken?
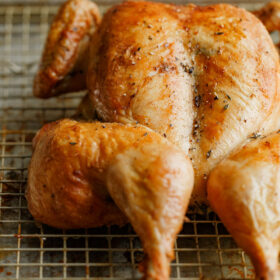
Spatchcock chicken simply means to remove the spine or backbone of a whole chicken. This allows you to press down on the breast bone and flatten the chicken for cooking. It is sometimes referred to as butterflied chicken. I’ll go over why this method produces a crisper skin and more evenly cooked chicken below.
Spatchcocking sounds and looks complicated, but is a very easy technique that can be accomplished in a matter of seconds with a pair of good quality kitchen scissors or shears (*I personally own and recommend these OXO shears, they are strong enough to be used on whole turkeys, tough flower stems, etc. –> affiliate link).
If you don’t own kitchen shears, an alternative is to buy your chicken whole from the meat counter and ask your butcher to do it for you.
What to do with the backbone of the chicken?
Don’t throw it out!
You can save the backbone for making a quick pan jus (sear the backbone – whole or chopped into smaller pieces – until dark golden brown on all sides in a stainless steel sauté pan with some olive oil, add finely chopped onion, celery, carrot, and herbs, cook until just beginning to caramelize, deglaze with wine and cook until dry, add stock and reduce, then strain).
Alternatively, you can freeze the backbone for a batch of homemade chicken stock.

Why Are Spatchcocked Chickens Better for Roasting?
If you’re going to try your hand at spatchcocking (which I promise, is very simple!), you probably are equally as interested in why you should cook chicken this way.
The trickiest part of roasting a chicken is timing. White meat (chicken breasts) cooks and dries out much faster than dark meat (chicken legs and thighs). Traditional trussing can provide some insurance by plumping up the chicken breasts, but doesn’t work very effectively.
Why Spatchcocking Works:
- removing the backbone allows the chicken to lay flat during roasting, which exposes the legs and breasts of the chicken evenly, and allows the dark and white meat to cook quickly and evenly. The heat in most kitchen ovens is very inconsistent, and this method uses this weakness as an advantage.
- spatchcocking exposes all of the skin, resulting in crisper, more evenly golden brown chicken skin (*note: seasoning and salting the chicken well in advance, and allowing it to sit uncovered in the fridge, also helps with this).
- since spatchcocked poultry cooks faster (more surface area, more heat exposure), it allows you to roast at higher temperatures, which promotes even browning.
- spatchcocked chickens are easier to season, as everything lays flat. There is no concern that the awkward crevices won’t be seasoned as evenly as the rest of the bird.
- no trussing required and easier to carve for serving.

Additional Tips for Roast Chicken Success:
- season the whole chicken liberally, on all sides, at least 12 hours or up to 24 hours before roasting. this method delivers a dramatic flavor difference (time allows the seasoning to fully permeate the meat), and refrigerating the bird, uncovered, allows the skin to dry out slightly and crisp up better during roasting.
- my spatchcock chicken recipe below uses Diamond Crystal kosher salt (affiliate link), which sticks and dissolves easily. this kosher salt is significantly less dense (by volume) than other kosher salt brands and varieties; please adjust accordingly using this cooking salts guide.
- if you have a convection oven setting, use it! Convection cooking uses a fan to evenly distribute hot air throughout the oven and promotes more even browning, particularly for meat.
- remove the chicken from the refrigerator an hour before roasting; this allows the chicken to come closer to room temperature before it hits the hot oven air, which reduces cook time, ensures even cooking, and better browning of the skin.
- allow the chicken to rest for at least 15 to 20 minutes before carving. this allows the juices in the bird to distribute themselves more evenly throughout the meat, resulting in juicier meat.
- remove the legs (cutting the drumsticks from the thighs, if desired), then remove the entire chicken breasts and carve at a slight angle against the grain of the meat to create tender cuts of meat.
- mix up the seasoning with your favorite fresh herbs or spice blend

How to Serve Roast Spatchcock Chicken:
- serve as a main course with a side of vegetables (this green beans almondine recipe would be a great choice!) and simple salad
- prep and save the leftovers for main course salads (such as my guacamole greens salad or Middle Eastern chicken salad), grain bowls, or add to soups just before serving!
Simple Spatchcock Chicken
Ingredients
- 4 to 6 teaspoons Diamond Kosher Crystal salt note: this quantity should be determined by your taste preference, but is also specific to this brand and variety of salt, and will need to be reduced if using other salts, which have higher density by volume
- ½ teaspoon freshly ground black pepper
- zest of 1 lemon
- 1 tablespoon finely chopped fresh thyme leaves
- 4 to 4½ lb whole chicken, without giblets
- extra virgin olive oil for brushing
Instructions
- Complete the day before roasting: In a small bowl, combine the salt, black pepper, lemon zest, and fresh thyme. Rub the mixture together with your fingertips to infuse the salt completely. Remove the chicken from its packaging (discarding any excess liquid into the sink or trash) and place breast-side down (with the neck facing towards you) on a large cutting board.
- Using good-quality kitchen or poultry shears and holding the neck in one hand, cut along one side of the chicken spine, separating it from the ribs. Cut closely to the spine so that you do not remove any excess meat. Continue to cut about ¾ along the spine on one side, repeat on the other side of the spine. Grip the spine for leverage and continue cutting on both sides to remove it completely. If you are having difficulty, rotate the bird so that the tail faces you and cut from the opposite side.
- Reserve the spine for homemade stock or a quick pan jus. Flip the chicken so that the breasts face upward and the chicken legs face outward on both sides. Using the palm of your hands, press along the breast bone with some force to flatten the chicken completely. You might hear a slight crack. The legs and breasts should lay completely flat. Pat the chicken dry with paper towels on both sides.
- Season the chicken evenly and liberally on both sides with the salt mixture, both on top of the skin and under the skin on both the legs and breasts by gently lifting the skin (being careful not to tear it). Place the chicken, breast side up, on a wire rack set within a half sheet pan - or other suitable rimmed dish that can fit within your refrigerator. Transfer seasoned chicken to the bottom shelf of your fridge (be sure it is not touching other fridge items) and refrigerate, uncovered, for at least 12 hours or up to a full day.
- To Roast the Chicken (Next Day): Remove the chicken from the fridge and allow to sit out at room temperature for an hour before roasting. This allows the chicken to come to room temperature, and will ensure it cooks more quickly, evenly, and will promote even browning and crisping of the skin. Preheat the oven, with a rack in the upper-middle position, to 425°F (218°C). Note: If you have a convection oven setting, I encourage you to use it - convection cooking uses a fan to evenly distribute hot air throughout the oven and promotes more even roasting/browning, particularly for meat.
- Transfer the chicken, breast side up, onto a wire rack set within a clean, room temperature sheet pan. Tuck the wings under the breasts. Brush the chicken on all sides, with extra virgin olive oil. Roast for about 45 to 50 minutes, rotating the pan once or twice during cooking, or until the juices run clear when you cut between the leg and the thigh, the bird is evenly golden brown, and the thickest part of the breast reads 157°F-160°F (71°C) on an instant thermometer. The temperature of the chicken will increase as it rests as much as 10 degrees, so you do not want to remove the chicken any later, or the chicken breast will begin to dry out.
- Allow the chicken to rest for at least 15 minutes before carving – slice away the legs. Then remove the entire breasts from the breast bone. Store for meal prep or slice against the grain and serve immediately.
15 Comments on “Simple Spatchcock Chicken Recipe”
I doubled the recipe and cooked 2 chickens on the same rack. It was so delicious, tender, and moist! The skin was to die for! Think I cooked them for 50-55 minutes. I can’t wait to eat leftovers and make chicken soup from the bones!
Followed the recipe to a T (sans the seasoning, which I changed to suit my own tastes, with butter and lemon juice), and it came out the juiciest, most flavorful chicken I have ever made at home! Tastes better than grocery store rotisserie!
I made a Spatchcock chicken for the first time last night and it was amazing! I just have a not so great chef’s knife but managed. Convection roast at 425° took only about 40 minutes! Having it on the baking rack really helped too, I think. It was so nice to have crispy skin on the thighs, unlike when you roast a whole chicken. We have a roasted chicken at least three times a week in the winter so it’s time to invest in some shears or a boning knife! Why haven’t I done this before?!
I’ve done this many a time now and we love the way it comes out, especially since my stepson likes dark meat and I have a thing about greasy, slimy food. This is a fantastic way to make sure the whole chicken is edible.
Love hearing this! Thank you. Happy holidays!
Easy and delicious! Our chicken was already spatchcocked for us.
The only part I was confused about was tucking the wings under the breast. That made our chicken not lay flat so we tucked under the thighs.
I made this and my party people loved it! I doubled the cook time and made two at the same time.
Check out my results on my facebook page! https://www.facebook.com/My-Food-Diary-102297901559947/
If you use convection roast, should you reduce temp and/or time? If so, how much?
Usually I reduce the temp by 25 degrees if I’m using convection! Great question. I would also watch the time a bit more closely, as it might go a touch faster.
Most newer convection ovens will automatically reduce the temperature by 25oF from the non-convection oven recipe. For example, for spatchcock chicken I select “convection” and then enter “425oF”…the range sets then adjusts the temp setting to 400oF.
Hi David – I’ve never worked with an oven that does that (my oven has just a digital temperature knob, for example) and haven’t come across one like that to date – but interesting!
Wonderful recipe! However, even with the fan going, smoking was a problem. Any hints? Thanks.
I put diced potatoes under the bird. They collect the drippings and prevent them from burning.
I made this tonight and it was absolutely delicious! I even used my convection setting on the oven. I need to do that more often!
Very nice