10 Affordable Everyday Food Photography Backgrounds
My favorite 10 Affordable Food Photography Backgrounds – less than $25 dollars a piece. Plus my tips and thoughts on food photography and what I’ve learned over the years.

This post contains Amazon and RewardStyle affiliate links.
We’re talking food photography today! And yes, I know what you’re thinking, “Did she really include a photograph of a paper bag up there?” Why yes, yes I did.
MY FOOD PHOTOGRAPHY PHILOSOPHY:
When it comes to food photography, I’m a big proponent of the ‘less is more’ and ‘you can do a lot with very little’ attitude–and that was my motivation behind today’s (unintentionally) lengthy post. I wanted to share how I’ve photographed lots of recipes over the years with very few and very inexpensive props and backgrounds. I didn’t want to just write about it, because I’m a visual person and figure some of you may be as well.
It is really easy to get caught up in the food photography rat race (as it relates to food blogging), so to speak, and constantly feel like you need more STUFF, whether that is a better camera lens, a fancier camera body, more props, expensive backgrounds, etc.
Trust me, I’ve gotten sucked into that rabbit hole on numerous occasions.

Food Photography Before vs. After
Great photography means different things to different people, and that’s OK. Like any art, it’s subjective. The definition of a great food photograph, for me, is one that does the following: a) showcases ingredients in an artistic way/has great composition, b) evokes some sort of feeling, memory, or story, c) makes me want to eat something immediately.
In an ideal world, it does all three. [And to be clear, I certainly do not feel like my photographs meet that criteria often, if at all.]
With that said, food photography has gotten a lot easier for me over the years and my photography has improved significantly from where it started five years ago. Um, have you taken a look at my recipe archive? Prepare yourself, it’s scary.
THE IMPORTANCE (or lack thereof) OF ‘STUFF’:
Food photography discussions have a tendency to place emphasis on stuff. While I do not consider myself an expert on photography, I guarantee that stuff does not a great photographer make.
Having high-quality camera equipment and food photography backgrounds can certainly help and be a factor. However, it is not necessary, nor will it magically enable you to take good photographs.

My Food Photography Equipment:
For the first four years of my blog’s life (2010-2014), all of my photographs on this site were taken with an entry-level Canon Rebel T1i and 50 mm/f 1.8 lens. Every last one.
In 2014, I upgraded my photography equipment to the following:
- Canon 6D EOS full-frame camera body
- Canon 100 mm/ f 2.8 IS macro lens
- Canon 50 mm/ f 1.4 lens
- Canon EF 24-70 mm f/2.8 lens
These upgrades are dramatic in regards to lens quality and functionality, but the photograph above shows two images (of similar subjects) that were taken with different photography equipment. Can you tell? I’m guessing no.
Regardless of which photo you like more, the defining difference between them cannot be attributed to camera equipment or camera equipment upgrades.
DOES NATURAL LIGHT MATTER?:
It is my personal belief (and I say this with some trepidation) that people place too much emphasis on the importance of natural light. This can discourage new food bloggers or anyone that doesn’t have a flexible work schedule.
I love and prefer to work with natural light. Natural light photography requires less equipment, working space, and fuss.

However, you can take amazing food photographs with artificial light. If you don’t have the ability to take photographs during the day, it’s not a make or break deal. If you want to start a food blog and have no ability to take photographs during the day – don’t let that stop you.Stephanie Le of the blog, I Am A Food Blog, is a perfect example of this.
The photographs above are side-by-side examples of natural light photography and artificial light photography, both of which I took at my previous job (where I did most of the in-house photography and could not use natural light). My experience with artificial lighting is limited, but would you ever know that those photos were taken with different light sources? Most likely no.
Natural light is not the norm in the commercial food photography world. It is not realistic. Natural light is inconsistent and constantly changing. If you’ve ever taken photographs over a given length of time, you know that lighting and colors change. Natural light photography requires you to adjust your settings and account for these changes.

How I’ve Improved My Food Photography Skills:
I credit my improvement in food photography over the years to the following:
- Using my camera and taking food photographs on a regular basis for the past five years.
- Learning how to properly use my camera settings and understanding ISO, shutter speed, and aperture.
- Being resourceful and creative with a limited number of food props and equipment.
- Playing with composition, lighting, angles, and styles.
- Reading photography books, studying food magazines, and immersing myself in food photography inspiration.
- Learning the value and significance of editing and post-processing. The editing processing is incredible important.
- Asking question and seeking advice from other photographers. Don’t hesitate to ask questions and reach out. More often than not, people are generous with their knowledge and don’t mind sharing, because at some point in their life or career, they’ve had to do the same thing.
Favorite Affordable Food Photography Backgrounds:
Let’s discuss food photography backgrounds! Specifically, 10 affordable everyday food photography backdrops (plus one bonus favorite!) that cost less than $25 dollars a piece and will not require you to make anything by hand.
Are expensive food photography backgrounds helpful? Absolutely. Since first writing this post, I have invested in high-end backgrounds. However, they are not necessary in order to produce high-quality food photographs. The backgrounds that I’ve listed below were my go-to food photography backgrounds for years and years.
Using these backgrounds forced me to be creative and try other things to add texture and dimension to my food photographs (layering plates and bowls, adding linens, etc.).
Below, you’ll find 10 affordable food photography backgrounds complete with edited food photographs taken using these backgrounds. I’ve also included why I love each of these – as well as any relevant cons worth considering.

Ikea Linnmon Table Top | Recipe: Spaghetti Amatriciana
1. IKEA LINNMON TABLE TOP
The Ikea Linnmon Table Top is a wonderful minimalist matte white food photography background that is easy to wipe down and clean up. It has very little shine (which is essential for food photography) and can easily be wiped up and cleaned. Ideal for recipe that are purposefully messy food photographs.
This table top is actually the top of an IKEA desk; however, the top is sold separately and can be ordered directly on IKEA’s site. The dimensions are 3 feet long and 2 feet wide.
Con: This background is on the larger side and requires more space to store, but it is relatively light in weight compared to most food photography boards (it is made of particle and fiber board).
Note: The table top is not pure, pure bright white. It is a muted white and will require a little boost in brightness/whiteness when post-processing to achieve a certain look.

Chicago Metallic Sheet Pan | Recipe: Pea and Leek Soup
2. ANTIQUE AND DISTRESSED SHEET PANS
Old sheet pans can be another great, affordable food photography backdrop. By old, you really want sheet pans or cookie sheets that are as distressed as possible. Look for sheet pans and cookie sheets at yard sales or source them on Ebay.
The sheet pan in the recipe photo above is actually a Chicago Metallic Sheet Pan (my favorite brand of sheet pans) which inevitably wore down with time and started taking on this appearance. Distressed sheet pans provide a good background for top-down ingredient shots, because they offer texture and character. You can also prop them up and use them as a background.
If you want more examples of awesome food photography that utilizes distressed sheet pans, check out Heather Christo’s blog.

Home Depot Floor Tiles | Recipe: Everything Bagel Breakfast Waffles
3. CERAMIC AND PORCELAIN FLOOR TILES
Ceramic and porcelain floor tiles from Home Depot (or any home improvement store) can serve as great food photography backgrounds in a pinch.
They are very cheap ($2.00-$6.00/tile) and can easily be wiped down, which is very helpful in food photography. Floor tiles come in a huge variety of finishes these days – marble, stone, and textured. They often come in matte finishes (ideal) as well.
Con: Floor tiles are heavy, breakable, and not ideal for storing or moving around frequently. They are often sold in various sizes (14 x 14 inches or 20-inches x 20 inches), but generally offer small surface areas to work with. This is very limiting for top-down photos, especially if you prefer to incorporate a lot of white space or accommodate larger plates and bowls.
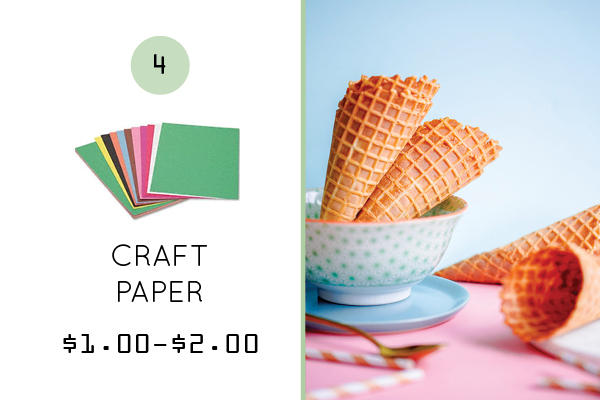
Craft and Construction Paper | Recipe: Olive Oil Stracciatella Ice Cream
4. CRAFT AND CONSTRUCTION PAPER
Craft paper or construction paper (in general) can be extremely helpful for food photography, because it is a very cheap way of adding color and texture to photographs. Craft paper is also fairly easy to store and weighs virtually nothing. If you enjoy playful or colorful food photography, it is a great option.
In the photo above, I used both a pink and baby blue piece of craft paper (12-inches x 12-inch squares) to create the setup.
Con: Craft paper generally doesn’t come in large sizes and if you spill anything on it, you will have to throw it out. If you’re using it as a background, you’ll need to clip it (a binder clip is a good way to do this) onto a foam board. However, if you’re careful, you can get several uses from them.

Paper Grocery Bags | Recipe: Creamy Leek and Pancetta Pappardelle
5. PAPER GROCERY BAGS
Grocery bags were one of my favorite, insanely easy food photography backgrounds several years ago. [Obviously, I do not use the side with the text.] Don’t knock it until you try it. Use scissors and open them up into flat paper bag sheets.
I love the natural color, which complements many ingredients very well, and when purposefully crumbled up and flattened out, it can add really interesting texture to photographs. Bonus? Cheap, disposable, and very easy to come by. Alternatively, you can just lay grocery bags flat and layer them. Here is a great example from Ashlae of Oh Lady Cakes!
Con: These stain very easily and generally need to be disposed of after a single shoot.

Natural Parchment Paper | Recipe: Citrus Shortbread Bars
6. NATURAL PARCHMENT PAPER
I love natural parchment paper. I love it for many, many reasons (that have nothing to do with food photography), but it a go-to food photography background when I want to add texture or natural color to food photographs.
Similar to paper bags, you can crumple parchment paper or lay it out flat. You can also cut it into pieces (if you’re placing it below a cookie or baked good) and as long as you don’t destroy it, you can even reuse it often.
Con: Stains easily.

Thin Plywood | Recipe: Grand Marnier Orange Bundt Cake
7. THIN PLYWOOD
On occasion, thin plywood sheets can work as great food photography backgrounds. They are super light, cheap, and provide a relatively large surface area (you can cut or buy them in carious sizes) with which to shoot food photographs on. Seek ones that have as much wood or unique grains as possible. To make things more interesting, I like to add other elements to the photograph (linens, etc.) to add texture, but they are a great alternative to expensive, heavy wood backgrounds and can easily be propped up.
Con: Depending on the size, these can be awkward to store in a small space. They also can easily be stained, so avoid placing most food directly on the surface.
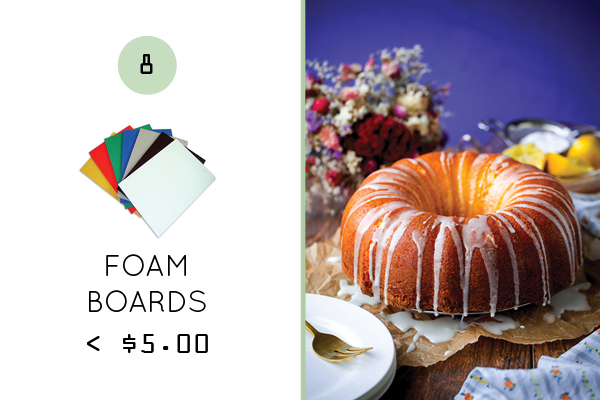
Foam Boards | Recipe: Lemon Yogurt Pound Cake
8. FOAM BOARDS
Foam boards are must-have’s for food photography. They can be used as surfaces (in a pinch, but not highly recommended), but can easily serve as a food photography backdrop and are fabulous for bouncing, blocking, or directing light. I have at least three white foam boards, two black foam boards (to create shadows). Color foam boards can also serve as backdrops too.
Find them at Michael’s, CVS, or most generic stores. Sarah of The Sugar Hit uses various paper/foam boards to add tons of color and character to her food photographs.
Con: Easily stainable.

Kitchen Linens/Cloths | Recipe: Green Lentil Coconut Soup
9. KITCHEN LINENS AND CLOTHS
Kitchen linens and cloths are another favorite food photography background (or surface) that I use on a regular basis. I prefer natural linen cloths that can easily lay flat, as they are the easiest ones to maneuver. I’ll lay them out and place them on a surface as part of a photograph (the photo above) and other times, I’ll lay them out completely and use them as the only background.
I have a few bold linens, such as this pink/red one above. However, I strongly encourage you to buy relatively neutral linens that can be used for as many applications as possible. Super bold linens are memorable, but can look dated with time.
West Elm, Crate and Barrel, Fog Linen, Restoration Hardware, and Anthropologie are great resources. Target can also carry good options as well.

Wood Cutting Board | Recipe: Asian Roasted Brussels Sprouts
10. WOODEN CUTTING BOARDS
Wooden cutting boards are in my top three of food photography backgrounds and surfaces. I don’t have many, but I used to use them constantly–in conjunction with many of the other items above–to add layering, texture, and warmth to my photographs.
They can vary in price. Cheap ones are out there, but they can also be extremely pricey. I try to find ones that have as much variance in grain as possible, and avoid any with yellow-ish tones, because they tend to clash with most foods and are difficult to deal with in post-processing.
The majority of my wooden cutting boards were between $10 and $25 a piece. You can find really nice ones from West Elm, Crate & Barrel, and even Bed Bath & Beyond (here is the exact one shown above). Alternatively, you can buy cheap boards from craft stores and stain them yourself, which can also work extremely well.
Con: They are usually small in size and can stain easily.
11. Marble Pastry Slab (Bonus Background!)
Marble pastry slabs make for a wonderful, relatively affordable food photography background. They are classic and will hold up over time (they also can serve a real purpose if you’re love to bake pies or make homemade pastries!). This Crate and Barrel pastry slab has become one of my go-to food photography backgrounds since first writing this post.
It has a dull, non-shiny finish, which is ideal for food photography. Depending on the slab, it can come in a variety of looks.
Con: Marble can stain easily and get watermarks, so avoid placing acidic or wet foods directly on the surface for any length of time.
I hope this photography resource post was helpful and gave you some insight and concrete examples of how I’ve incorporated extremely affordable food photography backgrounds to mix up my food photography over the years. I hope this post inspires you to mix things up, get creative, and play around.
If you have additional questions about my photography and equipment, feel free to check out my FAQ page!

118 Comments on “10 Affordable Everyday Food Photography Backgrounds”
Great tips. I am a professional chef and always loved food photography but now I am starting a vegetarian Indian Recipes food blog and having great pictures is a must. Thank you for this article.
Love the post 🙂
I know this is an older post but I wanted to say thanks! These ideas are great. I’ve struggled SO hard with photography and know this will help my website. This also made me want to look at my local thrift store. Thanks!
I seriously needed this. I love your writing style! And never apologize for being long winded (most of the time that’s what we need when we’re looking for help.) This is my first time at your blog, and I’m convinced to stick around and explore (which doesn’t happen often). Thanks again so much for the tips! I’m pinning this for later.
So glad it was helpful for you! Thank you so much for the kind words McKenna! Hope you stick around 🙂
This is brilliant! Thank you!
I needed this so much! Thank you!!
Hi Laura
Thank you for your post and for sharing your knowledge. I was looking for ways to add a little something to my photos and there you were ?. I am so glad I foumd yiur blog. Keep up your great work.
Love this post..so helpful. I was wondering about lighting set ups, I get very little available light in my house. Do you have any suggestions for an inexpensive set up?
Fab post – I’m just starting out as a food blogger and these tips are super helpful. So glad I came across this post as I can definately take a few ideas from here to add to my current collection photograpghy surfaces! I aspire to have beautiful photos just like yours.
This was super useful information! I just asked for paper bags at the grocery store today instead of plastic to start stocking up!! Thank you so much for sharing and your photos are beautiful!
Love, love, love this. Thanks so much for the tips! The old baking sheet and the ikea board are definite new adds to my list! my site, http://www.behindtheplates.com already uses some plywood, dish towels and ceramic tiles but always looking to expand ideas and these are some great ones!
Thank you for such a thorough post on food photography! It’s so helpful (and now I know what I can store in my RASKOG IKEA cart – props and photography backgrounds!)
One quick question though… here in the Northeast the sun sets at around 4 pm in the winter, and I still have a full-time job. What sort of artificial lighting do you recommend for those times you just can’t wait for natural light.
Hi Stacey! Thanks so much for the kind words. Glad this post was helpful! Unfortunately, I can’t give too many recommendations for artificial lighting, because I don’t use it (when I had a full-time job and blogged at the same time, I photographed everything on the weekend days in order to make it work). At my previous office job, we used some ego lights, which are relatively affordable. However, I know some people recommend strobe lighting (it is a lot more expensive though). This might be a good resource to check out: http://weeattogether.com/2686/how-to-make-strobe-light-look-natural-for-food/
Love your post and loved it even more as I read it while sitting in an IKEA restaurant so off to buy that tabletop! Lots of great ideas for our lifestyle website, morellolife.com . thank you
This was so extremely helpful! I’ve been perusing Amazon for the last few days and have been unimpressed with the prices I’ve seen for professional backdrops. Your list is so affordable, especially since I already own several of these items. So thank you!
Hi Laura,
This is just the inspiration that I needed. I have been really frustrated with my food photos lately and was looking for some ideas to change things up. Your options are much more economical than buying a new house with a perfect kitchen. 😉
Two years later and this post is still educating bloggers… Thank you! Just launched last month and your sharing will surely help me improve!
Loved this post. Many of these i never felt would be useful. Pics made it clear
I am so glad I found this post! I have really been trying to work on my food photography (I am just beginning) and this has been so helpful! I absolutely can’t wait to go out after work and get a few of these things. This whole food blogging thing has been a blast and I have been learning so much. Thanks for all the wonderful info on this blog.
Oh my goodness, thank you for this post! I’m trying to up my food photography game, but now that it is winter, I can’t use my deck anymore (it was the best rustic floor). I’ll be purchasing more foam boards asap, and totally using the tile from our patio table.
I can’t thank you enough for such an informative & helpful post! I just recently began my food blogging journey & this post was so appreciated! Your entire blog is so lovely & I can’t wait to continue to following it. Thank you again! ♥
Thank you so much Whitney! Thrilled that you found it helpful! 🙂 So happy to have you here.